
6 quick steps for changing the Sanyo PLC-XW56 projector lamp
Sanyo_PLC-XW56
Have you noticed the lights dimming on your Sanyo PLC-XW56 projector? When your lamp is reaching its end of life, you’ll notice the lamp replacement indicator yellow light blinking on the Top Control panel. Replace the old one with a new a Sanyo POA-LMP107 (service parts no 610 330 4564) projector lamp immediately.
It’s important the buy only a genuine POA-LMP107 to replace the old lamp. The price of counterfeit knock-off lamps may be tempting but can cost you more money in the long run. Counterfeit lamps are not manufactured according to Sanyo’s specifications and can damage the sensitive (and expensive) mechanisms in your Sanyo PLC-XW56.
STEP-BY-STEP INSTRUCTIONS FOR LAMP REPLACEMENT
Before installation of the Sanyo POA-LMP107 (service parts no 610 330 4564) lamp: Turn off the projector and unplug the AC cord. Allow the Sanyo PLC-XW56 projector to cool for one hour – it should be cool to the touch. Inside of the projector can be very hot since these machines operator under high temperatures.
Replacing the Sanyo POA-LMP107 (610 330 4564) lamp
Caution: Don’t touch the screen or the actual bulb with your finger since the oil from your skin can cause a black spot on the bulb.
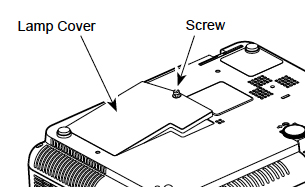 1. Underneath the Sanyo PLC-XW56 projector you’ll find the Lamp Hazard cover. Gently turn it upside down protecting the top of the projector. Using a Philips screwdriver loosen the screw holding the cover in place. Put the cover to one side.
2. Remove the two screws on either side of each the Sanyo POA-LMP107 (service parts no 610 330 4564) lamp. Grab the handle on the lamp cage and gently pull out the lamp. Place to one side.
3. Take the new Sanyo POA-LMP107 (610-330-4564) lamp cage by the handle and gently maneuver it into place.
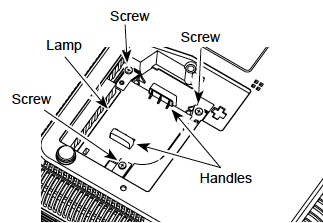
4. Avoid touching the glass or the bulb. The lamp should slide in easily – don’t force it. Once the lamp is in, tighten the screws on the Lamp Assembly.
5. Replace the Lamp Hazard Cover and tighten screws.
6. Re-connect the power cord and turn on the Sanyo PLC-XW56 projector.
Resetting the Lamp Replacement counter on the Sanyo PLC-XW56
Reset the Lamp Replacement Counter only when the Sanyo POA-LMP107 (service parts no 610 330 4564) has been replaced.
Do not operate the projectors while any of the lamps are removed as this may result in malfunctions, fire hazard and other accidents.
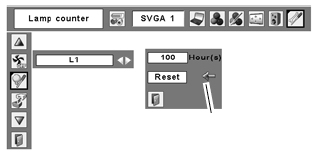
- Turn the Sanyo PLC-XW56 projector on.
- Press the Menu option to display the On-Screen Menu.
- Press Point left/right button(s) to move a red frame poster to Setting Menu icon.
- Press the black arrow point button to move the red framed pointer to the Setting Menu Icon.
- Press Point Down button to move the red frame pointer to Lamp counter reset.
- Press the Select button.
- Another confirmation dialog box appears, select YES.

- The Lamp box will disappear and the Lamp Replace Dialog box appears.
- Select YES to reset Lamp Replace Counter.
NOTE: When you reset the Lamp Replace Counter the Lamp Replace indicator stops lighting.
Cleaning the air your filter in the Sanyo PLC-XW56 will ensure a longer life for your newly installed Sanyo POA-LMP107 (service parts no 610 330 4564) projector lamp.
O meu Projector é um SANYO-PLC-XW56. O problema é o seguinte:
Depois de ligado, o projector reage normalmente. O indicador de led Power acende, tudo funciona, menos a lâmpada que continua apagada.A fim de 30 segundos a ventoinha pára de funcionar por alguns segundos e arranca novamente e mantem~se ligado por mais 30 segundos, sempre com lampada apagada. Logo depois, o aparelho entra em STAND-BAY. Por favor se, se puder me ajudar a resolver?
Olá Lucio,
espero que você entenda o meu portuguêsSua lâmpada precisa ser substituída. Chegou ao final de sua vida e o projetor está se desligando para proteção. Uma vez instalada uma nova lâmpada, o projetor voltará a ligar.
Saudações,
Shelagh
Obrigado pela resposta!