
Replace your Sanyo PLC-XL45 projector lamp
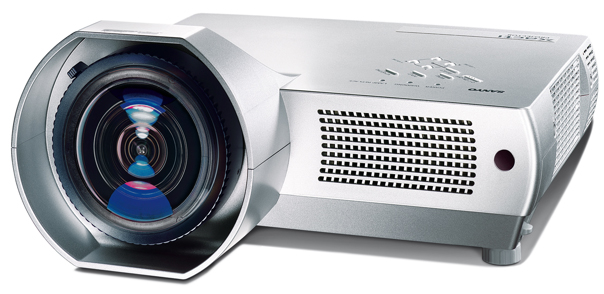
Sanyo PLC-XL45 projector
When the yellow light is blinking on the PLC-XL45 projector, it’s time to replace the projector lamp.
Be sure to use buy an authentic Sanyo POA-LMP106 (service part no 610 332 3855) Sanyo projector lamp bought from a verified source. These genuine lamps have been specifically manufactured to meet the specifications of the Sanyo PLC-XL45 projector.
Resist the temptation to buy a cheaper POALMP106 as these are often counterfeit models that can damage the sensitive mechanisms in your Sanyo PLC-XL40/PLC-XL45 projector.
Looking for a less expensive option? Are you technically saavy? Watch our step-by-step video on replacing only the POA-LMP90 (service parts no 610 323 0726) bulb instead of the entire lamp housing.
STEP-BY-STEP INSTRUCTIONS FOR PLC-XL45 LAMP REPLACEMENT
Before installation
1. Turn off the projector and unplug the AC cord.
2. Allow the Sanyo PLC-XL45 projector to cool for one hour – it should be cool to the touch. Inside of the projector can be very hot since these machines operator under high temperatures.
Replacing the Sanyo POA-LMP106 (610 332 3855) Lamp Assembly
Caution: Don’t touch the screen or the actual bulb with your finger since the oil from your skin can cause a black spot on the bulb.
 1. Underneath the Sanyo PLC-XL45 projector you’ll find the Lamp Hazard cover. Gently turn it upside down protecting the top of the project.Using a Philips screwdriver loosen the screw holding the cover in place. Put the cover to one side.
2. Remove the two screws on either side of each the Sanyo POA-LMP106 (610-332-3855) projector lamp. Grab the handle on the lamp cage and gently the lamp. Place to one side.
3. Take the new Sanyo POA-LMP106 (service part no 610-332-3855) lamp cage or by the handle and gently maneuver it into place. 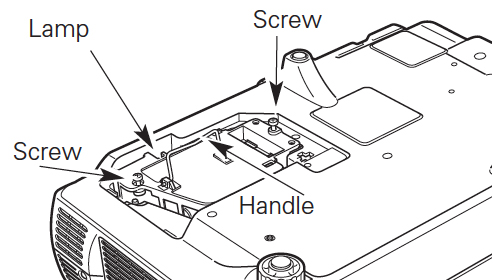
4. Avoid touching the glass or the bulb. The lamp should slide in easily – don’t force it. Once the lamp is in, tighten the screws on the Lamp Assembly.
5. Replace the Lamp Hazard Cover and tighten screws.
6. Re-connect the power cord and turn on the Sanyo PLC-XL40/PLC-XL45 projector.
Reset Sanyo PLC-XL45 Lamp Replacement Counter
Reset the Lamp Replacement Counter only when the Sanyo POA-LMP106 (610-332-3855) has been replaced.
Do not operate the projectors while any of the lamps are removed as this may result in malfunctions, fire hazard and other accidents.
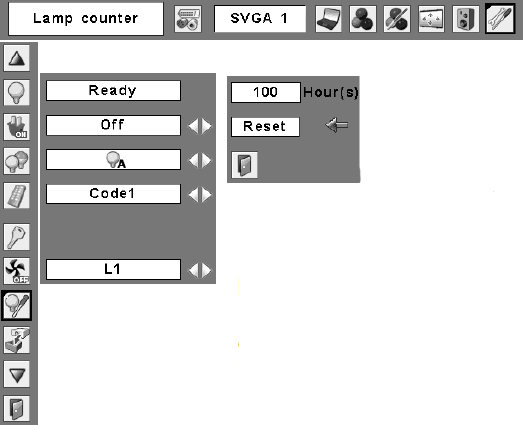
- Turn the Sanyo PLC-XL45 projector on.
- Press the Menu option to display the On-Screen Menu.
- Press Point left/right button(s) to move a red frame poster to Setting Menu icon.
- Press the black arrow point button to move the red framed pointer to the Setting Menu Icon.
- Press Point Down button to move the red frame pointer to Lamp counter reset.
- Press the Select button.
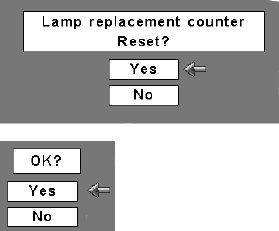
- Another confirmation dialog box appears, select YES.
- The Lamp box will disappear and the Lamp Replace Dialog box appears.
- Select YES to reset Lamp Replace Counter.
NOTE: When you reset the Lamp Replace Counter the Lamp Replace indicator stops lighting.
Cleaning your filter regularly will prolong the life of the Sanyo POA-LMP106 (610-332-3855) lamp.
Leave a Reply