
Easy instructions for replacing the Sanyo PLC-SU51 projector lamp
Sanyo PLC-SU51 projector
When you see the blinking yellow light on the top panel of your Sanyo PLC-SU51, it’s time to replace the Sanyo POA-LMP65 (service parts no 610 307 7925).
The lifespan of your Sanyo POA-LMP65 (service parts no 610 307 7925) lamp will vary depending on how much the projector is used and if the filters are cleaned regularly.
STEP-BY-STEP INSTRUCTIONS FOR SANYO PLC-SU51 LAMP REPLACEMENT
Before installation
Buy your Sanyo POA-LMP65 (610 307 7925) from an authorized manufacturer and avoid the lower-prices knock-off lamps. These counterfeit lamps are usually made with counterfeit parts that can damage your projector, they may end up costing you more if the damage the sensitive mechanisms in your Sanyo PLC-SU51 projector. Buying from a legitimate source doesn’t void your projector’s warranty and gives you a solid guarantee.
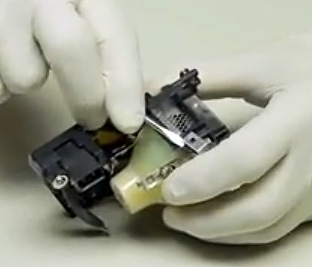
Looking for a less expensive option? Are you technically saavy? Watch our step-by-step video on replacing only the Sanyo POA-LMP65 (service parts no 610 307 7925) bulb instead of the entire lamp housing.
Replacing the Sanyo POA-LMP65 Lamp Assembly
Safety steps: Allow the Sanyo PLC-SU51 to cool before changing the lamp. Turn off the projector, unplug the AC cord and low 45 to 60 minutes for the projector to cool. There is a possibility of being burned if the projector is not fully cooled.
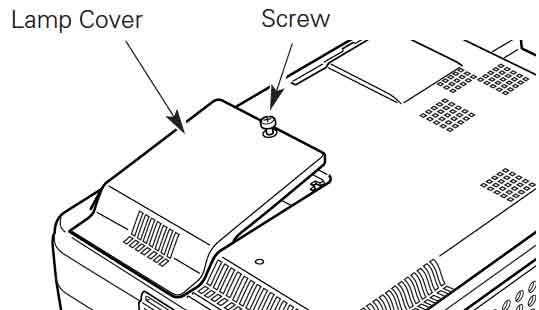
- The lamp cover for the Sanyo PLC-SU51 is located at the bottom of the projector. Gently turn over the projector and loosen the screw holding the cover in place.
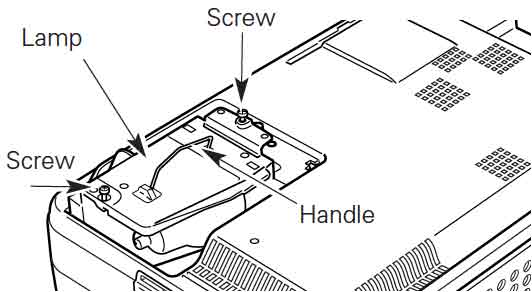
- The Sanyo POA-LMP65 (service parts no 610 307 7925) lamp cage will found inside. Loosen both screws holding the lamp cage in place. Grab the lamp handles and gently lift the lamp out of its socket. Place to one side. Be sure to dispose of the lamp properly through a local recycling program.

- Taking the newSanyo POA-LMP65 lamp cage by the handle—avoid touching the actual bulb a this can brek or damage the lamp. Without forcing the lamp, place it into the slot.
- Once the lamp is in, tighten both screws on the POA-LMP65 (service parts no 610 307 7925) Lamp Assembly. Make sure the screws have been tightened properly or the Sanyo PLC-SU51 projector will not turn on.
- Replace the Lamp Cover and tighten the screw. Re-connect the power cord and turn on the Sanyo PLC-SU51 projector If the Sanyo POA-LMP65 lamp does not turn on after the warm-up period, try re-installing the lamp. Reset the Lamp Counter Screen by following the instructions below.
NOTE: Your old Sanyo POA-LMP65 (service parts no 610 307 7925) lamp should be properly recycled. These lamps contain mercury and can’t be placed into common garbage.
RESETTING THE SANYO PLC-SU51 LAMP REPLACE COUNTER
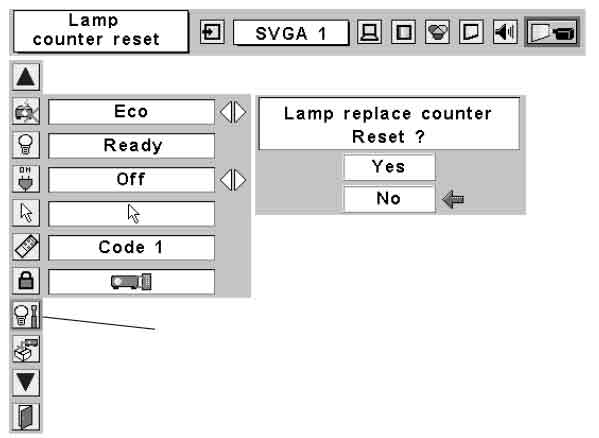
- Turn the Sanyo PLC-SU51 projector and using the remote control, press the MENU button so the ON-SCREEN menu will appear.
- Using the POINT LEFT/RIGHT button move to SETTING and press the SELECT button.
- A second dialog box SETTING MENU will appear.
- Press the POINT DOWN button so the red-arrow icon appears. Move the arrow to LAMP AGE.
- Press SELECT. The message “Lamp replace counter reset” is displayed.
- Select YES and the Timer will be reset
DON’T USE the Lamp Replace Counter unless the lamp has been replaced.
Prolong the life of your new Sanyo POA-LMP65 lamp
Make your newly installed Sanyo POA-LMP65 (610 307 7925) last longer:
- Wait at least five minutes before turning the Sanyo PLC-SU51 projector off.
- Don’t operate the projector continuously without letting it stand for at least one hour turned off every 24 hours.
- Clean the air filter regularly will also prolong the life of the Sanyo POA-LMP65 (service parts no 610 307 7925) by preventing the Sanyo PLC-SU51 from overheating.
Leave a Reply