
How to replace the Mitsubishi WD-82842 RPTV lamp
Replacing the lamp in your Mitsubishi WD-82842 RPTV is easy as 1-2-3.
Follow our step-by-step to install a new Mitsubishi 915B455011/915B455A11 Lamp.
Step 1: Know when to replace
Wondering when to replace the Mitsubishi WD-82842 RPTV? Watch for the telltale signs of a dimmer picture on screen or colours that appear off. When the Mitsubishi 915B455011/915B455A11 lamp is no longer working the Status Light on the front of the Mitsubishi WD-82842 RPTV will begin blinking red. Replace the Mitsubishi 915B455011/915B455A11 lamp immediately.
Step 2: Buy the right type of lamp
Although generic lamps may appear to be a bargain, you should purchase your Mitsubishi 915B455011/915B455A1 lamp from an authorized manufacturer These knock-off lamps are made with inferior, counterfeit parts that can damage the sensitive mechanisms in your Mitsubishi WD-82842 RPTV. These generic lamps advertise as compatible but may end up costing you more since they have a shorter lamp and are prone to explosions. Buying an authentic lamp from a legitimate source keeps your projector under warranty and gives you a solid guarantee that the lamp you are installing is suitable for your projector. Learn the 7 Ways to spot a counterfeit lamp.
Step 3: Installing the new Mitsubishi 915B455011/915B455A11
Before installation: Turn off the TV and allow it to cool for one hour. Failure to do so can put you at risk of burning yourself since the Mitsubishi WD-82842 RPTV operates under high heat. 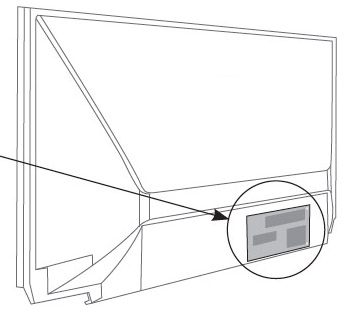
- After TV has cooled, turn the TV around to access the lamp cover located at the back of the Mitsubishi WD-82842 RPTV
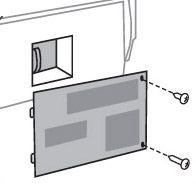
- Using a #2 Philips screwdriver, loosen the screw holding the cover in place. Put the cover to one side.
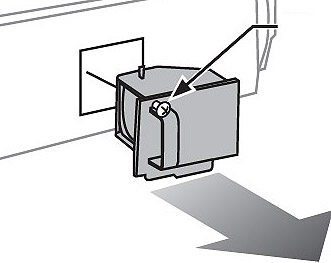
- Loosen the screw securing the lamp cartridge, releasing it from the mating threads. This is a captive screw so it will not be separated the lamp cartridge.)
- When the screw is loosened, gently grasp the handle on the lamp cartridge and pull the lamp straight out. DO NOT TILT, as there may be glass fragments that will fall inside the TV.
- If this happens, carefully pick up the larger shards wearing rubber gloves. Take a cloth just damp enough to pick up the small shreds. It’s important to pick up the broken lamps since this lamps does have mercury. Read more about proper clean-up from the EPA.
- Learn what to do should the bulb shatter.
- Take out the bag supplied with your new lamp and open it up. You’ll store the old lamp in this bag.
- Put the old lamp gently into the opened bag. Close the bag.
- Gently slide in the new Mitsubishi 915B455011 / 915B455A11 Lamp into the slot, making sure not to tile the lamp.
- Tighten the screw in the lamp.
- Replace the cover and tighten the screws.
NOTE: The Mitsubishi 915B455011 / 915B455A11 Lamp contains mercury and should not be thrown into regular garbage. Recycle your used lamps! If you bought from an authentic manufacturer, they will recycle the lamp for you at no extra cost (another reason to buy authentic lamps).
Leave a Reply