
How to change the Optoma H50 projector lamp
 Changing the Optoma H50 projector lamp can be done in just 15 minutes following this easy step-by-step guide.
Your Optoma H50 uses the Optoma BL-FU200A lamp. Be sure to buy an authentic Optoma H50 projector lamp in order to keep your projector working properly and avoid safety and health issues from counterfeit lamps. Why buy authentic? Scroll down to learn more .
Signs of lamp reaching end of life:
When the Optoma BL-FU200A (SP.83601.001C) lamp life is reaching end of life, watch for these warning signs:
- the Lamp LED flashing orange
- picture has poor colour quality
- image vibrancy and definition has deteriorated
- a warning message appears on screen: “Lamp may fail soon. Replacement suggested!”
When you see any of these signs, especially the warning message, change the lamp immediately. Avoid the temptation to left the projector run longer as it can result in a complete shut down of the Optoma H50 projector.
Buy this lamp on Amazon from the following authorized dealers:
Installing a new Optoma BL-FU200A lamp
Preparation:
Follow these important safety tips before installing a new Optoma BL-FU200A into your Optoma H50 projector.
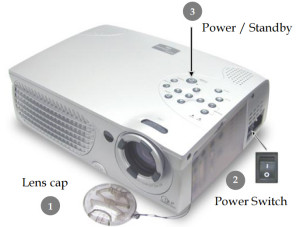
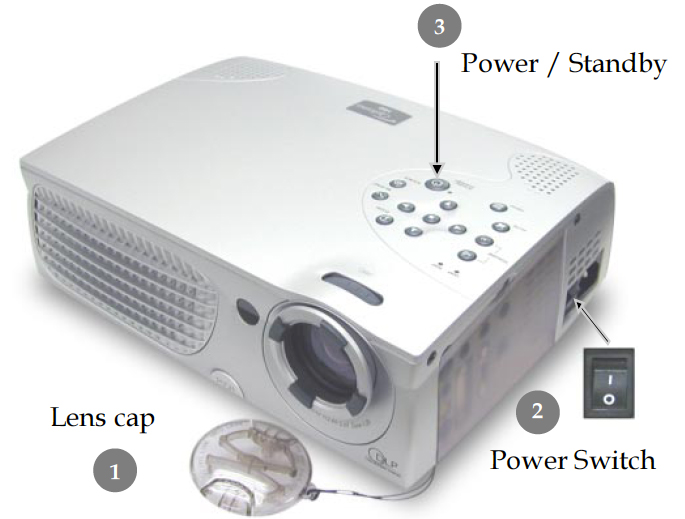
- Switch off the power to the projector by pressing the Power/Standby button.
- Allow the projector to cool down for at least 30 minutes. If should be cool to the touch. The Optoma H50 runs at a high temperature and you can burn yourself badly if you don’t allow the projector to cool down.
- Disconnect the power cord.
Step-by-step instructions
Remove the old lamp
Step 1: Use a screwdriver to loosen the two screws holding the lamp cover in place. The Optoma H50 projector should be cool to the touch.
Step 2: Remove the lamp cover and place to one side. Don’t lose the screws to the cover as the Optoma H50 projector will not turn back on until the lamp cover has been properly installed.
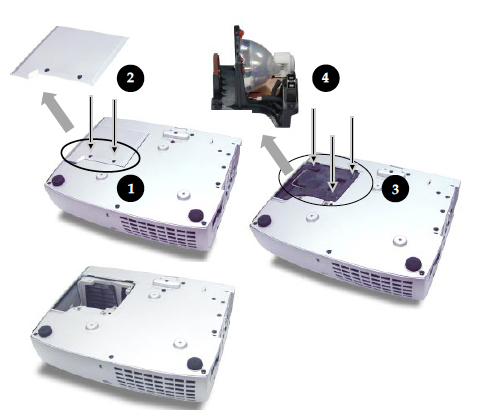 Step 3: Remove all three screws holding the Optoma BL-FU200A (SP.83601.001C) in place.
- NOTE: The Optoma BL-FU200A (SP.83601.001C) contains mercury and should not be thrown into regular garbage. Recycle this lamp.
Step 4: Lift the wire handle on the lamp and gently remove it from the projector. Be careful not to hit the lamp or you can cause it to break.
Install the new lamp:
- Take the new Optoma BL-FU200A lamp out of its packaging and lift the handle on the lamp. Gently place it into the projector making sure not to touch the actual bulb. Oil from fingerprint marks can burn black spots onto the lamp when it heats up.
- Tighten the screws on the lamp.
- Close the lid. Tighten the cover screws.
- You are now ready to reset the lamp timer.
Reset the Optoma H50 lamp timer
Your Optoma H50 comes equipped with an automatic lamp timer that tracks the number of hours left for the Optoma BL-FU200A lamp. Each time you change the lamp you need to reset the lamp timer. Failure to do so may cause the projector to use the lamp over the recommended period of time resulting in the lamp exploding.
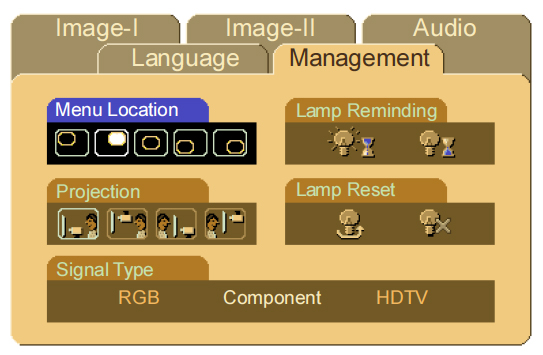
- Press the Menu button to open the On-Screen-Data (OSD) menu.
- Press the right/left arrow button to move to the Management menu.
- Press the right/left arrow button button to move down to Lamp Reset.
- Press the right arrow or Enter button to enter Status menu.
- Press the up/down arrow button to move down to Lamp Hour Reset.
- Press the right arrow or Enter button to select Reset option.
- Press the down button, then up button, then left button, then right button.
- The Status menu appears again showing the Lamp Hours reset to zero.
Why buy authentic?
- Generic lamps have a much shorter life
- These lamps use toxic chemicals as substitutes since they don’t have access to the proper materials
- Copycat lamps are more prone to overheat and explode
- Generic lamps are not properly calibrated to work with the sensitive electronics in projectors and installing can void the guarantee on your Optoma H50.
Watch for telltale signs you are about to purchase a counterfeit lamp:
- lower than normal price. The industry standard is no more then 20% discount
- amateur labelling with many spelling errors
- Glue on the edges and elements out of alignment
- Scratches inside the lamp cage
Leave a Reply