
How to connect your DLP projector to a TV
Your multi-purpose DLP projector can let you watch your favorite shows with cinema quality on your TV!
It’s easy to get your DLP projector and TV hooked up.
Step 1: Cables
Your TV must have an outgoing video connection. Older models will not have this option, the newer smart TVs definitely do. If you TV doesn’t have an outgoing video connection, you’ll need to hook it up through a cable. Read our blog on Hooking up your projector through an AV source.
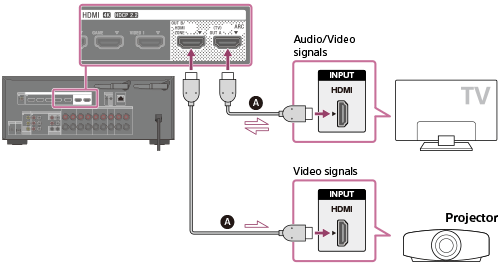
The cable you need depends on the type of VIDEO OUT pin you have on your TV:
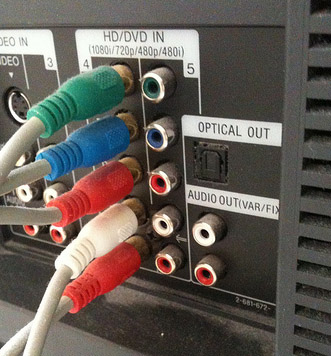
- RCA: composite video (yellow) and stereo audio (white and red) plugs. Similar to headphone or video gaming plugs. Find this on Amazon: Basics 2-Male to 2-Male RCA Audio Cable – 4 Feet
- S-video: All in one cable using a four-pin DIN connector
- HDMI: High-Definition Multimedia Interface connector integrating 19 cable pairs. This single-cable, all-digital solution is becoming the industry standard. Used with most HD devices. Find this cable on Amazon 25FT HDMI HDTV 1080P
- DVI: Most common digital video cables, similar to VGA connectors, with up to 24 pins. Supports analog as well as digital video so it most used with desktops and LCD monitors. It doesn’t do video so replace it with HDMI cables. Find this cable on Amazon:Basics DVI to DVI Cable – 3 Feet (0.9 Meters)
- VGA: Video Graphics Array connector has a 3-two, 15-pin connector and is used for video cards, computer monitors and HDTV. If you have an HDTV it will use the HDMI connection while older TVs will use either the VGA, S-video connection or RCA jack system. Find this cable on Amazon:<Cable Matters VGA to VGA Cable with Ferrites (SVGA Cable) 6 Feet (Available 3FT – 100 FT in Length)
/li>
Step 2: Positioning
You’ll still need to determine how far away your projector needs to be away from the projector screen. Check your manual to see how you need to set up the TV and projector.
Step 3: Connecting
- Unplug the projector. You will be connecting a cable from the VIDEO OUT jack on the TV to the VIDEO IN jack at the back of the projector.
- If you are using a VGA or HDMI connector you will have a single cable connection from one end to the other. If you are using a RCA jack system you will need to match up the colors accordingly: Yellow for video, white and read for stereo.
- Connect the power cords on both devices. Turn on the TV
- Open the TV menu settings using the remote control or buttons on the TV.
- Go to the menu and look for the Enable Video Out or Auxiliary Video Out. Set it onto ON.
- Turn on the projector.
- Go to the MENU or SETTINGS menu on the projector. Go to the INPUT SOURCE and change to the appropriate jack used. Some projectors have an SOURCE SEARCH button or function that will automatically find the video source. Refer to your projector user manual for more information.
- Remember that your projector will be reading what is on your TV screen. So if the TV screen in dark or blank so will be the projector.
Step 4: Tweaking the sound quality
Since most projector don’t have high quality, you may want to use surround sound speakers. This is easy to do it you are using the RCA jack set-up. Simply unplug the RED and WHITE cables from the projector and plug them into the AUDIO IN slots on your sound source.
Happy viewing.
Leave a Reply