
Installing a new Panasonic PT-D5500U projector lamp
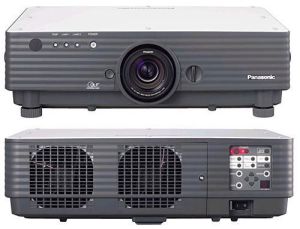 Install a new Panasonic PT-D5500U projector lamp following these instructions.
Be ready with an authentic projector lamp
With the Internet flooded with so many copycat manufacturers, it can be a challenge to find the best Panasonic PT-D5500U projector lamp to use. Always look for the seal of approval, be suspicious of bargain prices and always buy from an OEM manufacturer.
6 reasons to avoid generics:
- inferior parts that overheat and explode
- shorter life
- use toxic chemicals as substitutes
- aren’t calibrated properly and can damage your eyesight and projector’s optics
- copycat manufacturers offer no guarantee or refunds
- the warranty on your Panasonic PT-D5500U projector will become void.
Find this lamp sold on Amazon by these authorized dealers:
- PANASONIC ET-LAD55 / ET-LAD55W Replacement Bulb/Lamp with Housing Compatible for Projector PT-D5600U
- BND- PANASONIC SOLUTIONS COMPANY ET-LAD55 LAMP UNIT
- Panasonic ET-LAD55 Projector Lamp For Ptd5500/5600 – Ptdw5000 – Each
- Panasonic ET-LAD55L (Manufacturer OEM Projector Lamp,NOT Generic!) For PT-D5500U,PT-D5600U,TH-D5600,TH-D5500,PT-DW5000,PT-D5600UL,PT-D5600,PT-D5500UL,PT-D5500 Projectors, LONG-LIFE version!
- Panasonic Projector Lamp Part ET-LAD55-ER Model Panasonic PT PT-D5500 PT PT-D5500U
When to replace the projector lamp
This projector is equipped with three indicators lamp to show when the Panasonic ET-LAD55 lamp needs replacement. These lamps flash or light up to indicate a problem or when the projector lamp has reached its end of life.
Projector lamp life with the Panasonic PT-D5500U may vary depending on the working conditions and settings. When the projector lamp being used reaches 1300 hours, the lamp monitor (LAMP1 or LAMP2) light up to the standby state. The on-screen appears for about 30 seconds recommending replacing the projector lamp. After 1500 hours, the on-screen indication will stay on the screen unless the MENU button is pushed.
A message REPLACE THE LAMP will appear on screen as well. If your Panasonic ET-LAD55 projector lamp unit is not replaced after the warning message, the projector enters a standby state. It will remain in standby state until the projector lamp is changed.
Replace the Panasonic ET-LAD55 projector lamp
Follow these important safety tips before replacing the Panasonic PT-DW5600U projector lamp:
- Press the POWER OFF button
- Select OK using the right or left arrows on the control panel. Press the ENTER button. (Or press the POWER OFF button again. The power indicator will light up orange.
- Wait until the power indicator turns red and the cooling fans stop running.
- Press MAIN POWER to OFF.
Projector lamp installation steps:
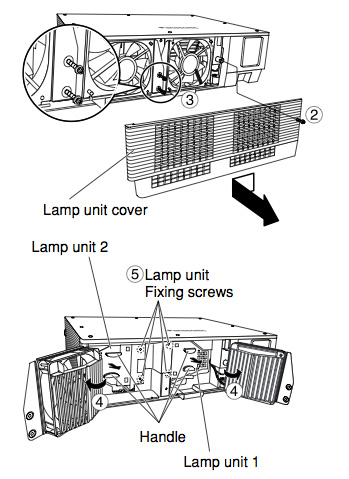 Using a Phillips screwdriver, remove the screw securing the projector lamp cover. Slide the lamp unit cover toward the left to remove it. (See diagram #2)
Remove the two screws securing the fan unit. (See diagram #3)
Gently open the fan unit in front of the both Panasonic ET-LAD55 projector lamps. (See diagram #4)
Remove the screws holding the Panasonic ET-LAD55 projector lamp in place. (Each lamps has two screws. Take hold of the wire handle and gently remove the projector lamp. (See diagram #5)
NOTE: The Panasonic ET-LAD55 projector lamp contains mercury and should not be thrown into regular garbage. Recycle this projector lamp!
Install the new lamp unit taking care not the touch the actual project lamp bulb as oil from your fingers will remain on the bulb and burn black spots when the projector lamp heats up.
Use a Phillips screwdriver to securely tighten each of the two screws on both projector lamps.
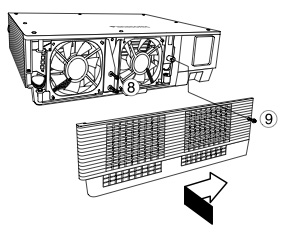 Put the fan back in place and tighten the two screens to hold it in place. (See diagram #8)
Slide the cover a little toward the right, and secure it by tightening the screw. (See diagram #9)
NOTE: Firmly install the projector lamp unit and projector lamp cover. If not installed properly, the protection circuit will be activated and the projector will not turn back on.
To reset the projector lamp timer
Each time you switch to a new Panasonic ET-LAD55 projector lamp you need to reset the Panasonic PT-D5500U projector lamp timer.
- Insert the power cord plug into the wall outlet and then press the MAIN POWER switch.
- Press the “ I ” button on the remote control to display an image picture onto the screen.
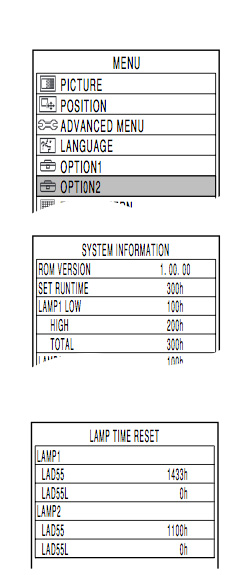
- Press MENU to display the MAIN MENU screen.
- Scroll down to select OPTION2. Press ENTER to display the OPTION 2 menu.
- Scroll down to SYSTEM INFORMATION. Press ENTER to display the SYSTEM INFORMATION menu.
- Press and hold the ENTER button on the projector or the remote control for approximately 3 seconds. The option LAMP TIME RESET will be added to the menu.
Scroll down to select the projector that has was replaced. Select the lamp which has been changed
- LAMP1: Replace the LAMP UNIT 1
- LAMP2: Replace the LAMP UNIT 2
- Press ENTER.
- When the LAMP TIME RESET display flashes, press ENTER again.
- The used hours of the specified lamp unit will be reset to zero.
- Press the MENU button to leave the LAMP TIME RESET menu.
Quick reset:
- When lamp unit 1 has been replaced: In standby mode, press the number buttons in the sequence of 737381, and then press ENTER.
- When lamp unit 2 has been replaced: In standby mode, press the number buttons in the sequence of 737382, and then press ENTER.
- When the projector lamps hours have been reset, the lamp monitor (LAMP1/LAMP2) will flash for 3 seconds.
Leave a Reply