
3 steps to a new Canon LV-S1 projector lamp
 Replace the Canon LV-S1 projector lamp by following this manual.
Step 1: Recognize end of life signs
When the Canon LV-S1 projector lamp has reached its end of life the LAMP REPLACE indicator on the projector will light yellow. Replace the lamp immediately when you see this. Other warning signs may be a dim picture, color that appears washed and a image that is faded.
Step 2: Invest in authentic
Have your replacement projector lamp ready and waiting. Your Canon LV-S1 projector uses the Canon LV-LP12- 7566A001 projector lamp. Be sure to always install an authentic projector lamp in order for your Canon LV-S1 projector to work at its optimum. Why should you avoid counterfeit lamps:
- shorter life
- no safety guards to protect your eyesight,
- prone to explosions inside projectors
- damaging your projector beyond repair
- created with carcinogenic, toxic substitutes.
When the price seems too good to be true — it’s a counterfeit. Keep your projector working at its best. Invest in authentic.
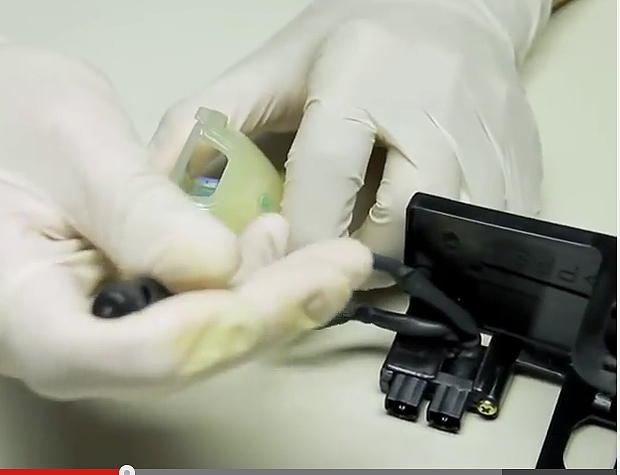
Step 3; Instal the projector lamp
Before changing the projector lamp follow these important safety procedures:
- Unplug the electrical cord on the Canon LV-S1 so there is no chance the projector could get turned on during the installation.
- The Canon LV-S1 operates under high temperatures so give it at least one hour to cool down before opening the projector to change the projector lamp.
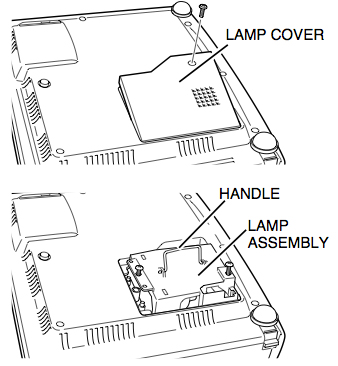
- Loosen the two screws holding the Canon LV-S1 projector lamp cover in place. Place the cover aside.
- Loosen the two screws on the projector lamp and slowly pull out the Canon LV-LP12- 7566A001 projector lamp assembly by using the built in handle.
- NOTE: The used LV-LP12 projector lamp contains mercury and should be properly recycled. Don’t throw it into regular garbage.
- Pulling too quickly can cause the bulb to shatter. Learn how to clean up a broken lamp.
- Replace the lamp assembly with a new Canon LV-LP12- 7566A001. Be careful not to touch the actual bulb as oil from your fingers can leave black marks on the lamp.
- Tighten the two screws on the lamp.
- Put back the lamp cover and tighten its two screws.
- Connect the AC power cord to the Canon LV-LP12 and turn on the projector to reset the lamp timer.
Resetting the lamp timer counter
After replacing the Canon LV-LP12 projector lamp, you’ll need to turn off the LAMP REPLACE indicator by resetting the LAMP REPLACE COUNTER in the Canon LV-S1. This counter tracks the number of hours the lamp has been used by the Canon LV-S1 and triggers the warning light when the lamp is reaching its end of life. Not resetting it after may stop your projector from turning back on.
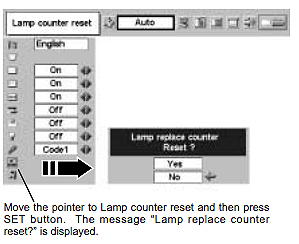
- Turn the projector on and press the MENU.
- The On-Screen menu will be displayed on the left.
- Using the arrow buttons, mover the red frame pointer to the SETTING menu icon.
- Press the up/docwn buttons, move to the LAMP COUNTER option.
- Press OK to open up as the RESET LAMP COUNTER box.
- Click on the SET option to open a confirmation window.
- The message “Lamp replace counter reset?” is displayed.
- Click on YES.
- Press OK.
- The lamp hours will be reset to zero.
- Learn how to prolong lamp life. Top tips for extending projector lamp life.
Go green with your Canon LV-S1
Do your bit for the environment by recycling the plastic lamp cage and just replacing the Canon LV-LP1 bulb. Our training video shows you how with step-by-step instructions!
Leave a Reply