
Install a new Sony VPL-VW40 projector lamp
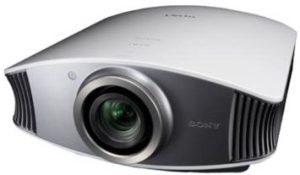
Our guide shows you how easy it is to replace the Sony VPL-VW40 projector lamp!
Buy authentic
Don’t settle for anything but the best for your Sony VPL-VW40 projector and install an authentic projector lamp. When buying look for the seal of approval — don’t get caught with a counterfeit lamp. They have shorter lamp and are more toxic due to the substitute materials used by counterfeit manufacturers. These lamps often don’t work properly with the sensitive electronics in your projector and are prone to explosions. Keep your projector working properly and invest in an authentic projector lamp.
Find this on Amazon sold by these authorized dealers:
- LMP-H200 Sony Projector Lamp Replacement. Projector Lamp Assembly with Genuine Original Philips UHP Bulb Inside.
- VPL-VW50 Sony Projector Lamp Replacement. Projector Lamp Assembly with High Quality Genuine Original Philips UHP Bulb Inside.
- Sony LMP-H200
- LMP-H200 Sony VPL VW60 Projector Lamp
When to replace?
When the this Sony VPL-VW40 projector lamp projector lamp is reaching end of life, the Lamp/Cover light will continue to flash red in 3 second intervals. The message “Please replace the Lamp/Filter” will also start flashing on screen. If the projector lamp dims or the color looks strange, change it immediately. Sony recommends replacing the air filter at the same as replacing the lamp.
Replacing the Sony VPL-VW40 Lamp and Air Filter
Before installations preparations: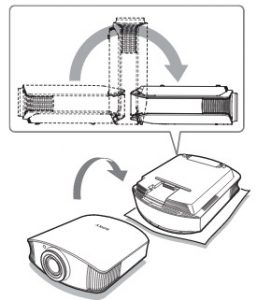
- Unplug the AC power cord on the Sony VPL-VW40 projector.
- Your Sony VPL-VW40 projector uses the Sony LMP-H200 projector lamp. Before installing the lamp, let the projector cool for at least 40 minutes. It should be cool to the touch. Don’t rush the cooling as these projectors operate using extremely high temperatures and you run the risk of a serious burn.
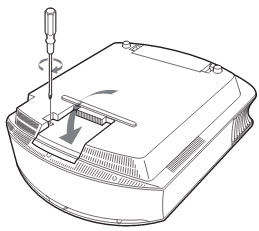
- The projector lamp cover is on the bottom of the projector so you will need to turn it over. Put down a soft cloth on a flat surface to prevent the projector getting scratched. Turn the projector over gently. Don’t lean on the projector and make sure the surface is flat and stable.
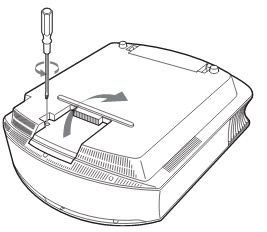
- Using a Philips screwdriver, loosen the screw holding the projector lamp cover in place. Slide the projector lamp cover. Put it to one side.
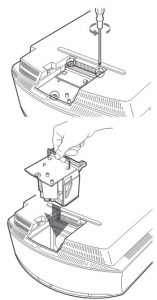
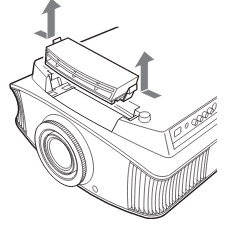
Loosen the 3 screws on the Sony LMP-H200 lamp using a Phillips screwdriver. Grab the wire handle on the Sony LMP-H200 projector lamp and gently pull the lamp straight out. Take care not to bang the lamp as you can cause the bulb to break.
NOTE: The Sony LMP-H200 projector lamp contains mercury and should not be thrown into regular garbage. Recycle this lamp!
To finish the projector lamp installation:
- Remove the packaging from the new Sony LMP-H200 projector lamp.
- Lift up the handle and slowly lower the Sony LMP-H200 projector lamp into the projector.
- Push it in securely until it reaches the end.
- Tighten the three screws on the lamp.
- Also don’t touch the actual bulb in the new lamp as oily fingerprints can burn a black spot on the lamp when it heats up.
- Slide the lamp cover back onto the Sony VPL-VW40 projector.
- Close the projector lamp cover and tighten the screws.
Remember to install the lamp cover properly as the projector will not turn on if the cover is loose or not installed correctly.
Replacing the Sony VPL-VW40 air filter
- Remove the filter holder. The air filter will be inside the holder. Don’t touch the fan inside as this can damage the projector.
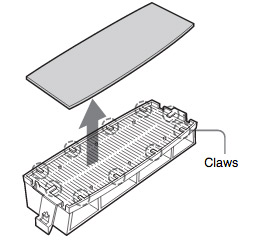 Remove the old Sony VPL-VW40 filter and put it to one side. Attach the new air filter so that is fits into the 10 claws properly on the holder.
- Aligning the air filter with the shape of the filter holder will make it easier to install.
- Be sure to put the air filter holder back into the projector aligned up properly. If not, the projector will not turn back on!
- Wipe off any dust from the ventilation intake holes using a soft cloth. Put the projector back in its original position
Resetting the Sony VPL-VW40 projector lamp timer
- To reset the projector lamp timer, plug the AC power cord back into Sony VPL-VW40 projector. It it on.
- Using the remote, scroll down to the Setup Menu.
- Press Enter.
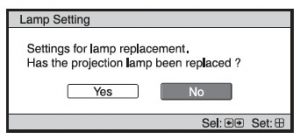
- A Lamp Setting message will appear asking you if the projector lamp has been replaced.
- Click on Yes.
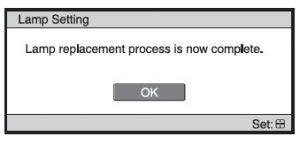
- You will see a confirmation message and the Projector Lamp Timer will be automatically reset to zero.
- You can see the number of hours left on your lamp by going to the Information Menu.
You can extend the life of the Sony LMP-H200 projector lamp by always making sure the filter is clean and there is enough airflow around the projector. Learn how to get a longer projector lamp life with top tips for extending DLP projector lamp life.
What do I do if I replaced yet already the lamp, cleaned the air filter and the light is still flashing red 3X’s on my Sony
VPL -BW60 projector, 1080 P??…
Hey Adam,
You’ve eliminated any overheating problems by cleaning the air filters. Did you reset the lamp timer? Turn on the projector, then select the Setup menu, Reset Lamp Replacement. then select Yes. The should reset the three blinking ligts. Hope this helps.
Regards,
Shelagh