
Replace the Canon LV-7590 projector lamp
 This guide shows you how to replace the Canon LV-7590 projector lamp

When it’s time to replace the Canon LV-7590 projector lamp you’ll see a lamp replacement icon appear on screen and the LAMP REPLACE indicator will light orange. Replace the lamp immediately
Invest in authentic
Be sure to always install an authentic Canon LV-7590 projector lamp. Avoid counterfeits — even if the price seems like a great deal. They will cost you more in the long run. Reasons to avoid them:
- shorter life
- no safety guards to protect your eyesight,
- are prone to explosions inside projectors
- can damageyour projector optics beyond repair
- have carcinogenic materials
Find this lamp on Amazon sold by these authorized dealers:
- Canon Replacement Lamp with Housing and Original Bulb for LV-7590; 4824B001; LV-LP33
- Canon LV-LP33 330 Watts Replacement Lamp for LV-7590 Multimedia Projector
- eWorldlamp LV-LP33 / 4824B001 CANON Projector Replacement Lamp with housing for CANON LV-7590
Install the projector lamp
Your Canon LV-7590 projector uses the Canon LV-LP33 Replacement Projector Lamp.
NOTE: The Canon LV-LP33 contains mercury and should be properly recycled. Don’t throw it into regular garbage.
- Unplug the electrical cord on the Canon LV-7590 so there is no chance the projector could get turned on during the installation.
- The Canon LV-7590 operates under high temperatures so give it at least one hour to cool down before opening the projector to change the projector lamp.
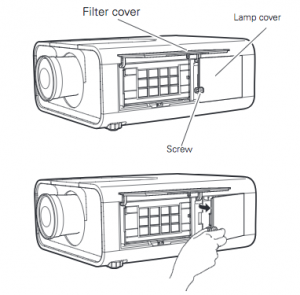
- Press the arrows to release the air filter cover to access the lamp cover.
- Loosen the screw holding the Canon LV-LP33 projector lamp cover in place.
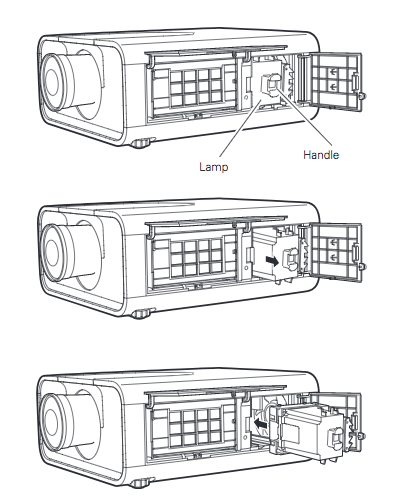
- Using the handle pull outthe Canon LV-LP33 projector lamp assembly
- Replace the lamp assembly with a new Canon LV-LP33 projector lamp. Be careful not to touch the actual bulb as oil from your fingers can leave black marks on the lamp.
- Close the lamp cover
- Replace the air filter cover
Resetting the lamp timer counter
After replacing the Canon LV-7590 projector lamp, you’ll need to reset the lamp
counter to zero so the projector can accurately record the lamp hours left. Until you reset the lamp counter, the LAMP REPLACE indicator will continue to keep flashing.
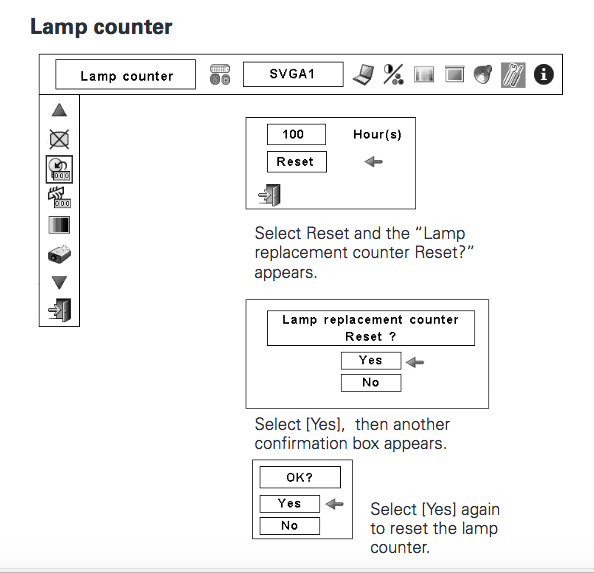
- Using the arrow buttons, scroll down to SETTING menu icon. Press OK.
- Press the up/down buttons, move to the LAMP COUNTER option.
- Press OK to open up as the LAMP COUNTER RESET.
- Click on the SET option to open a confirmation window.
- The message “Lamp replace counter reset?” is displayed.
- Click on YES.
- Press OK.
- Another confirmation box appears.
- Select YES to reset the lamp hours to zero
Leave a Reply