
Replacing the RCA HD50LPW166YX12 TV Lamp
 Our guide walks you through replacing the RCA HD50LPW166YX12 TV Lamp
When to replace?
When the RCA HD50LPW166YX12 TV lamp is reaching end of life, you will see a message on screen and the lamp indicator on the TV will start flashing. Other end of life signs may also include darker images and colors that look off.
Authentic lamps are critical!
Don’t settle for anything but the best for your RCA HD50LPW166YX12 TV Lamp. When buying look for the seal of approval. This TV uses the RCA 270414 TV Lamp.
6 reasons to avoid generic TV projector lamps:
- shorter lamp life than original lamps
- created with toxic materials and carcinogenic parts including Krypton-85
- prone to explosions
- can damage the sensitive electronics in your projector
- when you buy copy-cat lamps you get no guarantee or refunds
- installing a generic lamp voids your projector’s warranty.
Find this lamp on Amazon sold by these authorized dealers:
Installing the new lamp
NOTE: Avoid touching the bulb to avoid getting any dirt or oil on it. The oil residue can burn black marks into the bulb and cause premature failure. Be sure to do a final wipe with a clean, non-abrasive, lint-free cloth before installing your lamp.
We also recommend replacing the entire enclosure if it looks damaged or warped as this may cause your lamp to be misaligned inside the television!
Tools needed
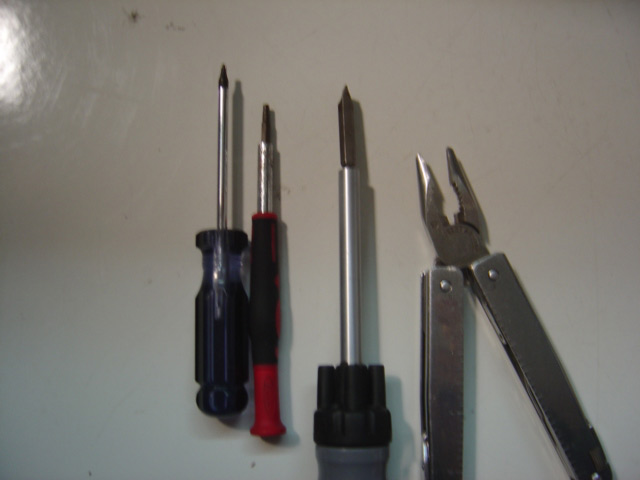
To replace just your lamp, all you need is:
- An RCA DLP lamp made by Philips
- A flat-head screwdriver
- A T-10 & T-15 Torx driver
- A pair of plyiers
- A pair of gloves or a lint-free cloth (to wipe the glass down afterwards)
Step 1: Locate the lamp.
Here is the back of a typical RCA DLP TV… your TV may look slightly different.
The lamp is behind this rectangle door!
You’re going to need your flat-head screwdriver to loosen this screw.
Loosen the screw and then use the two “clips” to open the compartment door.
What we’re looking at it is the RCA 270414 TV Lamp lamp enclosure. There is one screw on each side that need to be loosened.
Now you can gently pull back the tray and to remove the RCA 270414 TV Lamp.
This is what it should look like pulled straight back…
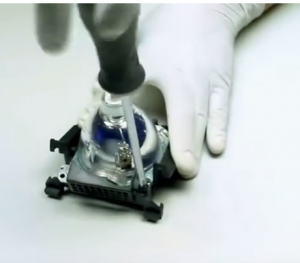
Step 2: Remove the lamp from the enclosure
With your old RCA 270414 TV Lamp \facing downward visually inspect the area labeled “Clip” on the top and bottom of the enclosure. Between them, there is about a 3″ gap where you need to push in to be able to pull out the rear lamp cover.
At the other side of the RCA 270414 TV Lamp enclosure while pushing in on the lamp enclosure, you want to release the side clips.
When disassembled the RCA 270414 TV Lamp bulb should look this wiring.
Unscrew the RCA 270414 TV Lamp connectors with your plyer and torx driver. Once the back of the enclosure is removed. Now you have access to remove the three screws circled above
You should have three parts after taking the RCA 270414 TV Lamp apart.
NOTE: The used RCA 270414 TV Lamp contains mercury and should be properly recycled. Don’t throw it into regular garbage.
Step 3: Installing the new lamp
You are ready to install a new original bulb. Place the bulb into the plastic lamp cage. Tighten the top washer on the RCA 270414 TV Lamp.
Secure the RCA 270414 TV Lamp into the cage by tigthening the side panels.
Place the lamp cover back on the television.
Watch our training video to learn more.
Leave a Reply