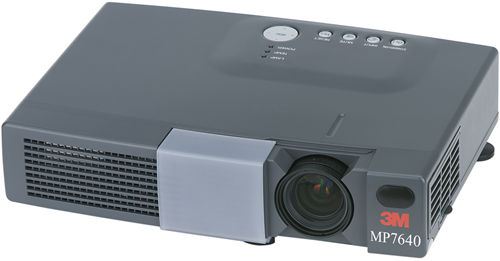
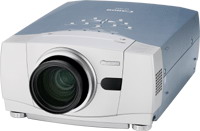
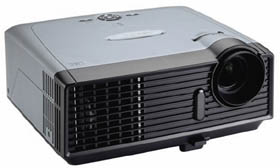
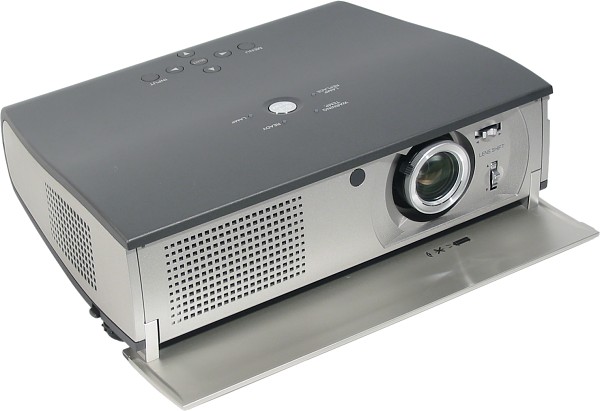
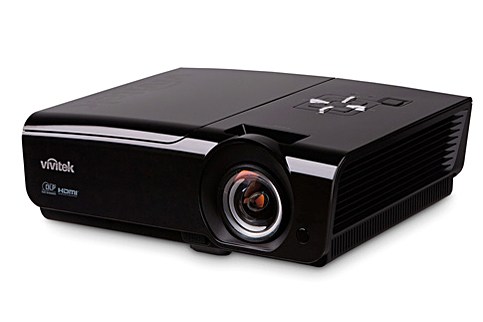
We're now Screen and Projector! For updated content, visit ScreenAndProjector.com and follow @screenandproj on social media!

Acer H5360BD-projector_ECK-0700-001_projector_lampInstall a new Acer H5360BD projector lamp by following this guide.

Using the correct lamp

Your Acer H5360 projector uses the Acer EC.K0700.001 projector lamp. Be sure to buy your Acer H5360BD projector lamp from an authorized dealer to keep your projector working properly. Cheap knock-offs will damage the sensitive mechanisms in your Acer H5360BD projector and  have a much shorter life span due to their inferior materials and worksmanship. They are prone to explosions and contain cancer-causing materials, such as Krypton 85. Installing a knock-off projector lamp into your Acer H5360BD projector will also void your warranty. Protect your health and keep your projector working properly — install an authentic Acer EC.K0700.001!

Find this lamp sold on Amazon by the following authorized sellers:

Replacing the Acer EC.K0700.001 projector lamp

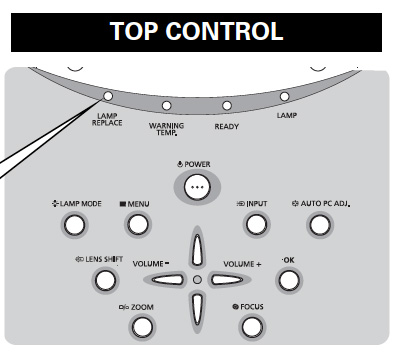
There are some telltale signs that are warnings your Acer H5360HD projector lamp is coming to its end of life. You may notice the colours on screen are faded or look off. When lamp usage is approaching 2000 hours, you will see warning message appear on screen:

Acer-H5360BD_projector_ECK-0700-001_projector_lamp_Warning_message

If the Power lamp indicator quickly flashes blue followed by a steady red light, the projector lamp has failed and needs to be replaced immediately.

Step-by-step instructions

Before installing the new projector lamp follow these important safety rules:

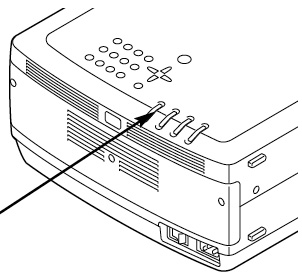
  • Turn off the projector and unplug the AC cord. These projectors operate under high temperatures and there is a risk of burning if the projector has not cooled enough. Allow the Acer H5360 to cool for one hour. It should be cool to the touch.
  • Don’t throw this old Acer EC.K0700.001 projector lamp into the regular garbage as it contains mercury — send it to a local recycling program where it can be disposed of properly.

Acer-H5360BD_projector_ECK-0700-001_change_projector_lamp 
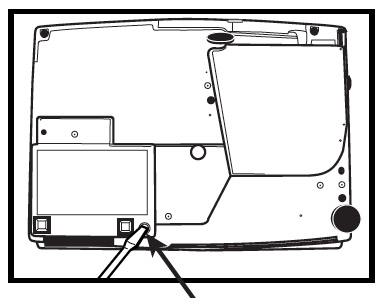
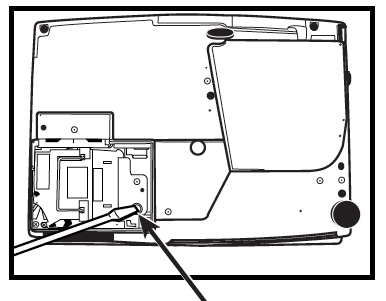
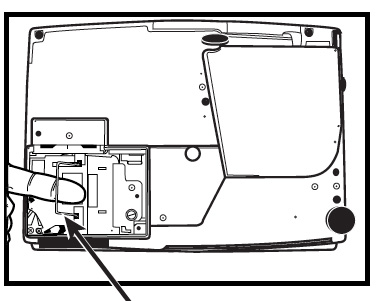
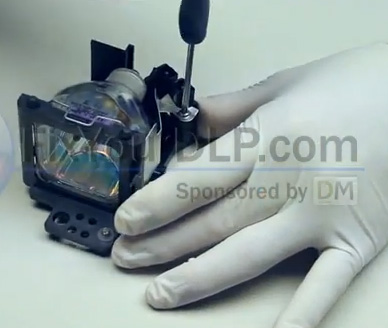
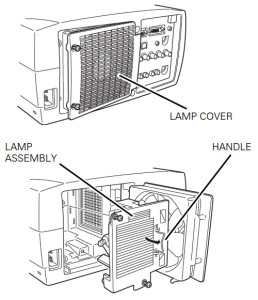
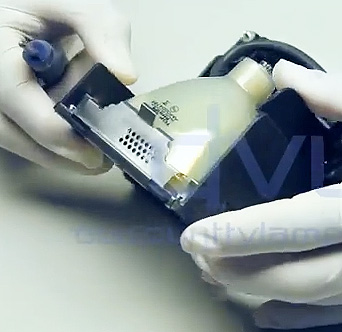
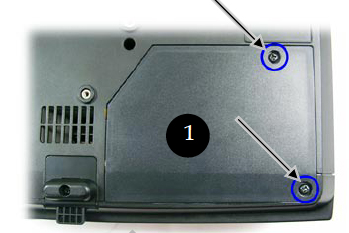
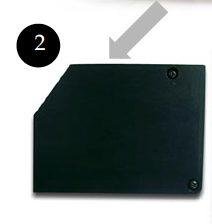
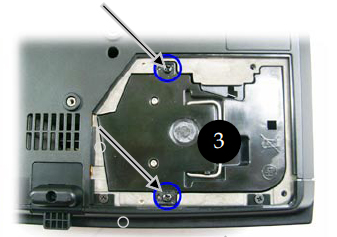
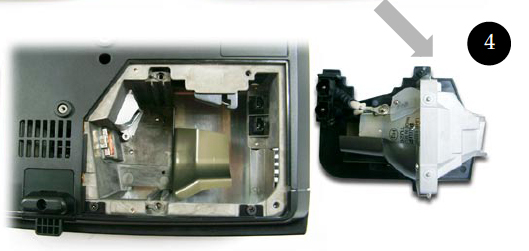
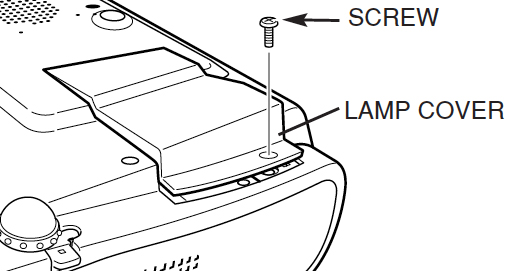
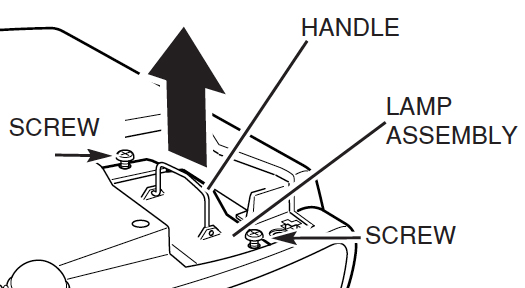
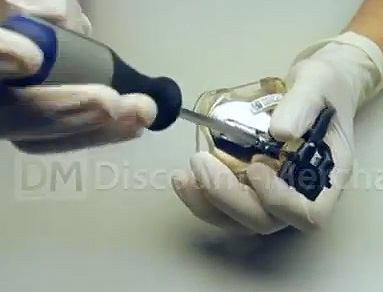
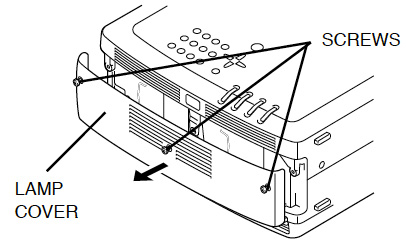
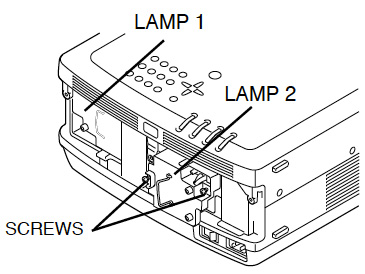
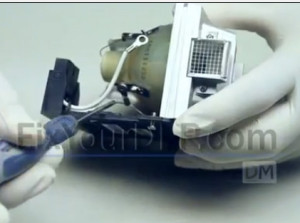
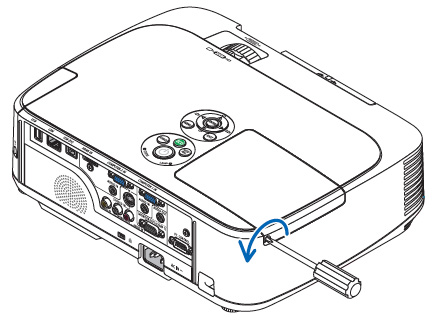
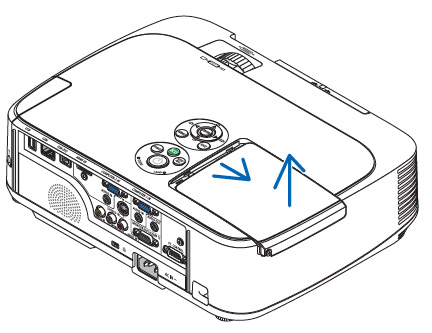
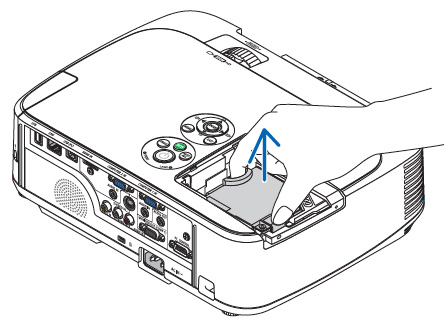
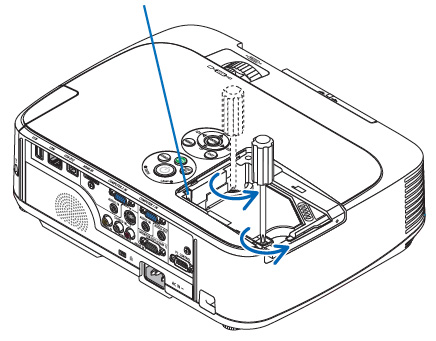
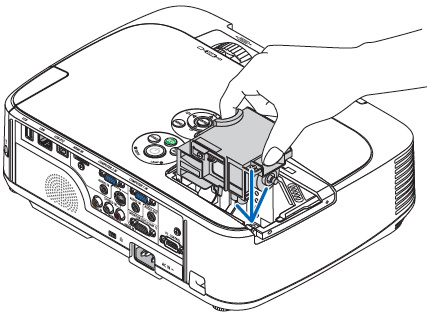
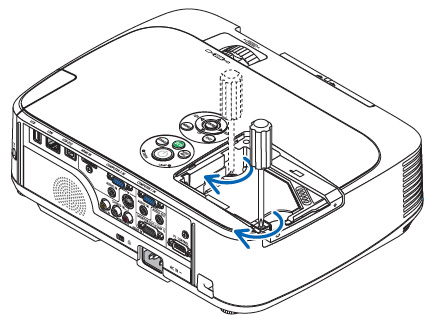
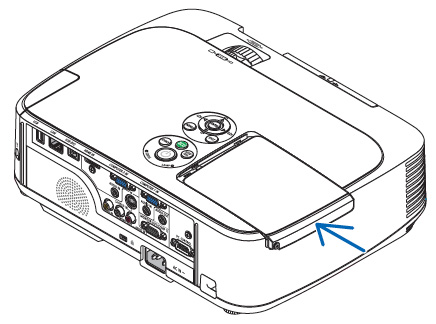
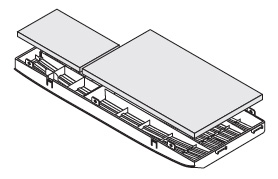
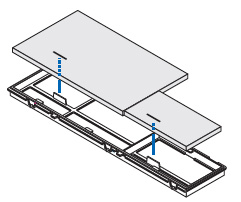
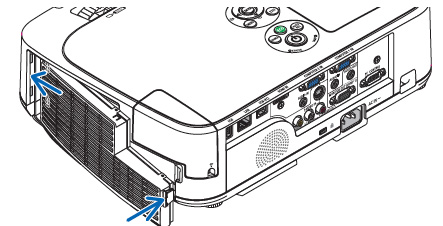
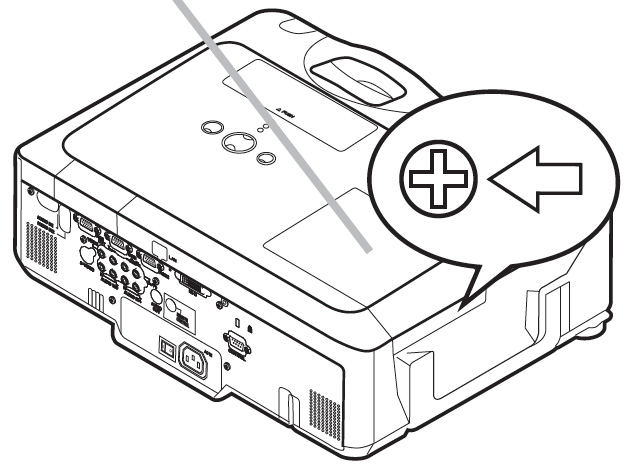
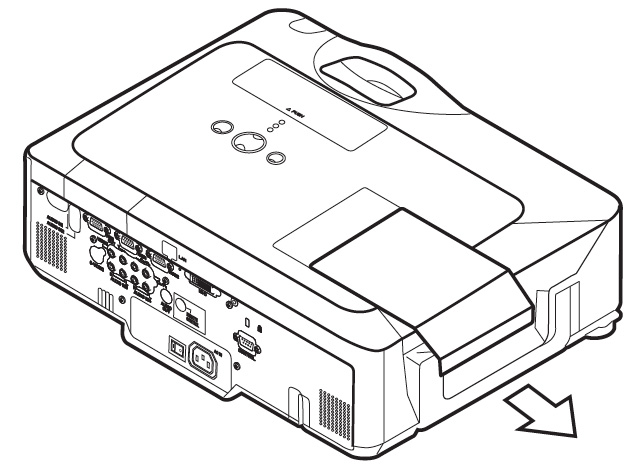
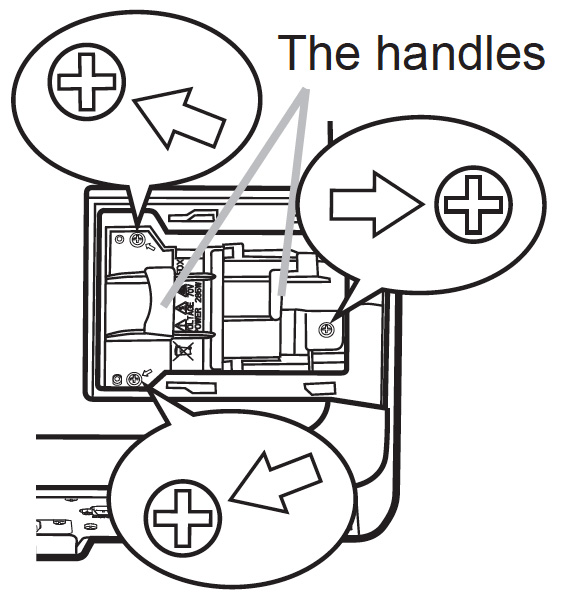
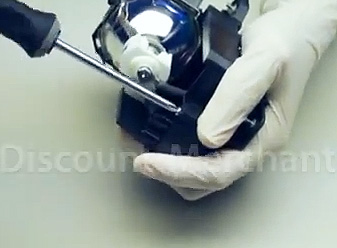
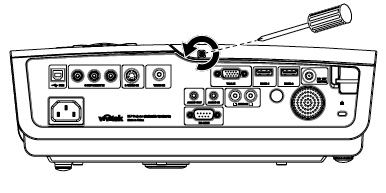
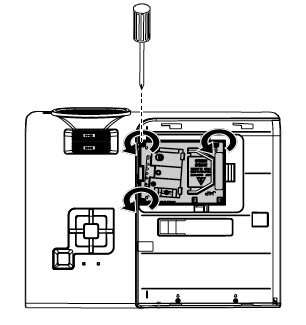
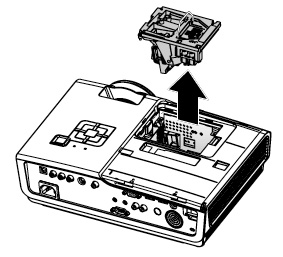
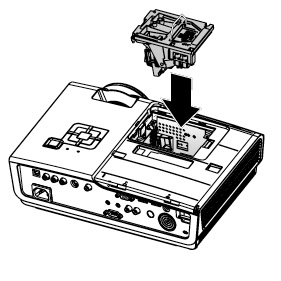
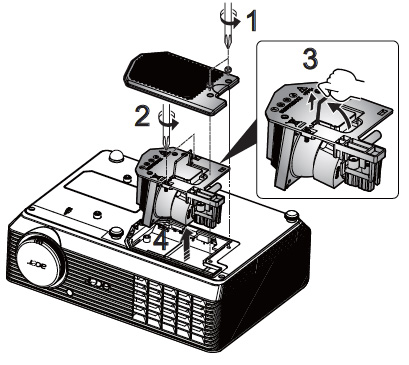
1. Use a screwdriver to remove the two screws from the cover. Lift the cover off the projector. 2. Use a screwdriver to remove the two screws holding the lamp in place. screw from the cover. 3. Lift the wire handle on the Acer EC.K0700.001 bulb and gently pull the lamp up to remove it. 4. Take the new Acer EC.K0700.001 lamp. Avoid touching the bare bulb; the oil on your finger can leave a black mark on the lamp affecting the projected image. Once the light is safely in the projector, you can proceed to finish the installation:

  • Tighten the screws on the new Acer EC.K0700.001 projector lamp.
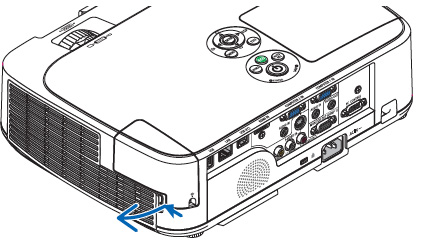
  • Put the lid back onto the projector. Tighten the screw holding the lid in place.
  • Plug the AC cables back into the projector. Turn the projector on so you can reset the lamp timer.

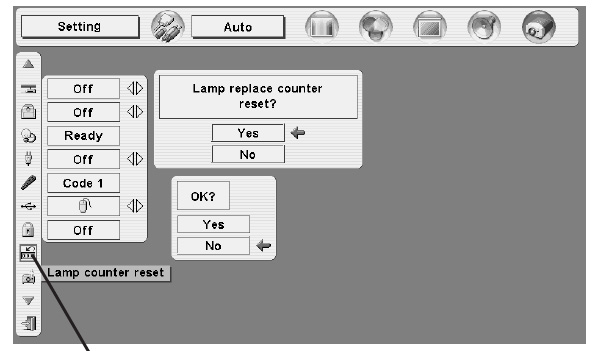
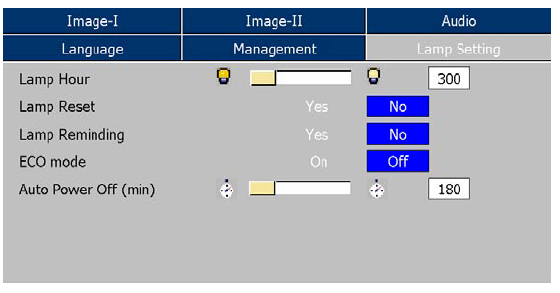
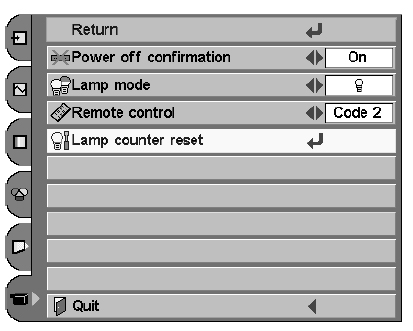
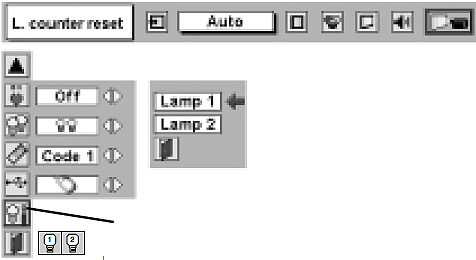
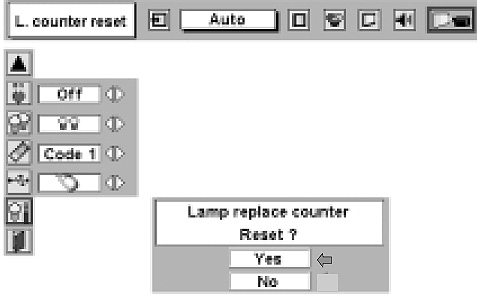
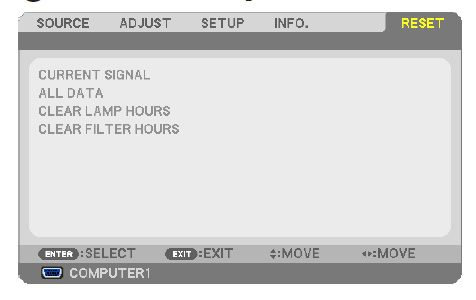
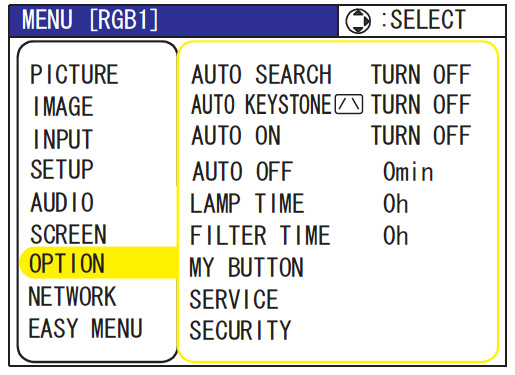
Resetting the Lamptimer

It’s important to always reset the lamp timer after replacing the lamp in your Acer H5360HD projector. You want the projector to track how many hours the lamp has been used and send out warning messages when the Acer EC.K0700.001 reaches end of life. To reset the Lamptimer: Acer-H5360BD_projector_ECK-0700-001_lamp_timer_reset

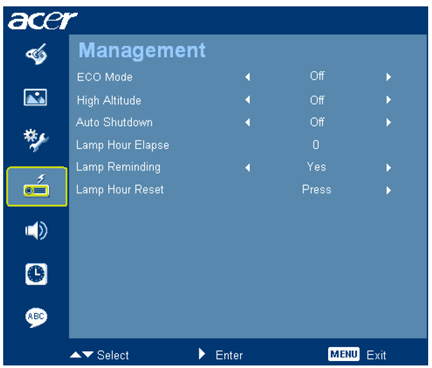
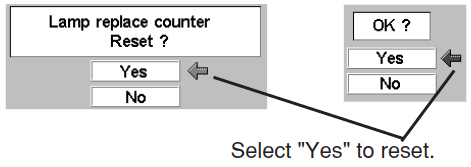
  • Open the MAIN MENU. Press ENTER.
  • Scroll down to the MANAGEMENT menu. Press ENTER.
  • Scroll down to the Lamp Hour reset option.
  • Press the right arrow.
  • The lamp will be reset to zero.

Extend the life of your Acer EC.K0700.001

Choose ECO Mode to lower power consumption. It will dim the projector lamp thereby extending lamp life as well as lowering power. Learn more tips for extending lamp life.

Tagged with: , , ,

3M_MP7640-projector_78-6969-9205-2_projector_lampOur step-by-step guide will help you change the 3M MP7640 projector lamp.

End of life signals

When the 3M MP7640 projector lamp is approaching end of life the LAMP INDICATOR on the projector lights up red and the “CHANGE THE LAMP” message appears on the screen.

To find out projector lamp life:

Press the TIMER button on the remote control for three seconds. The number of hours left until shutdown will decrease until 0 hour is reached, then power will turn off automatically. The operating time of the projector lamp is displayed at the bottom of the screen with the following messages:

  • CHANGE THE LAMP, AFTER REPLACING LAMP RESET THE LAMP TIMER: Appears when the lamp has reached the usual end of life.
  • POWER WILL TURN OFF AFTER 20 HOURS: Appears when 20 hours or less remain in the lamp life.

When you need to replace the projector lamp, the projector will run for only 10-minute intervals until the lamp is replaced and the lamp timer is reset. The message “CHANGE THE LAMP” will also continue to blink at projector start-up.

Go authentic

Your 3M MP7640 projector uses the 3M 78-6969-9205-2 lamp. Be sure the purchase an authentic projector lamp and avoid the temptation of  generic projector lamps with their seemingly great bargain prices. There are several problems associated with generics that you want to avoid:

Save yourself hassle and go an authentic 3M 78-6969-9205-2 lamp.

Replacing the 3M 78-6969-9205-2 lamp

Before replacing the projector lamp:

  • Wait until the projector is cool to the touch before removing the projector lamp. These projector work at a high temperatures and you can get badly burned.
  • Be sure to unplug the projector before replacing the lamp.

3M_MP7640-projector-door_78-6969-9205-2_projector_lamp

  • Remove the lamp access door located on the bottom of the projector by loosening the retaining screw.
  • Note: The screw in the lamp access door is self-contained and can’t be removed.


3M_MP7640-78-6969-9205-2_remove_projector_lamp_screws

  • Loosen the screw holding the lamp module in place. This screw is self-contained and that can’t be removed from the lamp module.

NOTE: The 3M 78-6969-9205-2 projector lamp contains mercury and should not be thrown into regular garbage. Recycle your used projector lamps!

3M_MP7640-remove_78-6969-9205-2_projector_lamp

  • Carefully slide the 3M 78-6969-9205-2 projector lamp module out by pulling straight up on the retaining wire on top of the module.
  • Carefully insert the new 3M 78-6969-9205-2 projector lamp into the projector by sliding it straight down into the opening. Ensure that it’s securely in the projector and fully seated.
  • Tighten the lamp module retaining screw to secure the lamp module in place.
  • Insert the hinge tabs on the bottom of the lamp access door, close, and tighten the retaining screw to secure the door.

You are now ready to reset the lamp operation hour.

Reset the projector lamp timing

The 3M MP7640 projector tracks the lamp life and when the 3M 78-6969-9205-2 lamp is changed the lamp operation hours must be reset. After replacing the lamp, you have 10 minutes to reset the lamp operation hours after switching on the power. After 10 minutes the projector will shut down and continue to shut down until the lamp operations has been reset.

To reset:

  • To display the total lamp hours, press the RESET button on the projector or the Timer button on the remote control and hold for three seconds. Lamp hours will be displayed at the bottom of the screen.
  • Press the RESET button on the projector or MENU button on the remote while the amp hours are displayed. The lamp hour reset message will display.
  • Use the left-arrow button on the remote control or the Menu diskpad of the projector to select 0, and wait until the timer display has cleared.

Extend the 3M 78-6969-9205-2 projector lamp life

  • Keep your air filters clean to avoid overheating the projector.
  • Turn off the projector and let it rest for at least two hours a day.
  • Make sure there is enough airflow around the projector particularly if it’s mounted on the ceiling.
  • Learn more with Top tips for extending DLP projector lamp life.

An environmentally-friendly option

3M_78-6969-9205-2-bulb_replacement

If you would like to save some money try replacing only the 3M 78-6969-9205-2 bare lamp rather than the entire lamp unit. You recycle the plastic cage and reduce waste. Watch our 3M 78-6969-9205-2 bulb replacement video to learn how.

Tagged with: , , ,

Canon_LV-7555FU_projector_LV-LP17_projector_lampDon’t panic when it’s time to switch the pCanon LV-7555FU projector lamp. Our guide will walk you through the procedure.

Why buy authentic projector lamp

You want to keep your Canon LV-7555FU projector working properly. The best way to do that is to always install authentic OEM Canon LV-7555FU projector lamp. Your Canon LV-7555FU projector uses the Canon LV-LP17 (9015A001) projector lamp. You may be tempted to buy a generic lamp sold at discount prices. These projector lamps actually cost more since the have a much shorter life and are prone to explosions. There are health and safety concerns as well, since these lamps have been created with carcinogenic, toxic substitutes. Installing generic lamps into your Canon LV-7555 projector also voids your warranty. Generics are not worth the few extra dollars you save. Go with an OEM Canon LV-LP17 (9015A001) lamp.

Canon_LV-7555FU_projector_warning_LV-LP17_projector_lampEnd of life signs

When the Canon LV-LP17 projector lamp has reached its end of life the LAMP REPLACE on the projector will light yellow. Replace the projector lamp immediately when you see this.

Other warning signs may be a dim picture, colour that appears washed and a image that is fading.

Replacing the Canon LV-LP17 projector lamp

Before changing the projector lamp:

  • Allow the Canon LV-7555FU to cool down for at least 45 minutes. This projector operates at an extremely high temperature and you can get burned. Don’t rush it.
  • Unplug the electrical cord so there is no chance the projector could get turned on during the installation. This could damage your projector and also give you a shock.

To replace the projector lamp:

Canon_LV-7555FU_projecaator_replace_LV-LP17_projector_lamp

  • Loosen the two screws holding the lamp cover in place. Place the cover aside.
  • Loosen the two screws on the with a screwdriver and pull out the Canon LV-LP17 (9015A001) projector lamp assembly by using the built in handle.
  • NOTE: The used LV-LP17 projector lamp contains mercury and should be properly recycled. Don’t throw it into regular garbage.
  • Pulling too quickly can cause the bulb to shatter. Learn how to clean up a broken lamp.
  • Replace the lamp assembly with a new Canon LV-LP17. Be careful not to touch the actual bulb as oil from your fingers can leave black marks on the lamp.
  • Tighten the two screws on the lamp.
  • Put back the lamp cover and tighten its two screws.
  • Connect the AC power cord to the Canon LV-7555FU projector and turn on the projector to reset the lamp timer.


Resetting the lamp timer counter

After replacing the Canon LV-LP13 (7670A001) projector lamp, you’ll need to turn off the LAMP REPLACE indicator by resetting the LAMP REPLACE COUNTER. The counter tracks the number of hours the Canon LV-7555FU projector lamp has been used and triggers the warning light when the projector lamp is reaching its end of life. Not resetting it after may stop your projector from turning back on.

Canon_LV-7555FU_reset_LV-LP17_projector_lamp_timer

  • Turn the projector on and press the MENU.
  • The On-Screen menu will be displayed on the left.
  • Using the arrow buttons, mover the red frame pointer to the SETTING menu icon.
  • Press the up/down buttons, move to the LAMP COUNTER option.
  • Press OK to open up as the RESET LAMP COUNTER box.
  • Click on the SET option to open a confirmation window.
  • The message “Lamp replace counter reset?” is displayed.
  • Click on YES.
  • Press OK.
  • The lamp hours will be reset to zero.

Tips for longer projector lamp life:

  • Avoid frequent on and offs to avoid power surges.
  • Don’t let the projector overheat as this puts stress on the lamp. Make sure there is enough airflow around the projector particularly if it’s been permanently mounted.
  • Let the projector stand unused for at least one hour ever 24 hours. An average use of four to five hours per day will ensure longer lamp life.
  • Keep the air filters clean and free of dust so it can do its job and keep the projector lamp for overheating. so on your Using “Eco mode” or “Lamp Economy Mode” can reduces lamp brightness by 20% while extending the lamp life by 50%.
  • Learn more with Top tips for extending projector lamp life.

Replacing just the bulb

 Canon_Bare_Lamp_Replacement_Video

If you would like to save some money try replacing only the Canon LV-LP17 bare lamp rather than the entire lamp unit. You recycle the plastic cage and reduce waste. Watch our Canon LV-LP17 replacement video to learn how.

Tagged with: , , ,

optoma_DSV0502_projector_BLFU180A_projector_lampDon’t panic when its time to replace the Optoma DSV0502 projector lamp. Let our guide help you.

Buy the right projector lamp!

Be ready to replace the Optoma DSV0502 projector lamp by purchasing an authentic lamp with the seal of approval.

Six good reasons to avoid copycat lamps:

Generic projector lamps have six main problems:

When the Optoma BL-FU180A (SP.82G01.001) projector lamp is approaching it’s end of life, you may  see the following signs:

  • A screen that is gradually dimming or deteriorating.
  • Colour in the image appears dark or off colour.
  • Lamp light flashing a steady orange.

A replacement warning message also appears on screen. Replace the projector lamp immediately. If you leave the lamp too long it may explode inside the projector. Learn how to properly clean up a broken lamp.

Optoma_DS305R_replace_lamp_warning_optoma_BL-FU180A_projector_lamp

Replace the Optoma BL-FU180A projector lamp

Follow these important safety steps before installing a new Optoma BL-FU180A (SP.82G01.001):

  • These lamps contains mercury and should be properly recycled. Don’t throw it into regular garbage.
  • Switch off the power to the Optoma DSV0502 projector by pressing the Power/Standby button.
  • Disconnect the power cord.
  • Allow the projector to cool down for at least 30 minutes. so it is cool to the touch. Trying to change the projector lamp while the projectors is not cooled down can result in serious burns as these projectors operate using high heat.

Optoma_DSV0502_remove_cover_screws_BL-FU180A_projector_lamp


Place something soft underneath the Optoma DSV0502 before turning the projector onto it’s back. Remove the two screws holding the cover in place.

Optoma_DSV0502_remove_cover_BL-FU180A_projector_lamp


Push the cover up to remove it.

Optoma_DSV0502_remove_lamp_screws_BL-FU180A_projector_lamp

Remove the two screws holding the Optoma BL-FU180A (SP.82G01.001) lamp module in place.

Lift up the wire handle and slowly put out the old projector lamp. Be careful not to bang the lamp against the projector as this may case the bulb to break. NOTE: The Optoma BL-FU180A (SP.82G01.001) projector lamp contains mercury and should not be thrown into regular garbage. Recycle this lamp.

Optoma_DSV0502_insert_new_BL-FU180A_lamp

Remove the Optoma BL-FU180A (SP.82G01.001) projector lamp from its packaging and using the wire handle, place it into the Optoma DSV0502 projector. Tighten the two screws on the lamp. Replace the lamp cover and tighten its two screws.

You must now reset the Lamp Replacement Timer.

Reset the lamp timing on the Optoma DSV0502

In order to track the lamp life, the Optoma DSV0502 projector has an automatic lamp timer that triggers the lamp replacement warning. You need to reset the timer each time the lamp is replaced.

Optoma_DSV0502_reset_lamp_timer_optoma_BL-FU180A_lamp

  • Press the Menu option on either the remote or on the projector.
  • Scroll over the Lamp Setting. Press Enter.
  • Select Reset Lamp Hours. Press Yes
  • The lamp hours is reset to zero.
  • You can also used this screen to set ECO mode and turn off the lamp reminder message (not recommended to do).

Tips for a Optoma BL-FU180A (SP.82G01.001) projector lamp longer life:

  • Turning on the Eco Mode to lower power consumption and extend the lamp life by 130%.
  • Keep your air filters clean to avoid overheating the projector.
  • Turn off the Optoma DSV0502 and let it stand for at least one hour ever 24 hours.
  • Make sure there is enough airflow around the projector particularly if it’s been permanently mounted.
  • Top tips for extending DLP projector lamp life

Tagged with: , ,

4K_ultraHD_home_theatersBring your home theater to a new level with an HDTV antenna. It brings the full impact of HD to your screen.

Even with one of the newer 4K TVs you may not be seeing all the amazing visuals due to the way HD is being broadcast into your home.

Compressed signals

Most local TV stations continue to broadcast using SD (standard-definition), currently the industry standard. They will break away from that to broadcast special events (such as the Super Bowl or the Oscars) in high-definition. Even then we are not getting the full effect due to the delivery method of cable or satellite. In order to get a signal through cable or satellite it is compressed. The instant an image is compressed it get softened and all the HD qualities we were after are gone. Many people are switching to an HDTV antenna that pulls the image over-the-air (OTA). OTA images are crisper and clearer because they are never compressed in the first place.

No blackouts

Wondering why you can’t get certain channels or watch certain games. It’s not the signal but the various contracts and agreements made between cable and satellite providers to create blackout periods. An HDTV antenna doesn’t discriminate. OTA programs are free and can’t be blacked out. With the right HDTV antenna and location you can have great reception and received out-of-town channels with programs not blacked-out.

HDTV_antenna_home_theatreNew breed

HDTV antenna have come a long way since the days of rabbit ears on the TV or aluminium skeletons on the roof. HDTV antennas are thin, lightweight and unobtrusive usually with a flat rectangular design that can be installed flat, upright or mounted on the wall.

You’ll want an antenna able to handle both VHF and UHF signals since Digital TV signals are broadcast in two different frequencies:

  • VHF (Very High Frequency) are the low-band channels 2 through 13
  • UHF (Ultra High Frequency) are the high band channels 14 and up.

New antennas

Omni-directional with a multi-directional antenna can receive signals from all directions and often provide better reception. You will want a multi-directional antenna if have a lot of obstacles in your area. If you live far away from the transmitter but in relatively flat terrain, an uni-directional antenna picks up signals from greater distances in only one direction with little interference. If the signal is very weak boost the signal with an amplified antenna.

Indoor vs. outdoor antennas

Outdoor antenna are always going to work better than indoor antenna simply because there are fewer obstacles. Indoors you are restricted to the height of your tallest wall, which may not be high enough to be above outdoor bushes and trees. This could result in dropouts when the wind blows. There may also be interference from computers, cordless phone and other WiFi devices.

Where to aim

Before choosing your antenna, you’ll need to know the distance and direction of your local TV station transmitter. Mountains, rocky terrain and even tall skyscrapers can block transmissions while the farther away you are, the stronger your signal needs to be.

Check out these online services that let you find channels and transmitter in your area.


Tips for older models

Any HDTV bought after 2007 has a built-in tuner for receiving OTA broadcasts. Older TVs that still receive analog signals will need a separate HDTV tuner. Often your satellite service come with a built in OTA HD tuner which means you lose your digital signal if you disconnect your service. Instead you can install your own Digital ATSC Converter Box  that lets you analog to digital with easy HDMI connections. Lutema sells a reasonably priced converter that works with most TV sets.

Resources

Check out the community forums to help you with your HDTV antenna:

It takes a bit of work to set-up and find the perfect location but receiving a crystal-clear high-definition picture with no cable charges is worth in the end.


Tagged with:

Sanyo PLV-Z1C Projector_lampChanging the Sanyo PLV-Z1C projector lamp is simple when you understand the technology.

NOTE: This guide is also compatible with the Sanyo LP-Z1 (K) projector.

Authentic projector lamps are the way to go

Invest in an authentic Sanyo PLV-Z1C projector lamp. It’s the best insurance you can have to keep your Sanyo PLV-Z1C projector working. Avoid the temptation to buy a cheaper priced lamp online from popular sites. These bargain lamps are usually counterfeit lamps created with inferior parts that can damage your projector.

They may end up costing you more in the long run. Authentic projector lamps have been manufactured with reliable parts that work with the sensitive mechanisms in your Sanyo PLV-Z1C projector. These authentic projector lamps come with a guarantee and won’t make your projector’s warranty invalid.

When it’s time to change your projector lamp on your Sanyo PLV-Z1C projector, you’ll notice the yellow light blinking on the Lamp Indicator found on the top control panel. Buy a Sanyo POA-LMP54 (service parts no 610 302 5933) lamp replacement.

Instructions for projector lamp replacement

Remove Lamp Cover on Sanyo PLV-Z1C Projector_lamp1. Turn off the projector and unplug the AC cord.Allow the Sanyo PLV-Z1C projector to cool for at least 45 minutes. Don’t open the projector until it is cool to the touch. These projectors operate under high temperatures.

2. Place the Sanyo PLV-Z1C on something soft and turn it upside down. Loosen the screw holding the lamp cover in place (found over top of the ventilation holes).

Replace POA-LMP54 in Sanyo PLV-Z1C Projector_lamp3. Loosen the two screws keeping the Sanyo POA-LMP54 (610 302 5933) lamp in place. Grab the handle on the projector lamp cage and gently remove the lamp. Place to one side. Your old projector lamp should be properly recycled. These lamps contain mercury and can’t be placed into regular garbage.

4. Take the new Sanyo POA-LMP54 (6103025933) projector lamp cage by the handle and gently maneuver it into place. Avoid touching the glass or the bulb since the oil from your fingers may cause black spots on the bulb when the projector heats up. The lamp should slide in easily – don’t force it.

5. Tighten the two screws on the Lamp Assembly for the Sanyo POA-LMP54 (610 302 5933).

6. Replace and tighten the three screws on either side of Lamp Hazard Cover. Let the projector stand for five minutes so the projector lamp can stabilize. Re-connect the power cord and turn on the Sanyo PLV-Z1C projector. You’ll need to reset the Lamp Counter.

RESETTING THE Sanyo PLV-Z1C LAMP CONTROL MODE

Reset the Lamp Control Mode only when Sanyo POA-LMP54 (service parts no 610 302 5933) projector lamp has been replaced. Do not operate the projectors while any of the lamps are removed as this may result in malfunctions, fire hazard and other accidents.

Reset Lamp Screen for Sanyo PLV-Z1 Projector_lamp

  • Turn the Sanyo PLV-Z1C projector on. Press the Menu option to display the On-Screen Menu. Scroll down to the Setting option.
  • Select Lamp Control.
  • A second screen will appear.
  • Second Lamp Reset Screen for Sanyo PLV-Z1C Projector_lamp
  • Press Point left/right button(s) to move to move the red frame pointer to Lamp counter reset.
  • Press the Select button.
  • Another confirmation dialog box appears, select YES.
  • The Lamp box will disappear and the Lamp Replace Dialog box appears.
  • Select YES to reset Lamp Replace Counter.

Make your new Sanyo POA-LMP54 projector lamp last longer

To maintain the life of your newly installed Sanyo POA-LMP54 (610 302 5933), wait at least five minutes before turning the Sanyo PLV-Z1C projector off. Don’t operate the projector continuously without letting it stand for at least one hour turned off every 24 hours. Regular cleaning of the air filter will also prolong lamp life.

Sanyo_lamp_bulb_replacement_Sanyo_ PLV-Z1C _projector_lamp

Looking for a less expensive option? Want more information? Watch our step-by-step video on replacing only the Sanyo POA-LMP54 (service parts no 610 302 5933) bulb instead of the entire lamp housing.


Tagged with: , ,

Eiki LC-SX4U_POA_LMP39_projector_lampYou can replace the Eiki LC-SX4U projector lamp in three easy steps using our handy step-by-step guide.

The Eiki LC-SX4L is equipped with two projection lamps for a brighter image. It’s recommended that you change both the Eiki LC-SX4U projector lamp at the same time as well as the air filter. Invest in an authentic Eiki LC-SX4U projector lamp.

Step 1: Knowing when to replace

Knowing when to replace your Eiki POA-LMP39 projector lamp and watching for end-of-life signs is your first step to keeping your projector working. The Eiki LC-SX4U is able to detect lamp life and switch between the two. Check the number of lamps being used on the Lamp Status and started by understanding the lamp mode.

Lamp Mode Changeover: Lamp Management Function automatically changes the combination of lighting lamp (Lamp Mode) by detecting the status of each lamp. When any of the two lamps goes out, Lamp Mode is changed over from 2 lamps to 1 lamp. Lamp Mode can be switched to 2 lamps or 1 lamp manually. Check the number of lamps being used on the Lamp Status.

Lamp Status

Eiki_SX4U_Eiki_POA-LMP39_projector_lamp_modeThe Lamp Management Function detects the status of bots lamps and displays it on screen. The lamp status is also displayed for 5 seconds when the projector is turned on. The LAMP REPLACE indicator lights yellow when either lamp is nearing end of life.

On screen status:

  • ON: Yellow lamp on screen: Lamps are functioning normally.
  • OFF: Dim Lamp: Lamp is turned off and not in use.
  • NEAR END: Red lamp: Projection Lamp is nearing its end. When image becomes darker or color becomes unnatural, replace lamp. (The Lamp replace light on the projector lights yellow at the same time.
  • OUT: X Mark on lamp: The lamp has reached its end of life and fails to turn on. It may also be defective. Replace lamp corresponding with number marked X.

Find this lamp sold on Amazon by these authorized dealers:

Step 2: Buying the right projector lamp

Always install an authentic projector lamp in your Eiki LC-SX4U to keep it working properly. Look for the seal of approval before buying Eiki POA-LMP39 projector lsmp.

Six good reasons to avoid cheaper, knock-off generics lamps:

Go with original OEM projector lamps and keep your Eiki LC-SX4U projector working!

Eiki-SX4U_Eiki_POA-LMP39_projector_lamp_remove_coverStep 3: Replacing the Eiki POA-LMP39 projector lamp

Follow these important safety steps before replacing the Eiki POA-LMP39 projector lamp.

  • The Eiki LC-SX4L projector operates under very high temperatures. Let it cool for one full hour before attempting to replace the lamp in order to avoid being burned.
  • Turn off the projector by pressing the power button. Wait for the light to stop flashing.
  • Turn off the power switch at the back on the projector
  • Unplug any power cords.

NOTE: To maintain quality of picture (better balance of color and brightness in entire screen), replacing both lamps at the same time.

Eiki_SX4U_Eiki_POA-LMP39_remove_projector_lamp

Loosen the three screws on Lamp Cover and remove Lamp Cover.


Eiki_SX4U_Eiki_POA-LMP39_replace_lamp

  • Loosen the 2 screws. Using the wire handle and pull out the projector lamp. Pulling too quickly can cause the bulb to shatter. Learn what to do should the bulb shatter.
  • Replace the Lamp Assembly. NOTE: The Eiki POA-LMP39 projector lamp  contains mercury and should be properly recycled. Don’t place it into regular garbage.
  • Make sure that Lamp Assembly is set properly. Tighten the 2 screws on the new projector lamp.
  • Replace Lamp Cover and tighten 3 screws. Connect AC Power Cord to a projector and turn projector on.
  • Reset Lamp Replacement Counter.

Reset lamp counter

Eiki_-LC-SX4U_Eiki_POA-LMP39_reset_projector_lamp_timer

  • When the Lamp Replace Counter is reset, the LAMP REPLACE indicator stops lighting.
  • Turn projector on, press MENU button and ON-SCREEN MENU will appear.
  • Press POINT LEFT/RIGHT button(s) to move the red frame pointer to SETTING Menu icon. Press POINT DOWN button to move a red frame pointer to “Lamp counter reset.”
  • Press SELECT button.
  • Move arrow to select either Lamp 1 or Lamp 2. Press SELECT button.

Eiki_LC-SX4U_Eiki_POA-LMP39_reset_projector_lamp_timer_2

  • Message “Lamp replace counter Reset?” is displayed.
  • Move pointer to YES and then press SELECT button.
  • NOTE: Be sure to reset correct lamp number otherwise LAMP REPLACE indicator continues lighting.
  • Another confirmation dialog box appears and select YES to reset Lamp Replace Counter.
  • Do not reset Lamp Replace Counter except after Projection lamp is replaced.

Extend the life of the Eiki POA-LMP39 projector lamp

Get more hours from your Eiki POA-LMP39 projector lamp by following these maintenance tips:

  • Keep your air filters clean to avoid overheating the projector.
  • Turn off the Eiki LC-SX4U projector and let it stand unused for at least one hour ever 24 hours. An average use of four to five hours per day will ensure longer lamp life.
  • Make sure there is enough airflow around the projector particularly if it’s been permanently mounted.
  • Learn more with Top tips for extending DLP projector lamp life.
  • Press the MENU button to exit.

Save money, go green

Video_Changing_Lamp_for_Eiki_SX4LALooking for a green alternative? Try replacing only the bulb and re-using the same plastic cage.

Watch this how to video guide to learn more.


Tagged with: , , ,

NEC_M260XSG_NEC_NP15LP_projector_lampWhen it’s time to replace the NEC M260XSG projector lamp consult this handy guide.

End of projector lamp signs

When the NEC M260XSG projector lamp is approaching end of life you will see the image go dark and the colours start to deteoriate. Watch for the lamp light on the projector to start flashing red well.  The on screen message will appear: LAMP HAS REACHED THE END OF ITS USABLE LIFE. PLEASE REPLACE THE LAMP AND FILTER.

Checking end of life with the NEC M260XSG projector lamp

NEC_M260XSG_check_NE_NP15LP_projector_lamp_usageTrack the life of the NEC NP15LP projector lamp with the usage time menu. The progress indicator shows the percentage of remaining bulb life:

  • Go to INFO menu
  • Scroll down to USAGE TIME to display the LAMP LIFE REMAINING and LAMP HOURS USED
  • When the lamp usage reaches 0, the Lamp Life REMAINING starts a count down from 100 hours
  • When the count down reaches 0, the projector will turn off and not turn on.

Buy authentic!

Why take a chance with buying a knock-off lamp when buying an authentic NEC NP15LP projector lamp will keep your NEC M260XSG projector working at its best. Generics projector lamps may appear to be a bargain with their cheaper price tag but they actually end up costing you more i the long run. They have been created using a toxic materials and prone to explosions with a shorter lamp life. Installing them often damages the sensitive electronics in your NEC M260XSG projector. NOTE: New air filters are shipped with the lamp and it’s recommended you replace them at the same time.

Find this lamp sold on Amazon by these authorized dealers:

Changing the NEC NP15LP projector lamp

Follow these important safety instructions before installing the new NEC NP15LP projector lamp

  • turn off the NEC M260XSG projector.
  • unplug the projector from its power source.
  • unplug the power cable.
  • wait until the projector is cool to the touch to avoid getting burned.

NEC_M260XSG_NEC_NP15LP_remove_projector_lamp_screwLoosen the NEC M260XSG projector lamp cover screw.

NEC_M260XSG_projector_NEC_NP16LP_remove_projector_lamp_coverPush and slide the lamp NEC M260XSG projector cover off.

Loosen the two screws holding the NEC NP15LP projector lamp in place. (The screws will not come out only loosen.) Remove the projector lamp by holding the indent and pulling up.NEC_NP M300X_remove_NEC_NP16LP_projector_lamp

NEC_M260XSG_remove_NEC_NP16LP_projector_lamp_screws

NOTE: Your NEC NP15LP projector lamp should be properly recycled. These lamps contain mercury and can’t be placed into common garbage.

NEC_M260XSG_projector_install_new_NEC_NP16LP_projector_lampInstall a new lamp housing into the NEC M260XSG projector lamp, gently pressing the lamp housing into the socket. Take care not to touch the actual bulb as your finger prints can leave oil marks that burn black marks onto the bulb.

NEC_M260XSG_projector_tighten_NEC_NP16LP_projector_lamp_screws

Push the top center on the projector lamp to secure it. Tighten the screw on the projector lamp.


NEC_M300X_projector_replace_projector_lamp_cover_NEC_NP16LPReattach the NEC M260XSG projector lamp cover by sliding the cover until it snaps into place. Tighten the screw on the lamp cover.

Replacing the filters

There are four filters in the NEC M260XSG projector:

  • Honeycomb hard filter – large and small
  • Accordion soft filter — large and small

Replace all four filters at the same time. Before replacing the filters wipe off any dust and dirt that came loose from the old filters. NOTE: The filters are made with two different types of material in the membrane. Both perform the same.


NEC_M260XSG_projector_NEC_NP16LP_projector_lamp_remove_air_filterPush the catch to release the NEC M260XSG filter and gently pull it out.


NEC_M260XSG_projector_NEC_NP16LP_projector_lamp_detach_filter_cover

The filter cover is fixed at six separate points in the projector. Bow the filter cover by pushing it slightly until it releases.

NEC_M260XSG_projector_NEC_NP16LP_projector_lamp_replace_dark_filtersRemove the dark sponge filter and clean the filter unit and cover. Attach the new non-woven white material filters.


NEC_M260XSG_projector_NEC_NP16LP_projector_lamp_replace_four_filters

  • Filter unit: Attach two honeycomb hard filters to the NEC M260XSG filter unit.
  • Filter cover: Attach the two accordion soft filters to the filter cover. Be sure to align the accordion slits with the protrusions of the filter cover.

NEC_M260XSG_projector_NEC_NP16LP_projector_lamp_attach_filter_cover


Attach the filter cover back to the filter unit. Align the filter until with the filter cover and push the protrusions into place. Make sure all the six mounting points are aligned properly.


NEC_M260XSG_projector_NEC_NP16LP_attach_filter

Insert the two catches of the top of the filter into the groove of the cabinet. Push the filter until it clicks into place.

Reset the lamp timer

Once the NEC NP15LP lamp and NEC M300X projector filter have both been replaced you will need to reset the timer for both. You want the projector to be able to accurately track the lamp life.

 NEC M260XSG projector_NEC_NP16LP_projector_lamp_timerClear usage hours and reset hours

  • Plug in the power cored into the wall outlet.
  • Turn on the projector.
  • From the MENU select RESET.
  • Choose CLEAR LAMP HOURS.
  • A confirmation message appears.
  • Select YES.

Reset the filter hours:

  • Scroll up to CLEAR Filter HOURS.
  • A second submenu will appear.
  • Select YES. Press the ENTER button.

Extending the life of the NEC NP15LP projector lamp

Get your newly installed NEC NP15LP projector lamp will last longer by choosing the ECO option. The ECO MODE increases lamp life by lowering the power consumption. There are three modes to choose from:

  • Auto Mode: 4000 hours
  • Normal: 5000 hours
  • Eco ModeL 8000 hours

Learn more tips to extend the life of the NEC NP15LP projector lamp.

Tagged with: , ,

Hitachi-CP-X505_Hitachi_DT00771_projector_lampIt’s not difficult to replace the Hitachi CP-X505 projector lamp. Keep reading to learn more.

First step: Buy authentic

If you want your projector to keep working working at its best be sure to install an authentic Hitachi CP-X505 projector lamp. You’ll need a Hitachi DT00771 CPX605 lamp. Look for the seal of approval and avoid generics. With their inferior parts, combined with a shorter life means counterfeit projector lamps cost you more in the end. Avoid exposure to the toxic materials and parts used to create the lamps and keep your warranty in place.

Find this lamp on Amazon sold by these authorized dealers:

Signs your projector lamp needs to be replaced:

  • Hitachi CP-X505 Lamp Indicator light will start flashing red.
  • Color tone on the screen may also appear weak or washed out.
  • Picture has poor colour quality.
  • You may notice the Hitachi DT00771 CPX605 starts to go dark after being used for long period of time. It does have a finite life and trying to force it to work beyond its normal life can damage your Hitachi CP-X505 projector.

Replace the projector lamp

Hitachi-CP-X505_Hitachi_DT00771_projector_lamp_cover_screwTurn the Hitachi CP-X505 projector off, and unplug the power cord. Allow the projector to cool for at least 45 minutes. It should be cool to the touch. This projector works using high heat and there is danger you can be burned.

NOTE:  If the projector is mounted on the ceiling, don’t stand underneath the projector while opening the cover.

Hitachi-CP-X505_Hitachi_DT00771_projector_lamp_remove_coverLoosen the screw on the lamp cover (marked with an X).  Slide the cover to off the projector and set it one side.

Hitachi-CP-X505_Hitachi_DT00771_projector_lamp_handlesLoosen the three screws holding the Hitachi DT00771 CPX605 projector lamp in place. Slowly pick up the projector lamp by its handle and pull out taking care not to bang the bulb on the side of the projector. If you do shatter the bulb, you will need take time to properly clean the projector. Learn how to clean up a broken lamp.

NOTE: The Hitachi DT00771 projector lamp contains mercury and should be properly recycled. Don’t place it into regular garbage.

Finish the installation:

  • Insert the new Hitachi DT00771 CPX605 projector lamp making sure to line it up properly and tighten the three lamp screws.
  • Slide the cover back onto the projector, lock it in place and fasten the screw.
  • Turn on the projector and set the lamp time:

To reset the lamp timer:

Hitachi_DT00771_reset_lamp_timerNote: Reset the projector lamp time only when you have replaced the lamp so the Hitachi CP-X505 projector can properly track the lamp life. Otherwise you run the risk of using the lamp beyond its lamp life.

Press the MENU button

  • Scroll down to the GO TO ADVANCED MENU option. Press ENTER
  • Scroll down to the OPTION menu in the left column and press ENTER.
  • Scroll down to LAMP TIME. Press ENTER To make a dialogue field appear
  • Scroll up to the RESET option on the dialogue box.
  • The lamp setting will be set to zero.

Get more hours from your Hitachi DT00771 CPX605 by keeping your air filters clean to avoid overheating the projector. Learn more with Top tips for extending DLP projector lamp life.

Go green, save money

Hitachi_Replace_BulbIf you are looking for a green alternative, why not consider changing only the bulb and leaving the housing for the bulb. Our training video shows you how simple it is.


Tagged with: , ,

Vivitek_H1081_projector_Vivitek_5811116206_projector_lampOur guide shows you how to replace Vivitek H1082 projector lamp in three easy steps.

Check your hours

Check the Vivitek H1082 projector lamp life if you notice the picture becoming distorted or the Power LED flashing 5 times consecutively. To check the lamp hours:

  • Press the Menu button to open the OSD menu.
  • Press left/right arrow keys to move button to move to the STATUS Menu.
  • The LAMP HOUR field displays the number of hours the lamp has been in use.
  • You can expect 2000 hours lamp life. 3000 hours if Eco Mode has been turned on.

Buy the right projector lamp!

Your Vivitek H1082 projector uses the Vivitek 5811116206-S projector lamp. Be sure the purchase an authentic projector lamp and avoid the temptation of a generic lamps with their seemingly great bargain prices. There are several problems associated with generics that you want to avoid:

Save yourself hassle and go an authentic Vivitek 5811116206-S projector lamp.

Replace the 5811116206-S projector lamp

Before changing the Vivitek 5811116206-S projector lamp:

  • Reduce the risk of electrical shock by disconnecting the power cord on the Vivitek H1082 projector.
  • Reduce the risk of severe burns by allowing the projector to cool for at least 45 minutes.

Vivitek_H1082_projector_remove_cover_Screws_Vivitek_5811116206_projector_lamp

  • Turn the projector around to locate the lamp cover screw. Remove the captive screw holding the lamp cover place.

Vivitek_H1082_projector_remove_lamp_cover_Vivitek_5811116206_projector_lamp

  • Gently slide off the lamp cover and place it to one side. You will need to re-install the cover before turning on the Vivitek H1082 projector again.

Vivitek_H1082_projector_remove_lamp_screws_Vivitek_5811116206_projector_lamp

Vivitek_H1082_projector_remove_Vivitek_5811116206_projector_lamp

NOTE: The 5811116206-S projector lamp contains mercury and should not be thrown into regular garbage. Recycle your used lamps!

Vivitek_H1082_projector_install_Vivitek_5811116206_projector_lamp

  • Lift up the wire handle on the new Vivitek 5811116206-S projector lamp and gently guide it into the H1082 projector.
  • Take care not to touch the actual bulb as the oil from your fingers will smudges that will burn into a black spots when the projector heats up.
  • Tighten the lamp screw.
  • Re-install the H1082 lamp cover and tighten the screw.
  • Reset the total lamp hour timer.

Resetting the Lamp Hour Timer

It’s important to only reset the lamp timer when the Vivitek 5811116206-S projector lamp has been replaced. Resetting the lamp timer without changing the lamp can make it work beyond its recommended hours and cause harm to your Vivitek H1082 projector.

  • Press the Menu button to open the OSD menu.
  • Press left/right arrow keys to move to the Setup menu.
  • Press up/down arrows to move to the Advanced menu
  • Press Enter.
  • Press the cursor up/down arrows button to Lamp Hour Reset.
  • Press Enter.
  • A message will appear saying the Lamp Hour has been reset to zero.
  • Press the Menu button to return to the main Setup menu.

Extending the life of the Vivitek 5811116206-S projector lamp:

  • Keep your air filters clean to avoid overheating the projector.
  • Use the Lamp Power option on the Vivitek H1082 projector and set to Eco Mode to reduce the amount of power used but extend lamp life.
  • Learn more with Top tips for extending DLP projector lamp life.


Tagged with: , ,
Join the discussion on Facebook! All your questions, answered! The Screen & Projector Group