We're now Screen and Projector! For updated content, visit ScreenAndProjector.com and follow @screenandproj on social media!

Publishing more content does not automatically create better results. The strongest sites usually work from an editorial plan that connects audience needs, business priorities, and realistic publishing frequency.

A practical way to improve performance is to focus on evergreen resources and continuously refine them over time. Many of the strongest examples of content marketing succeed because they answer recurring questions clearly and remain useful well beyond the publication date.

When teams combine research, internal expertise, and simple performance analysis, they usually produce fewer weak pages and more articles that attract links, rankings, and repeat visits over time.

Validation reference: bbv-validation-364275

cybermonday-BlackfridayBlack Friday is not the only day for great deals. There are other options.

Too much turkey leaving you unmotivated for Black Friday madness?  No worries. There are still some great deals out there, if you know when and where to look.


Online deals continue

It’s become a tradition for retailers roll over the bargains into the weekend for Small Business Saturday into Cyber Monday. Many retailers are starting the Black Friday sales at the beginning of the week. So there is time to shop around and not feel pressured to buy immediately. Try the local stores that offer special sales throughout the weekend You may be able to find an even better bargain. The big retailers know that to stay competitive they have to offer the same deals. Be an online deal-hunter.

Cyber Monday is the day for certain items

For many items, you’ll see deeper discounts on Cyber Mondays. According to Adobe data, electronics are 18% discounted on Cyber Monday without the same out-of-stock problems that occur on Black Friday. Same for clothing. Many online apparel stores do bigger discounts on Cyber Monday than on Black Friday. Sometimes they have loss leaders of up to 45% off. Toys are also discounted on this day but there may be a problem with stock running low.

Big Electronics aren’t on sale

Those big tickets items aren’t going to be on sale on Black Friday so the HDTV or new high-res camera is not going to there for you to buy. Be patient. There will be a better deal on the big ticket item. Lurk on your favorite website on Cyber Monday and you just may get a deal. Black Friday is not the day to be shopping with the other hoards looking for smaller electronics. A lot of “door-buster” electronic sales aren’t that great and are inferior products and often that one great deal is there to lure you into buying more stuff. Save your money, do your research and hold out for the sale on that big ticket item.

Get better returns on another day

Black Friday purchases often come with a different return policy or you may be charged a restocking fee. Sometimes when you pay cash can delay the return. It’s hard to think straight when you are rushed to purchase so if you do buy something on Black Friday use your credit card to make returns easier and check if your card has sale price protection. This is a service that gets you a refund if the item you bought suddenly gets further discounted within a few days of your purchase.

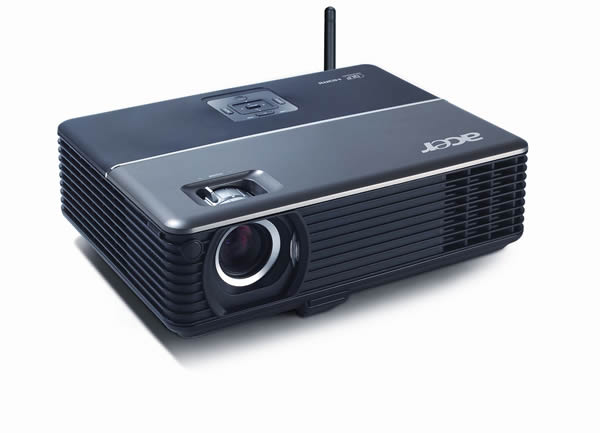
acer_wireless_projectorShould you go with a wireless projector? Read about the pros and cons before making your decision.

More and more projectors are going wireless and getting free of any cable connection. A wireless connection to the image source can give you some flexibility but there are still some challenges.

Advantages

There are definitely some advantages to going wireless and they include:

  • Without the need of a cable connecting it to the source, you have more flexibility of location.
  • The projector is easier to install.
  • There is a tidier look without cables.
  • No signal loss over longer distances.
  • Easier to switch between multiple PCs or MACS. This can be ideal in a business setting where there is more than one presenter.
  • Presenters can move around the room since they don’t need to be close to the projector.

Disadvantanges

While the technology is rapidly gathering momentum in the projector marketplace, there are still some significant drawbacks to wireless projectors that include:

  • Projectors are limited to the bandwidth offered by the connection. A weak signal means a delay between the projector and source.
  • There is always going to be a slight delay as the projector first waits for the wireless signal and then interprets it. While this won’t effect straightforward presentations, animated images will be effected and make appear to be out of synch.
  • Full motion video can’t be shown in real time. This can be a major drawback in educational or artistic presentations.
  • If your signal is extremely weak or fluctuates you may need to install a wireless USB WiFi dongle.
  • You may need to go with a different brand altogether. Epson is now selling a WiDi projector, which has the projector connected to the Epson WiDi Transmitter eliminating any transmission delays.
  • You will need to encrypt the signal for security reasons. You usually choose 64-bit or 128-bit encryption. This is going to also slow down the display refresh as the laptop and projector have to do more work to encode and decode the signal.
  • Wireless Animation and video are greatly limited by bandwidth on business or educational projectors but now present for home cinema projectors producing reliable 1080p resolution video.

As the market continues to grow and expand, many of these issues are sure to be addressed. Is wireless for you or are you going to wait?

Tagged with: , ,

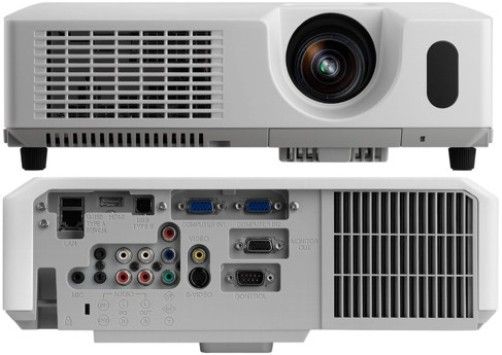
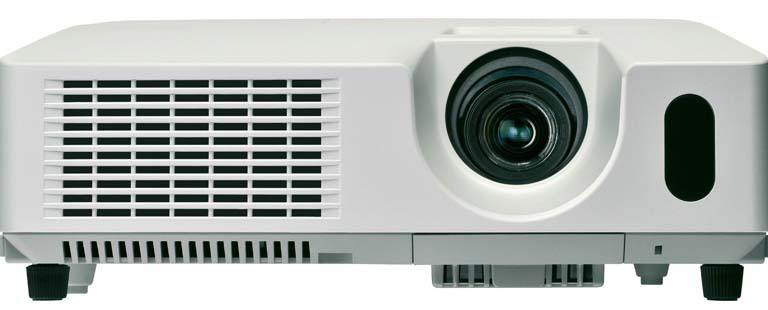
Hitachi CP-X4014WN projector

Here’s how to replace the Hitachi CP-X2510 projector lamp

Keep your projector working at its best by installing a genuine Hitachi CP-X2510 projector lamp. Your Hitachi CP-X2510 projector uses the Hitachi DT01021 projector lamp. Only an OEM authentic replacement projector lamp will keep your projector working.

Tracking Hitachi CP-X2510 projector lamp

Keep track of the Hitachi CP-X2510 projector lamp life so you’ll know when to replace the projector lamp. Watch for these signs that indicated the projector lamp is reaching its end of life:

  • The Power and Lamp Indicators will begin blinking.
  • Color tone on the screen may also appear weak or washed out.
  • Picture has poor color quality.

Install the replacement projector lamp

Before installing the replacement Hitachi DT01021 follow these important safety tips:

  • Turn off the Hitachi CP-X2510 projector.
  • Unplug the power cord.
  • Allow the projector to cool for at least 45 minutes. It should be cool to the touch. This projector works using high heat and there is danger you can be burned.
  • NOTE: If the projector is mounted on the ceiling, don’t stand underneath the projector while opening the cover.

Hitachi_CP-X2510_projector_lamp_Hitachi_DT01021_cover

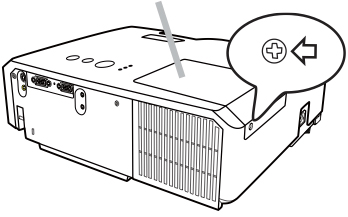
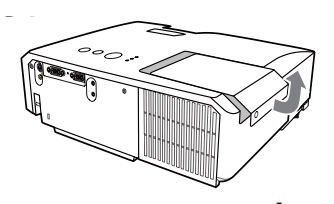
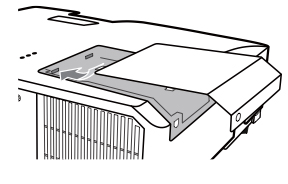
  • Loosen the screw (marked by arrow) of the lamp cover and then slide the lamp cover to the side to remove it.
  • Hitachi_CP-X2510_projector_lamp_Hitachi_DT01021_remove_cover
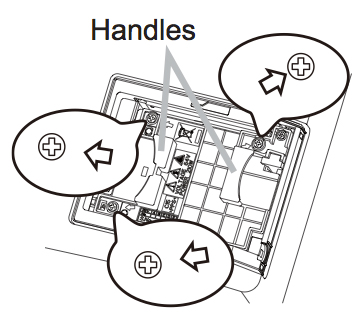
  • Loosen the 3 screws (marked by arrow) of the projector lamp, and slowly pick up the lamp by the handles. Be careful not the bang the lamp.

NOTE: The Hitachi DT01021 projector lamp contains mercury and must be recycled properly. Do not throw it in regular garbage.

Hitachi_CP-x2510_Install_projector_lamp_Hitachi_DT01021_remove

  • Insert the new lamp, taking care not to touch the actual bulb. Oil in your fingers will cause a dark spot on the lamp when it heats up.
  • Tighten the 3 screws of the Hitachi DT01021 projector lamp that were loosened to remove the old projector lamp.
  • Hitachi_CP-X2510_projector_lamp_cover_install
  • Slide the lamp cover back in place and firmly fasten the screw of the lamp cover.
  • Turn on the projector and set the lamp timer

To reset the projector lamp timer:

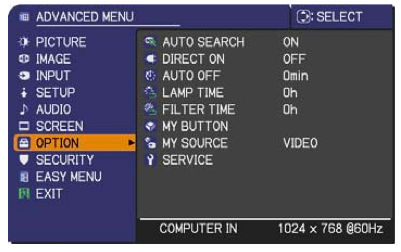
Reset the projector lamp time only when you have replaced the lamp so the Hitachi CP-X2510 projector can properly track the lamp life. Otherwise you run the risk of using the lamp beyond its lamp life. Hitachi_CP-X2510_reset_lamp_timer_hitachi_DT01021

  • Press the MENU button
  • Scroll down to the GO TO ADVANCED MENU option. Press ENTER
  • Scroll down to the OPTION menu in the left column and press ENTER.
  • Scroll down to LAMP TIME. Press ENTER To make a dialogue field appear
  • Scroll up to the RESET option on the dialogue box.
  • The lamp setting will be set to zero.

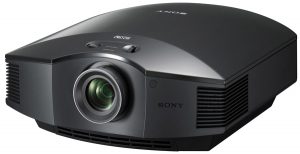
VPL-GH10_projectorHow to replace the Sony VPL-GH10 projector lamp

Our guide shows you how to install a replacement Sony VPL-GH10 projector lamp with easy step-by-step instructions.

Buy authentic

Don’t settle for anything but the best for your Sony VPL-GH10 projector and install an authentic projector lamp. Don’t get caught with a counterfeit lamp. Keep your projector working properly and invest in an authentic projector lamp.

Find this lamp on Amazon from these authorized dealers:

When to replace?

When the this Sony VPL-GH10 projector lamp projector lamp is reaching end of life, the Lamp light will flash red in 3 second intervals. The message “Please replace the Lamp/Filter” will also start flashing on screen. If the projector lamp dims change it immediately. Sony recommends replacing the air filter at the same as replacing the lamp.

Replacing the Sony VPL-GH10 Lamp and Air Filter

Sony_VPL-GH10_Sony_LMP-H201_projector_lampBefore installations preparations:

  • Unplug the AC power cord on the Sony VPL-GH10 projector.
  • Your Sony VPL-GH10 projector uses the Sony LMP-H201 projector lamp. Before installing the lamp, let the projector cool for at least 40 minutes. It should be cool to the touch. Don’t rush the cooling as these projectors operate using extremely high temperatures and you run the risk of a serious burn.
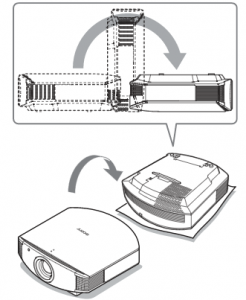
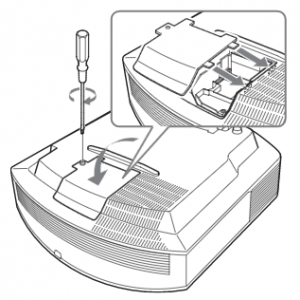
  • The projector lamp cover is on the bottom of the projector so you will need to turn it over. Put down a soft cloth on a flat surface to prevent the projector getting scratched. Turn the projector over gently. Don’t lean on the projector and make sure the surface is flat and stable.
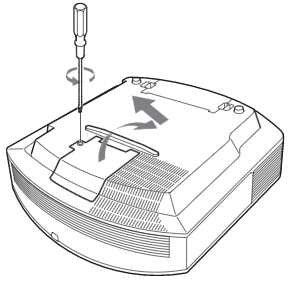
  • Using a Philips screwdriver, loosen the screw holding the projector lamp cover in place. Slide the projector lamp cover. Put it to one side.

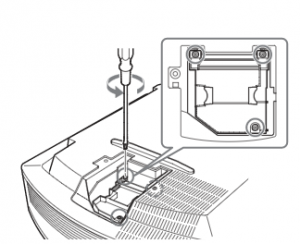
Sony_VPL-GH10_Sony_LMP-H201_remove_projector_lamp_screwLoosen the 3 screws on the Sony LMP-H201 lamp using a Phillips screwdriver. Grab the wire handle on the Sony LMP-H201 projector lamp and gently pull the lamp straight out. Take care not to bang the lamp as you can cause the bulb to break.

NOTE: The Sony LMP-H201 projector lamp contains mercury and should not be thrown into regular garbage. Recycle this lamp!

Sony_VPL-GH10_Sony_LMP-H201_remove_projector_lamp

To finish the projector lamp installation:

  • Remove the packaging from the new Sony LMP-H201 projector lamp.
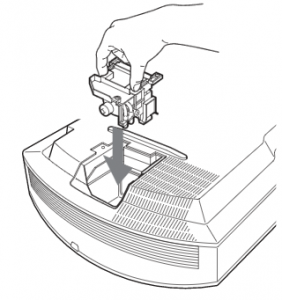
  • Lift up the handle and slowly lower the Sony LMP-H201 projector lamp into the projector.Sony_VPL-GH10_insert_Sony_LMP-H201_projector_lamp
  • Push it in securely until it reaches the end.
  • Tighten the three screws on the lamp.
  • Also don’t touch the actual bulb in the new lamp as oily fingerprints can burn a black spot on the lamp when it heats up.
  • Slide the lamp cover back onto the Sony VPL-GH10 projector.
  • Close the projector lamp cover and tighten the screws.
    Remember to install the lamp cover properly as the projector will not turn on if the cover is loose or not installed correctly.

Replacing the Sony VPL-GH10 air filter

201_remove_projector_lamp_aor_filter

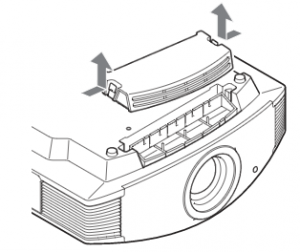
  • Remove the filter holder. The air filter will be inside the holder. Don’t touch the fan inside as this can damage the projector.
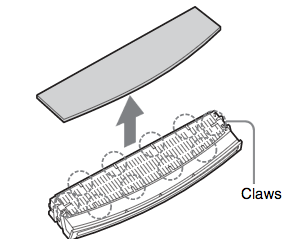
  • Remove the old Sony VPL-GH10 filter and put it to one side. Attach the new air filter so that is fits into the 10 claws properly on the holder.Sony_VPL-GH10_Sony_LMP-H201_remove_projector_lamp_cover
  • Aligning the air filter with the shape of the filter holder will make it easier to install.
  • Be sure to put the air filter holder back into the projector aligned up properly. If not, the projector will not turn back on!
  • Wipe off any dust from the ventilation intake holes using a soft cloth. Put the projector back in its original position

Resetting the Sony VPL-GH10 projector lamp timer

Sony_VPL-GH10_Sony_LMP-H201_rese

  • To reset the projector lamp timer, plug the AC power cord back into Sony VPL-GH10 projector.
  • Using the remote, scroll down to the Setup Menu.
  • Press Enter.

Sony_VPL-GH10_Sony_LMP-H201_reset_projector_lamp_timer

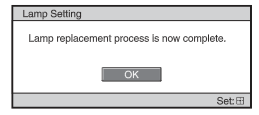
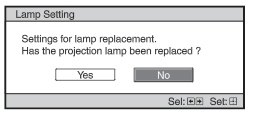
  • A Lamp Setting message will appear asking you if the projector lamp has been replaced.
  • Click on Yes.
  • You will see a confirmation message and the Projector Lamp Timer will be automatically reset to zero.
  • See the number of hours left on your lamp by going to the Information Menu

You can extend the life of the Sony LMP-H201 projector lamp by always making sure the filter is clean and there is enough airflow around the projector. Learn how to get a longer projector lamp life with top tips for extending DLP projector lamp life.

4 reasons to avoid counterfeit lamps:

Tagged with: , ,

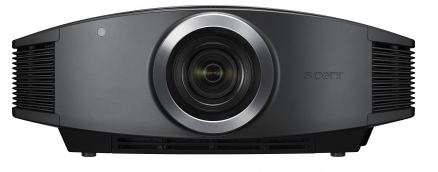
Sony-vplhw20_projector

Our guide shows you how easy it is to replace the Sony VPL-HW20 projector lamp!

Buy authentic

Don’t settle for anything but the best. Buy an authentic  for your Sony VPL-HW20 projector lamp. When buying look for the seal of approval — don’t get caught with a counterfeit lamp. They have shorter lamp and are more toxic due to the substitute materials used by counterfeit manufacturers. These lamps often don’t work properly with the sensitive electronics in your projector and are prone to explosions. Keep your projector working properly and invest in an authentic projector lamp.

Don’t settle for anything but the best for your Sony VPL-HW20 projector and install an authentic projector lamp. Don’t get caught with a counterfeit lamp. Keep your projector working properly and invest in an authentic projector lamp.

Buy this lamp on Amazon from the following verified manufacturers:

When to replace?

When the this Sony VPL-HW20 projector lamp is reaching end of life, the Lamp light will flash red in 3 second intervals. The message “Please replace the Lamp/Filter” will also start flashing on screen. If the projector lamp dims change it immediately. Sony recommends replacing the air filter at the same as replacing the lamp.

Replacing the Sony VPL-HW20 Lamp and Air Filter

Sony _VPL-HW20 _Sony_LMP-H201_projector_lampBefore installations preparations:

  • Unplug the AC power cord on the Sony VPL-HW20 projector.
  • Your Sony VPL-HW20 projector uses the Sony LMP-H201 projector lamp. Before installing the lamp, let the projector cool for at least 40 minutes. It should be cool to the touch. Don’t rush the cooling as these projectors operate using extremely high temperatures and you run the risk of a serious burn.
  • The projector lamp cover is on the bottom of the projector so you will need to turn it over. Put down a soft cloth on a flat surface to prevent the projector getting scratched. Turn the projector over gently. Don’t lean on the projector and make sure the surface is flat and stable.
  • Using a Philips screwdriver, loosen the screw holding the projector lamp cover in place. Slide the projector lamp cover. Put it to one side.


Sony_VPL-HW20_Sony_LMP-H201_remove_projector_lamp_screwLoosen the 3 screws on the Sony LMP-H201 lamp using a Phillips screwdriver. Grab the wire handle on the Sony LMP-H201 projector lamp and gently pull the lamp straight out. Take care not to bang the lamp as you can cause the bulb to break.

NOTE: The Sony LMP-H201 projector lamp contains mercury and should not be thrown into regular garbage. Recycle this lamp!

Sony_VPL-HW20__Sony_LMP-H201_remove_projector_lamp

To finish the projector lamp installation:

  • Remove the packaging from the new Sony LMP-H201 projector lamp.
  • Lift up the handle and slowly lower the Sony LMP-H201 projector lamp into the projector.Sony_VPL-HW20_insert_Sony_LMP-H201_projector_lamp
  • Push it in securely until it reaches the end.
  • Tighten the three screws on the lamp.
  • Also don’t touch the actual bulb in the new lamp as oily fingerprints can burn a black spot on the lamp when it heats up. Sony_VPL-HW20_
  • Slide the lamp cover back onto the Sony VPL-GH10 projector.
  • Close the projector lamp cover and tighten the screws.
    Remember to install the lamp cover properly as the projector will not turn on if the cover is loose or not installed correctly.

Replacing the Sony VPL-GH10 air filter

Sony_VPL-HW20_201_remove_projector_lamp_air_filter

  • Remove the filter holder. The air filter will be inside the holder. Don’t touch the fan inside as this can damage the projector.
  • Remove the old Sony VPL-GH10 filter and put it to one side. Attach the new air filter so that is fits into the 10 claws properly on the holder.Sony_VPL-HW20_Sony_LMP-H201_remove_projector_lamp_cover
  • Aligning the air filter with the shape of the filter holder will make it easier to install.
  • Be sure to put the air filter holder back into the projector aligned up properly. If not, the projector will not turn back on!
  • Wipe off any dust from the ventilation intake holes using a soft cloth. Put the projector back in its original position

Resetting the Sony VPL-GH10 projector lamp timer

Sony_VPL-HW20_Sony_LMP-H201_rese

  • To reset the projector lamp timer, plug the AC power cord back into Sony VPL-GH10 projector.
  • Using the remote, scroll down to the Setup Menu.
  • Press Enter.


Sony_VPL-HW20_Sony_LMP-H201_reset_projector_lamp_timer

  • A Lamp Setting message will appear asking you if the projector lamp has been replaced.
  • Click on Yes.
  • You will see a confirmation message and the Projector Lamp Timer will be automatically reset to zero.
  • See the number of hours left on your lamp by going to the Information Menu

You can extend the life of the Sony LMP-H201 projector lamp by always making sure the filter is clean and there is enough airflow around the projector. Learn how to get a longer projector lamp life with top tips for extending DLP projector lamp life.

4 reasons to avoid counterfeit lamps:


Tagged with: , ,

cpx2510 projector lamp

Here’s how to replace the Hitachi CP-X2510 projector lamp

Keep your projector working at its best by installing a genuine Hitachi CP-X2510 projector lamp. Your Hitachi CP-X2510 projector uses the Hitachi DT01021 projector lamp. Only an OEM authentic replacement projector lamp will keep your projector working.

Tracking Hitachi CP-X2510 projector lamp

Keep track of the Hitachi CP-X2510 projector lamp life so you’ll know when to replace the projector lamp. Watch for these signs that indicated the projector lamp is reaching its end of life:

  • The Power and Lamp Indicators will begin blinking.
  • Color tone on the screen may also appear weak or washed out.
  • Picture has poor color quality.

Install the replacement projector lamp

Before installing the replacement  Hitachi DT01021 follow these important safety tips:

  • Turn off the Hitachi CP-X2510 projector.
  • Unplug the power cord.
  • Allow the projector to cool for at least 45 minutes. It should be cool to the touch. This projector works using high heat and there is danger you can be burned.
  • NOTE: If the projector is mounted on the ceiling, don’t stand underneath the projector while opening the cover.

Hitachi_CP-X2510_projector_lamp_Hitachi_DT01021_cover

  • Loosen the screw (marked by arrow) of the lamp cover and then slide the lamp cover to the side to remove it.
  • Hitachi_CP-X2510_projector_lamp_Hitachi_DT01021_remove_cover
  • Loosen the 3 screws (marked by arrow) of the projector lamp, and slowly pick up the lamp by the handles. Be careful not the bang the lamp.

NOTE: The  Hitachi DT01021 projector lamp contains mercury and must be recycled properly. Do not throw it in regular garbage.

Hitachi_CP-x2510_Install_projector_lamp_Hitachi_DT01021_remove

  • Insert the new lamp, taking care not to touch the actual bulb. Oil in your fingers will cause a dark spot on the lamp when it heats up.
  • Tighten the 3 screws of the  Hitachi DT01021 projector lamp that were loosened to remove the old projector lamp.
  • Hitachi_CP-X2510_projector_lamp_cover_install
  • Slide the lamp cover back in place and firmly fasten the screw of the lamp cover.
  • Turn on the projector and set the lamp timer

To reset the projector lamp timer:

Reset the projector lamp time only when you have replaced the lamp so the Hitachi CP-X2510 projector can properly track the lamp life. Otherwise you run the risk of using the lamp beyond its lamp life. Hitachi_CP-X2510_reset_lamp_timer_hitachi_DT01021

  • Press the MENU button
  • Scroll down to the GO TO ADVANCED MENU option. Press ENTER
  • Scroll down to the OPTION menu in the left column and press ENTER.
  • Scroll down to LAMP TIME. Press ENTER To make a dialogue field appear
  • Scroll up to the RESET option on the dialogue box.
  • The lamp setting will be set to zero.

Green your projector

Hitachi_CP-X2510_projector_bulb_only_lamp_Hitachi_DT01022

Recycle your lamp housing by only replacing the Hitachi CP-X2510 bulb. Our video shows you how. It’s quick and easy.

5 reasons to avoid counterfeits

Tagged with: , ,

Hitachi CP-X3010 projector

Replace the Hitachi CP-X3010 projector lamp

Keep your projector working at its best by installing a genuine Hitachi CP-X3010 projector lamp. Only an OEM authentic replacement projector lamp will keep your projector working.

Why avoid counterfeits?

Find this lamp on Amazon sold by these authorized dealers:

Keep track of the Hitachi CP-X3010 projector lamp life so you’ll know when to replace the projector lamp. Watch for these signs that indicated the projector lamp is reaching its end of life:

  • The Power and Lamp Indicators will begin blinking.
  • Color tone on the screen may also appear weak or washed out.
  • Picture has poor color quality.

Install the replacement projector lamp

Your Hitachi CP-X3010 projector uses the Hitachi DT01021 projector lamp. Before installing the replacement Hitachi DT01021 follow these important safety tips:

  • Turn off the Hitachi CP-X3010 projector.
  • Unplug the power cord.
  • Allow the projector to cool for at least 45 minutes. It should be cool to the touch. This projector works using high heat and there is danger you can be burned.
  • NOTE: If the projector is mounted on the ceiling, don’t stand underneath the projector while opening the cover.

Hitachi_CP-X3010_projector_lamp_Hitachi_DT01021_cover

  • Loosen the screw (marked by arrow) of the lamp cover and then slide the lamp cover to the side to remove it.
  • Hitachi_CP-X3010_projector_lamp_Hitachi_DT01021_remove_cover
  • Loosen the 3 screws (marked by arrow) of the projector lamp, and slowly pick up the lamp by the handles. Be careful not the bang the lamp.

NOTE: The Hitachi DT01021 projector lamp contains mercury and must be recycled properly. Do not throw it in regular garbage.

Hitachi_CP-x3010_Install_projector_lamp_Hitachi_DT01021_remove

  • Insert the new lamp, taking care not to touch the actual bulb. Oil in your fingers will cause a dark spot on the lamp when it heats up.
  • Tighten the 3 screws of the Hitachi DT01021 projector lamp that were loosened to remove the old projector lamp.
  • Hitachi_CP-X3010_projector_lamp_cover_install
  • Slide the lamp cover back in place and firmly fasten the screw of the lamp cover.
  • Turn on the projector and set the lamp timer

To reset the projector lamp timer:

Reset the projector lamp time only when you have replaced the lamp so the Hitachi CP-X3010 projector can properly track the lamp life. Otherwise you run the risk of using the lamp beyond its lamp life. Hitachi_CP-X3010_reset_lamp_timer_hitachi_DT01021

  • Press the MENU button
  • Scroll down to the GO TO ADVANCED MENU option. Press ENTER
  • Scroll down to the OPTION menu in the left column and press ENTER.
  • Scroll down to LAMP TIME. Press ENTER To make a dialogue field appear
  • Scroll up to the RESET option on the dialogue box.
  • The lamp setting will be set to zero.

Green your projector

Hitachi_CP-X3010_projector_bulb_only_lamp_Hitachi_DT01022

Recycle your lamp housing by only replacing the Hitachi CP-X3010 bulb. Our video shows you how. It’s quick and easy.

Save

Save

Save

Save

Tagged with: , ,

  Replace the Optoma HD143X projector lamp using this guide

With its wide screen format the Optoma HD143X projector is perfect for 3D gaming or HD viewing. The Optoma HD143X projector lamp will need to be changed after 15,000 hours of use.

Find this lamp on Amazon:

AWO Original Bulb Inside BL-FP240G / SP.7AZ01GC01 / BL-FP210A / BL-FP210B Replacement Lamp with Housing for OPTOMA DH350 EH334 EH335 EH336 EH337 HD143X HD144X HD270e HD27e WU335 WU337 HD28DSE DH1012

Why buy authentic?

Counterfeit lamps have a variety of problems including:

Buy an authentic projector lamp in order to keep your Optoma HD143X projector working properly while protecting your health and safety .

When to replace

When the Optoma HD143X projector lamp life is reaching end of life, you’ll see a warning sign appear on screen.

Replace the lamp immediately when you see this warning signs. Using the lamp beyond its recommended hours can result in the lamp exploding inside the projector. Watch for these other signs that the lamp may be reaching it’s end of life:

  • the Lamp LED flashing red
  • poor colour quality
  • image has deteriorated

Installing a new projector lamp

Your Optoma HD143X uses the BL-FP240G projector lamp. Follow these important safety tips before installing a new projector lamp

  • Switch off the power to the projector by pressing the Power/Standby button.
  • Allow the projector to cool down for at least 30 minutes. If should be cool to the touch. The Optoma HD143X runs at a high temperature and you can burn yourself badly if you don’t allow the projector to cool down.
  • Disconnect the power cord.

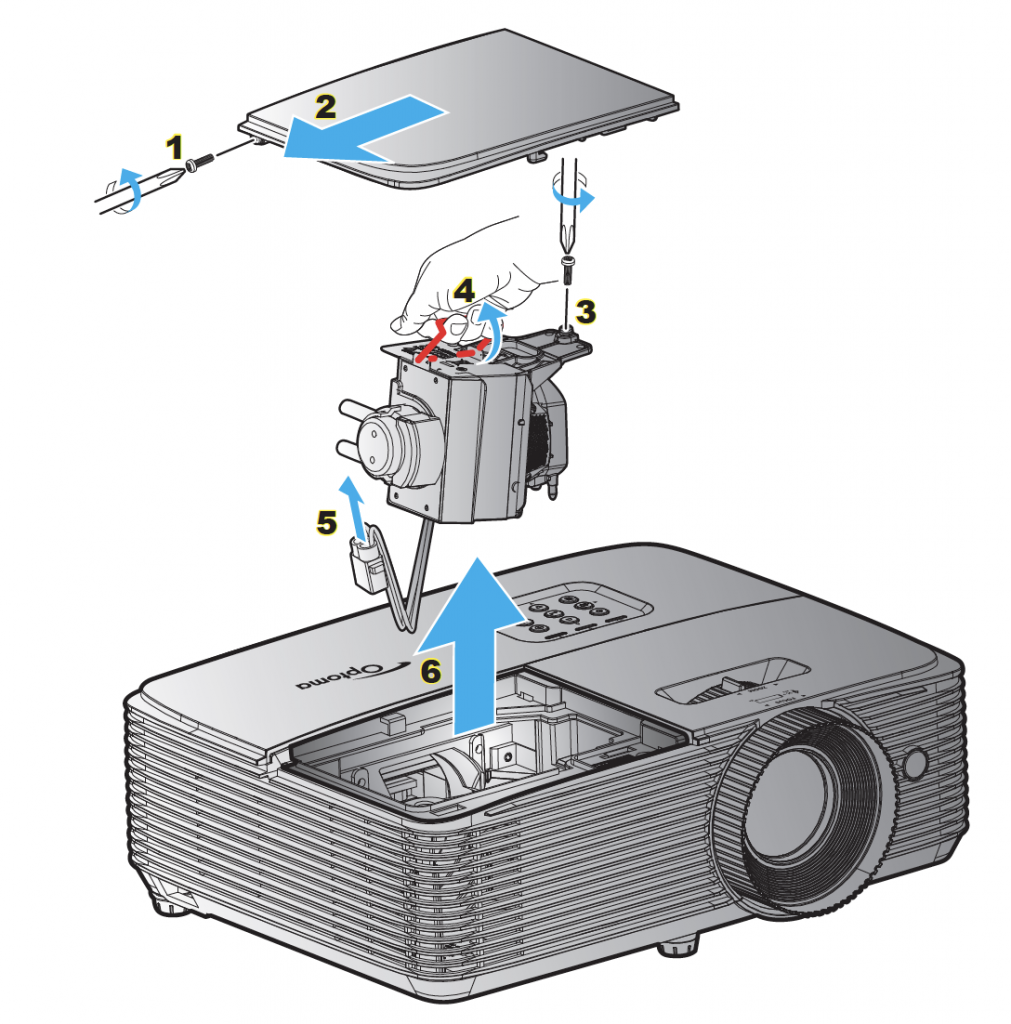
Remove the old lamp

  1. Use a screwdriver to loosen the screw holding the projector lamp cover in place.
  2. Remove the lamp cover and place to one side.
Optoma_projector_HD143X_replace-lamp

3. Loosen the screw holding the lamp in place.

4. Lift the wire handle on the lamp.

5. Unplug the lamp cord connecting it to the projector.

6. Carefully lift the lamp out of the projector. NOTE: This projector lamp contains mercury and should not be thrown into regular garbage. Recycle this used lamp!

Install the new lamp:

  • Gently place the new lamp into into the Optoma HD143X projector making sure not to touch the actual bulb. Oil from your fingers will burn black spots onto the lamp when it heats up.
  •  Connect the lamp cord to the projector outlet.
  • Tighten the lamp screw.
  • Connect the lamp cord.
  • Put the wire handle in place.
  • Close the lid. Tighten the cover screw.
  • You are now ready to reset the lamp timer.

Reset the Optoma HD143X projector lamp timer

Your Optoma HD143X comes equipped with an automatic projector lamp timer that tracks the number of hours left for the lamp. Each time you change the lamp you need to reset the lamp timer. Failure to do so may cause the projector to use the lamp over the recommended period of time resulting in the lamp exploding.

To reset the lamp timer:

  • Press MENU
  • Select Setup
  • Select Lamp Settings
  • Select Lamp Reset
  • Select Yes

Learn TOP Tips for extending the lamp life in your Optoma HD143X projector.

Tagged with: ,

Hitachi_CP_X201_projectorReplace the Hitachi CP X807 projector lamp

Watch for these signs when the Hitachi CP X807 projector lamp is reaching end of life:

  • Both the Hitachi CP X807 Power and Lamp Indicators are flashing red while the Temp Indicator is turned off.
  • Color tone on the screen may also appear weak or washed out.
  • Picture has poor color quality.

Authentic lamps

The Hitachi CP X807 uses the Hitachi DT00871. Only an OEM authentic replacement projector lamp will keep your Hitachi CP X807 projector working. Look for the seal of approval before purchasing. Learn to spot copycat lamps posing as authentic lamps. Keep track of projector lamp life so you’ll know when to replace the projector lamp. Avoid generics because they have a shorter life than originals as well as being prone to explosions and created with toxic substitute parts. They can damage the sensitive optics in your Hitachi CP X807 projector and as well as hurt your eyesight.

Find this lamp sold on Amazon by these authorized distributors:

Install the Hitachi projector lamp

Safety steps before installing the Hitachi DT00871

  • Turn off the Hitachi CP X807 projector.
  • Unplug the power cord.
  • Allow the projector to cool for at least 45 minutes. It should be cool to the touch. This projector works using high heat and there is danger you can be burned.
  • NOTE: If the projector is mounted on the ceiling, don’t stand underneath the projector while opening the cover.
  • Prepare the new Hitachi CP X807 projector lamp. If the projector is mounted on a ceiling, or if the lamp has broken, contact your dealer for assistance.
  • Loosen the screw (marked by arrow) of the lamp cover and then slide the lamp cover to the side to remove it.

Hitachi_CP_X807_projector_lamp_Hitachi_DT00871_remove

  • Loosen the 3 screws (marked by arrow) of the Hitachi DT00871 projector lamp, and slowly pick up the lamp by the handles. Be careful not the bang the lamp. The Hitachi DT00871 projector lamp contains mercury and must be recycled properly. Do not throw it in regular garbage.
  • Insert the new lamp, and retighten firmly the 3 screws of the lamp that are loosened in the previous process to lock it in place.
  • Slide the lamp cover back in place and firmly fasten the screw of the lamp cover.

To reset the projector lamp timer:

Note: Reset the projector lamp time only when you have replaced the lamp so the Hitachi CP X807 projector can properly track the lamp life. Otherwise you run the risk of using the lamp beyond its life.

  • Press the MENU button
  • Scroll down to the GO TO ADVANCED MENU option. Press ENTER
  • Scroll down to the OPTION menu in the left column and press ENTER.
  • Scroll down to LAMP TIME. Press ENTER To make a dialogue field appear
  • Scroll up to the RESET option on the dialogue box.
  • The lamp setting will be set to zero.

Learn more tips to extend the life of the Hitachi CP X807 projector lamp.

Tagged with: ,
Join the discussion on Facebook! All your questions, answered! The Screen & Projector Group