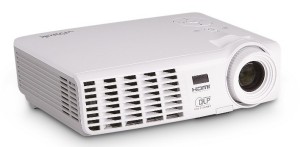
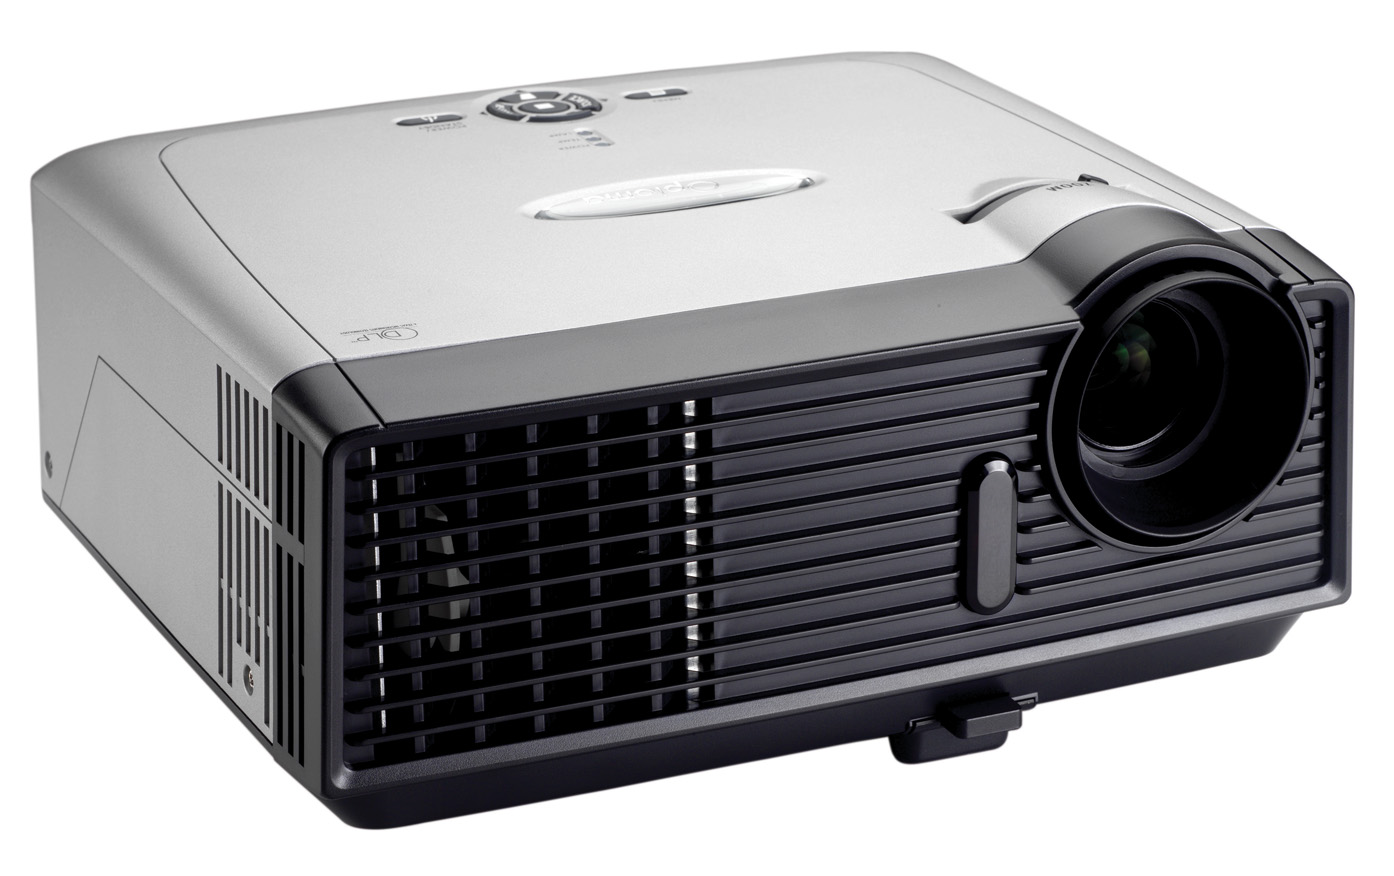
We're now Screen and Projector! For updated content, visit ScreenAndProjector.com and follow @screenandproj on social media!

Optoma_EP7169_projector_BL-FU1801A_projector_lamp
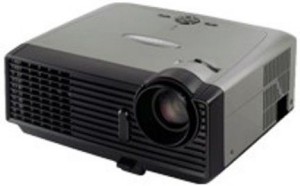
This handy step-by-step guide will help you install a new Optoma EP7169 projector lamp.

Why avoid generic lamps?

When it’s time to repkace Optoma EP7169 projector lamp be sure to invest in an authentic lamp. Your Optoma EP716P uses the Optoma BL-FU180A  projector lamp. Look for the seal of approval to be sure you’re buying an authentic OEM projector lamp.

Counterfeit lamps appear to be a great deal with their great price tag. But they are actually going to cost you more in the long run. These generics are created with toxic materials and often don’t have the proper safeguards to protect your eyesight. They are also prone to explosions, don’t last as long as authentic and can damage the sensitive optics in your Optoma EP716P9 projector. Learn the 7 Ways to Spot a Counterfeit Lamp.

Buy this lamp on Amazon sold by these authorized dealers:

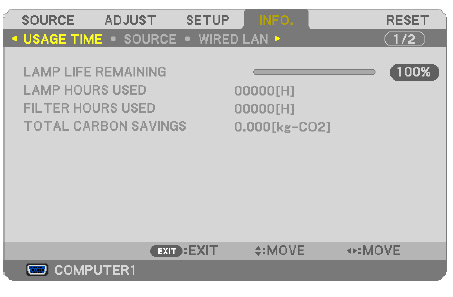
End of projector lamp life warnings

Watch for these telltale signs that the Optoma BL-FU180A  lamp is reaching end of life:

Optoma_EP7169_projector_Lamp_Replacement_warning_Optoma_BL-FU180A_projector_lamp

  • faded image
  • colours are off or not as vivid
  • blinking LED lights on the Optoma EP761P projector
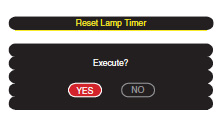
  • the following warning sign on your screen:

Installing a new Optoma BL-FU180A projector lamp

Follow these important safety steps before installing a new Optoma BL-FU180A projector lamp:

  • Switch off the power to the Optoma EP7169 projector by pressing the Power/Standby button.
  • Disconnect the power cord.
  • Allow the projector to cool down for at least 30 minutes. Bu sure it is cool to the touch before opening the projector or you could burn yourself badly. These projectors work under extremely high temperatures.

Optoma_EP7169_BL-FU180A_remove_lamp_cover


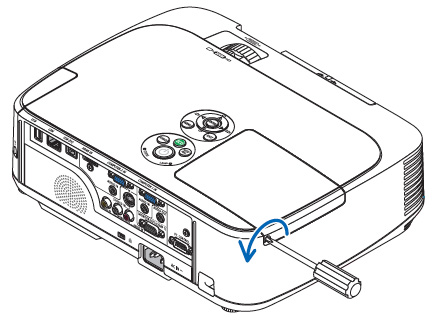
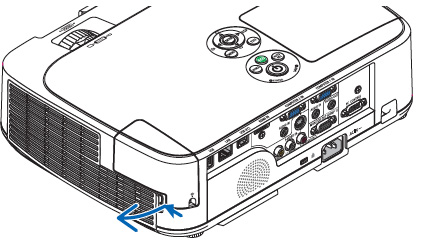
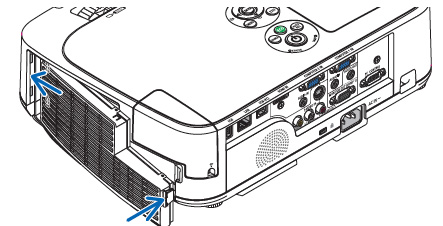
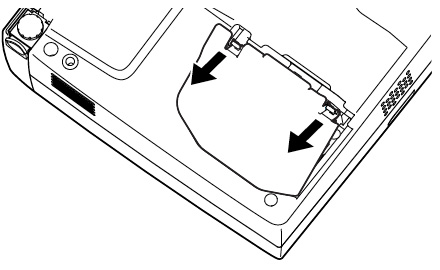
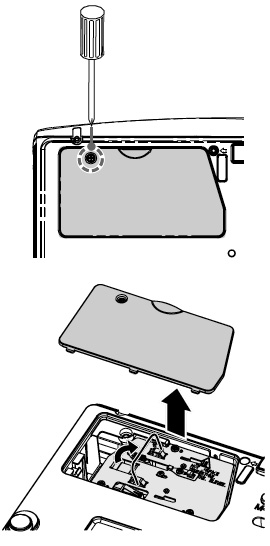
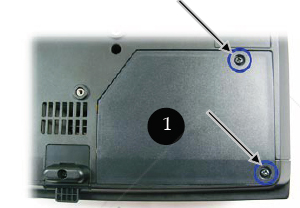
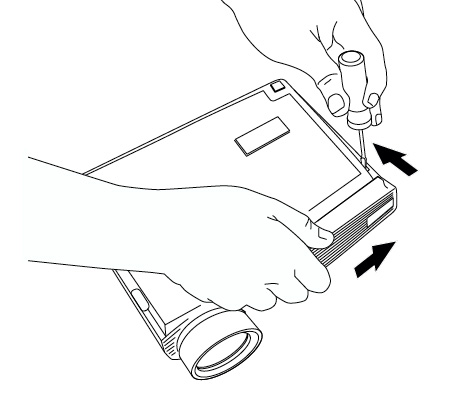
Step 1: Place something soft underneath the Optoma EP7169 and then turn the projector onto it’s back. Remove the two screws holding the projector lamp cover in place.

Optoma_EP7169_BL-FU180A_remove_projector_lamp_cover


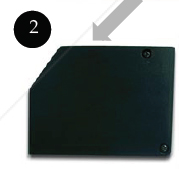
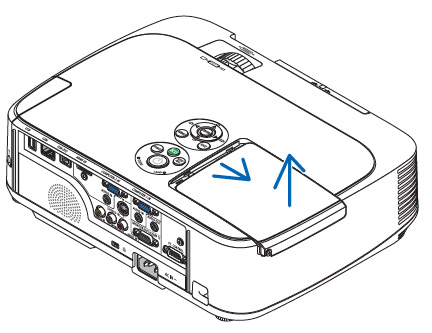
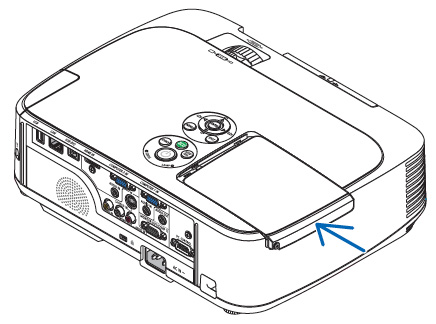
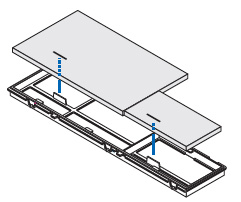
Step 2: Push the cover up to remove it.

Optoma_EP7169_BL-FU180A_remove_projector_lamp_screws

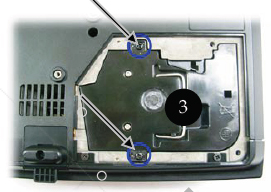
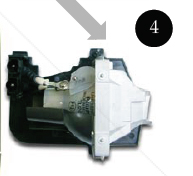
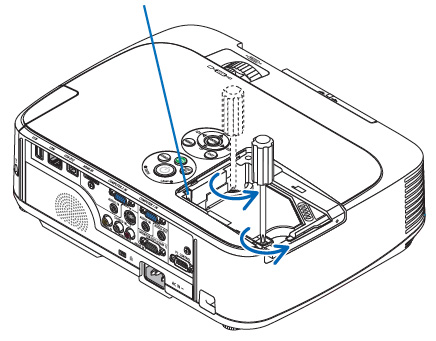
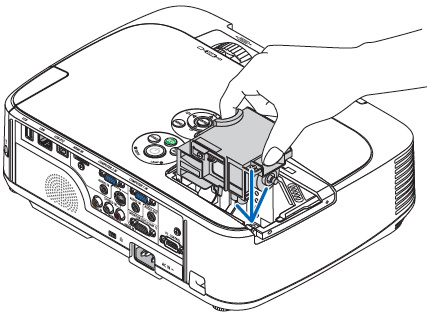
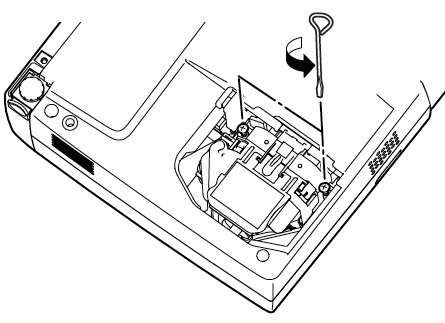
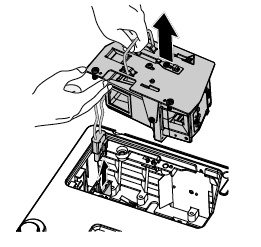
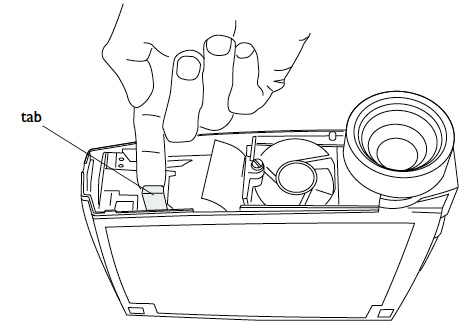
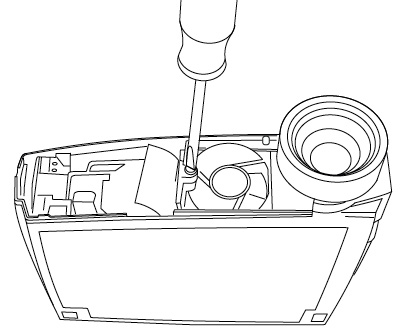
Step 3: Use a screwdriver to remove the two screws holding the Optoma BL-FU180A  projector lamp module in place.

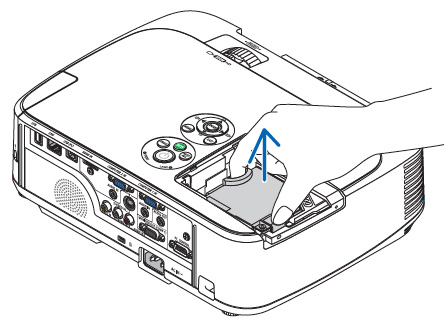
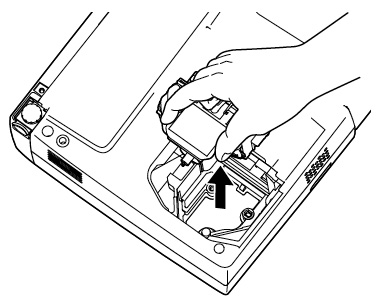
Slowly put out the old projector lamp by grabbing the edge of the lamp. Be careful not to bang theprojector  lamp against the projector as this may case the bulb to break. Learn what to do if the lamp has exploded inside the projector.

NOTE: The used projector lamp contains mercury and should be properly recycled. Don’t throw it into regular garbage.

Optoma_EP7169_BL-FU180A_new_projector_lampOptoma_EP7169_BL-FU180A_projector_lamp

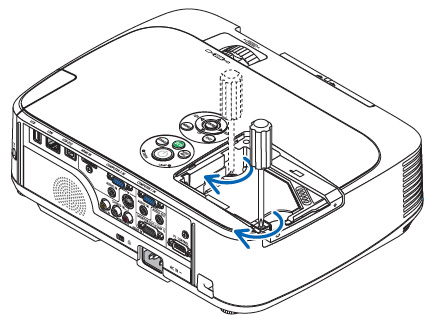
Step 4: Place the new Optoma BL-FU180A projector lamp into the Optoma EP7169 projector. Tighten the two screws on the projector lamp. Replace the lamp cover and tighten its two screws. You must now reset the Lamp Replacement Timer.

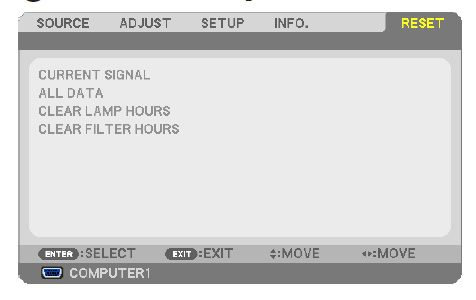
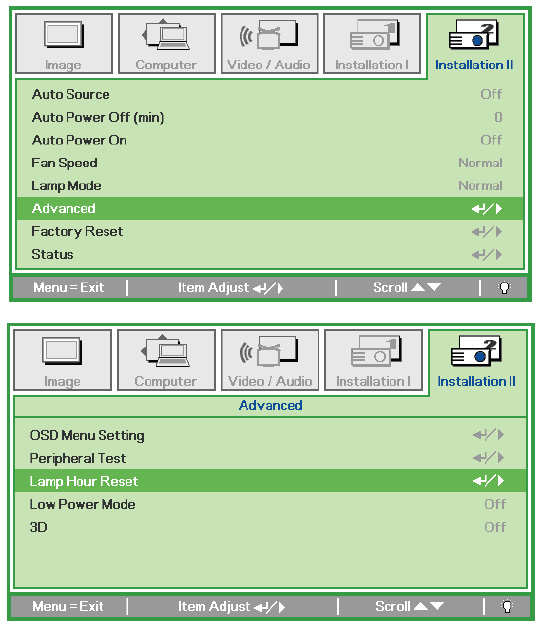
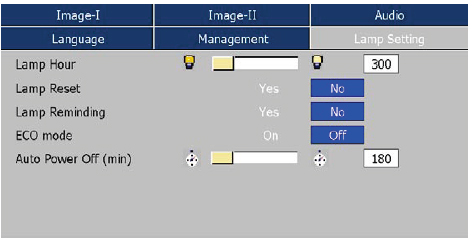
Reset the lamp timing on the Optoma EP7169

Optoma_EP7169_projector_Lamp_Setting_Menu_Optoma_BL-FU180A_projector_lamp

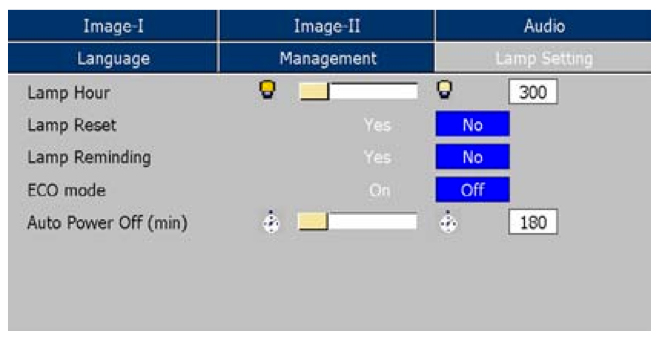
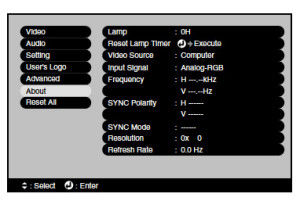
The Optoma EP7169 projector has an automatic projector lamp reset timer that tracks the life of the lamp and triggers the lamp replacement warning. You need to reset the timer each time the lamp is replaced.

  • Press the Menu option on either the remote or on the projector.
  • Scroll over the Lamp Setting. Press enter.
  • Select Reset Lamp Hours. Press Enter
  • The Execute/Cancel command line will appear.
  • Scroll over to choose Execute. Press Enter. The lamp hours is reset to zero.

Give the Optoma BL-FU180A projector lamp longer life:

  • Turning on the Eco Mode to lower power consumption and extend the lamp life by 130%.
  • Keep your air filters clean to avoid overheating the projector.
  • Turn off the Optoma EP7169 projector and let it stand for at least one hour ever 24 hours.
  • Make sure there is enough airflow around the projector particularly if it’s been permanently mounted.
  • Top tips for extending DLP projector lamp life
Tagged with: , , ,

NEC-M260W_projector_NEC_NP15LP_projector_lampThis handy step-by-step guide shows you how to change the NEC M260W projector lamp.

Buy authentic!

The first thing to do is buy an OEM replacement NEC M260W projector lamp. Your NEC M260W projector uses the NEC NP15LP projector lamp. Avoid the cheaper generic lamps with their shorter lamp life and toxic materials. They are prone to explosions and often damage the sensitive electronics in your NEC M260w projector.

NOTE: New air filters are shipped with the lamp and it’s recommended you replace them at the same time.

Find this lamp sold on Amazon by these authorized dealers:

When to replace the NEC M260W projector lamp

How will you know the the NEC NP15LP projector lamp needs to be replaced and is reaching end of life? Watch for the following signs:

  • the LAMP indicator will begin to blink red
  • message on screen reads LAMP HAS REACHED THE END OF ITS USABLE LIFE. PLEASE REPLACE THE LAMP AND FILTER.
  • colour looks off
  • picture is faint or has deteriorated

Checking the end of the NEC M260W projector lamp

NEC_M260W_check_NE_NP15LP_projector_lamp_usageTrack the life of the NEC M260W projector lamp with the usage time menu. The progress indicator shows the percentage of remaining bulb life:

  • Go to INFO menu
  • Scroll down to USAGE TIME to display the LAMP LIFE REMAINING and LAMP HOURS USED
  • When the lamp usage reaches 0, the Lamp Life REMAINING starts a count down from 100 hours
  • When the count down reaches 0, the projector will turn off and not turn on.

Changing the NEC NP15LP projector lamp

Follow these important safety instructions before installing the new NEC NP15LP projector lamp

  • turn off the NEC M260W projector.
  • unplug the projector from its power source.
  • unplug the power cable.
  • wait until the projector is cool to the touch to avoid getting burned.

NEC_NP M260W_NEC_NP16LP_remove_projector_lamp_screwLoosen the NEC M260W projector lamp cover screw.

NEC_M260W_projector_NEC_NP16LP_remove_projector_lamp_cover

Push and slide the lamp NEC M260W projector lamp cover off.


NEC_NP M260W_remove_NEC_NP16LP_projector_lamp_screws

Loosen the two screws holding the NEC NP15LP projector lamp in place. (The screws will not come out only loosen.)

NEC_NP M260W_remove_NEC_NP16LP_projector_lamp

Remove the projector lamp by holding the indent and pulling up.

NOTE: Your NEC NP15LP projector lamp should be properly recycled. These lamps contain mercury and can’t be placed into common garbage.


NEC_M260W_projector_install_new_NEC_NP16LP_projector_lampInstall a new lamp housing into the NEC M260W projector, gently pressing the projector lamp housing into the socket. Take care not to touch the actual bulb as your finger prints can leave oil marks that burn black marks onto the bulb.

NEC_M260W_projector_tighten_NEC_NP16LP_projector_lamp_screws

Push the top center on the projector lamp to secure it. Tighten the screw on the lamp.


NEC_M260W_projector_replace_projector_lamp_cover_NEC_NP16LP

Reattach the NEC M260W projector lamp cover by sliding the cover until it snaps into place. Tighten the screw on the lamp cover.

Replacing the filters

There are four filters in the NEC M260w projector:

  • Honeycomb hard filter – large and small
  • Accordion soft filter — large and small

Replace all four filters at the same time. Before replacing the filters wipe off any dust and dirt that came loose from the old filters. NOTE: The filters are made with two different types of material in the membrane. Both perform the same.


NEC_M260w_projector_NEC_NP16LP_projector_lamp_remove_air_filterPush the catch to release the NEC M260w filter and gently pull it out.


NEC_M260W_projector_NEC_NP16LP_projector_lamp_detach_filter_cover

The filter cover is fixed at six separate points in the projector. Bow the filter cover by pushing it slightly until it releases.


NEC_M260W_projector_NEC_NP16LP_projector_lamp_replace_four_filters

  • Filter unit: Attach two honeycomb hard filters to the NEC M260W filter unit.
  • Filter cover: Attach the two accordion soft filters to the filter cover. Be sure to align the accordion slits with the protrusions of the filter cover.

NEC_M260W_projector_NEC_NP16LP_projector_lamp_attach_filter_cover


Attach the filter cover back to the filter unit. Align the filter until with the filter cover and push the protrusions into place. Make sure all the six mounting points are aligned properly.


NEC_M260W_projector_NEC_NP16LP_projector_lamp_attach_filter

Insert the two catches of the top of the filter into the groove of the cabinet. Push the filter until it clicks into place.


Reset the NEC M260W projector lamp timer

Once the NEC NP15LP projector lamp and NEC M260W projector filter have both been replaced you will need to reset the timer for both. You want the projector to be able to accurately track the lamp life.

 NEC M260W projector_NEC_NP16LP_projector_lamp_timerClear usage hours and reset hours

  • Plug in the power cored into the wall outlet.
  • Turn on the projector.
  • From the MENU select RESET.
  • Choose CLEAR LAMP HOURS.
  • A confirmation message appears.
  • Select YES.

Reset the filter hours:

  • Scroll up to CLEAR Filter HOURS.
  • A second submenu will appear.
  • Select YES. Press the ENTER button.

Extending the life of the NEC M260W projector lamp

Get your newly installed NEC NP15LP projector lamp will last longer by choosing the ECO option. The ECO MODE increases lamp life by lowering the power consumption. There are three modes to choose from:

  • Auto Mode: 4000 hours
  • Normal: 5000 hours
  • Eco ModeL 8000 hours

Learn more tips to extend the life of the NEC NP15LP projector lamp.

Tagged with: , ,

Epson_720c_projector_ELPLP18_projector_lampThis guide will help you change the Epson EMP-720c projector lamp in 3 easy steps.

STEP 1: When do I need to change the projector lamp?

Your replacement Epson EMP-720c projector lamp is Epson ELPLP18. The Epson EMP-720c projector lamp has up to 1500 hours before it reaches end of life. Watch for these warning signs that you need to replace the projector lamp:

  • A screen that is gradually dimming or deteriorating.
  • Colour in the image appears dark or off colour.
  • “Replace the lamp” warning flashing on screen.
  • Lamp light flashing red and then a steady orange.

STEP 2: Be ready with an authentic projector lamp

To keep your Epson EMP-720c working at its optimum level you should also be sure to install an authentic projector lamp. What’s the difference between generic and OEM lamps?  Quality, price and reliability! Buy an authentic projector lamp from a recognized dealer who proudly displays the seal of approval. Protect yourself and buy authentic.

Generics may have a lower price tag but in the long run, they cost more because they create a lot of problems:

Find this lamp on Amazon sold by these authorized dealers:


STEP 3: Replacing the Epson ELPLP46 projector lamp

IMPORTANT: Do not operate the projectors if the lamps are removed as this may result in malfunctions, fire hazard and other accidents

Before installation follow these important safety tips:

  • Turn Epson EMP-720c off and unplug the power cord.
  • The projector should be cool to the touch. DO NOT attempt to change the Epson ELPLP18 projector lamp if the projector is still hot. You can be badly burned if you don’t wait for the projector to cool.

Epson_720c_projector_remove_cover_ELPLP18_projector_lamp

  • Turn the projector upside-down to access the projector lamp compartment.
  • Press the two tabs and remove the projector lamp cover.
  • Loosen the screws on the Epson EMP-720c projector using the screw drive provided. These screws also don’t completely come out.

Epson_720c_projector_replace_Epson ELPLP18_projector_lamp

Epson_720c_projector_remove_ELPLP18_projector_lamp

Finish the installation:

  • Gently insert the new Epson ELPLP18 projector lamp into the Epson EMP-720c projector.
  • Avoid touching the actual lamp since your fingerprints will cause black out spots on the screen.
  • Tighten the screws on the Epson ELPLP18 projector  lamp. Be sure not to tighten too much or the lamp may not work.
  • Replace the lamp cover and tighten the screw on the Epson ELPLP18 projector lamp cover.
  • Reset the lamp timer.

Resetting the Epson EMP-720c Projector Lamp Timer

The Epson EMP-720c has a lamp timer that tracks the number of hours left for the Epson ELPLP18 projector lamp. Every time you install a new Epson ELPLP18 projector lamp you must reset the lamp timer to zero.

Epson_720c_projector_reset_ELPLP18_projector_lamp_timer

  • Press the MENU button.
  • Scroll down to the ABOUT menu.
  • Press Enter to select the ABOUT menu.
  • Scroll down to RESET LAMP TIMER.
  • A confirmation message will appear. Epson_720c_projector_reset_ELPLP18_projector_lamp_timer_confirm
  • Scroll over to highlight YES.
  • Press ENTER.
  • Press ESC to return to the Main Menu
  • Press ESC to exit the Menu system.

Extending the life of your Epson ELPLP18 projector lamp

Follow this simple tips to make your Epson ELPLP18 projector lamp last even longer:

  • Keep your air filters clean to avoid overheating the projector.
  • Turn off the Epson EMP-720c projector and let it stand for at least one hour ever 24 hours.
  • An average use of four to five hours per day will ensure longer lamp life.
  • Make sure there is enough airflow around the projector particularly if it’s been permanently mounted.
  • Set the Brightness Mode to low.
  • Learn more with Top tips for extending DLP projector lamp life
Tagged with: , ,

Use these handy tips to get flying with your new Lutema R/C Helicopter!

Your Lutema RC Helicopter MIT35CLH/ MIT35CLHY offers hours of fun. If this is your first remote control helicopter, you’ll need some practice with the remote control.

Here are some tips to get your started on the road to flying like a pro!

Tip 1: Fly safely

Lutema-RC-Helicopter-MIT35CLHR-MIT35CLHY
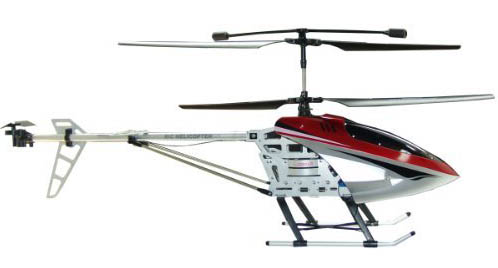
The first thing you’ll need to do is to charge your Lutema R/C helicopter. Since lithium batteries can heat up quickly, be sure to monitor your helicopter while the battery is recharging. When you’re waiting get your space ready. Move any objects out of the way and may sure you have enough clear space to fly the helicopter without running into any objects.

Before starting to fly, get your flying area set up properly. Make sure the Lutema RC helicopter is turned off and the remote control throttle is all the way down. This will make sure the helicopter doesn’t fly off randomly before you’ve taken control and end up hitting someone or crashing into something.

Tip 2: Learning the basics

Your remote has three main controls that will help you control the Lutema R/C helicopter.

  1. Throttle: Found on the left hand side of the remote. The throttle controls the height of the R/C helicopter. Push the throttle all the way up to make the remote helicopter gain height. Push the throttle all the way down to make the R/C helicopter go down.
  2. Direction: Found on the right hand side of the remote. The control stick controls direction of the RC helicopter. For a clockwise direction, move the stick to the right. For an anti-clockwise direction, push the control stick to the left.
  3. Trim: Found on the right side of the remote. The trim button stops any uncontrolled movements. Moving it right corrects clockwise movements. Moving trim button left corrects the R/C helicopter from spinning counter-clockwise.

Tip 3: Altitude control and stabilization

When the Lutema R/C helicopter is on and ready to fly practice these moves:

  • Slowly push the throttle up until the helicopter lifts off.
  • Use the right trim button to stop uncontrolled clockwise spinning. Use the left trim button to stop uncontrolled clockwise spinning.
  • Land the helicopter by slowing releasing the throttle stick. The helicopter will slowly descend.
  • Repeat the procedure until you can get the remote R/C helicopter to fly smoothly.

Tip 4: Steering the Lutema R/C helicopter

Once you’re comfortable with getting the Lutema RC helicopter off the ground, try doing some maneuvers:

  • Push the throttle stick up and stabilize the remote helicopter.
  • Press the direction stick to the right to move the R/C helicopter forward. Not too far to the right because the remote helicopter will just spin rather than moving forward.
  • Move the direction stick to the left and practice moving the remote helicopter counter-clockwise.
  • Move the direction stick to the right so the Lutema remote helicopter starts flying in clockwise circles.

Keep practicing these moves until they come automatically to you. You’ll soon be flying like a pro in no time at all. Check out the Lutema R/C helicopter video below for more Lutema MIT35CLH/ MIT35CLHY remote helicopter flying tips.


RC-Lutema-Helicopter-MIT35CLHR-MIT35CLHY-remote-control

Click on the photo or this link to watch a video on how to use the remote control


Tagged with: ,

Mid-Size-Lutema-R/C-Helicopter-MIT35CMHO

Use these tips to get flying with MIT35CMHO Lutema helicopter!

Your remote control 3-channel Lutema helicopter is fun to fly but if you’re a beginner you’ll need to give yourself some time to master the remote control and certain maneuvers. With a bit of practice you’ll be flying your RC helicopter like a pro in no time at all. Here are some basic tips to help you get started.

These instructions are also compatible with Lutema helicopter models: MIT35CMHB , MIT35CMHY, MIT35CMHR , MIT35CMHO

Tip 1: Stay safe flying your Lutema helicopter

Be sure to monitor your Lutems helicopter when the battery is recharging. Lithium batteries can heat up quickly. While the Lutema helicopter is charging, get your space ready. Close windows and doors, move any objects out of the way and make sure you have enough space between the remote control helicopter blades and people around you.

Before you start flying your RC helicopter, make sure it’s turned off and the throttle on the remote control is all the way down. You don’t want the R/C helicopter spinning off before you’re ready to take control and hitting someone blades to hit anyone.

Tip 2: Learn the Lutema helicopter basics

Your Luttema MIT35CMHO helicopter remote has three main controls: the throttle, the direction and the trim.

  • The throttle is the left hand control stick. Pushing it all the way up will make the R/C helicopter gain height. Push it all the way down and the remote control helicopter will slowly descend.
  • The direction is the right hand control stick. Push it to the right and the helicopter moves in a clockwise direction. Push it to the left and the RC MIT35CMHO helicopter will spin in an anti-clockwise direction.
  • Use the trim button to stop uncontrolled movements. If the remote control helicopter starts spinning off into a clockwise spin, press the right trim button to correct it. If it starts spinning in a counter-clockwise direction, press the left trim button.

Step 3: Altitude control and stabilization for the Lutema helicopter

Your first practice with the Lutema helicopter will be to learn how to keep the helicopter at a constant and stable altitude.

  • Switch the RC MIT35CMHO helicopter to ON. You should see some flashing lights.
  • Place the R/C MIT35CMHO helicopter on a flat surface with nothing it its way.
  • Take a few steps back before turning on the remote control.
  • Slowly push the throttle up until the helicopter lifts off.
  • Use the right trim button to stop uncontrolled clockwise spinning. Use the left button to stop uncontrolled counter- clockwise spinning.
  • Land the remote control helicopter by slowing releasing the throttle stick. The MIT35CMHO RC helicopter will slowly descend.

Step 4: Steering the Lutema helicopter

Once you’re comfortable with getting the Lutema helicopter off the ground, try doing some maneuvers.

  • Push the throttle stick up and stabilize the remote control helicopter.
  • To make the RC helicopter move forward, press the direction gently to the right. Not too far to the right because the helicopter will just spin rather than moving forward
  • Push the direction stick to the left and the R/C helicopter will move counter clockwise
  • Push the direction stick to the right and get the remote control helicopter to start flying in a clockwise circle.

Step 5: Practice makes perfect

Once you get the handle on how the remote works on the Lutema helicopter and the various directions the MIT35CMHORC helicopter can fly, experiment with the controls. You’ll find your natural flying style and start doing more complicated maneuvers in no time. Check out the video below for more Lutema MIT35CMHO remote helicopter flying tips.

Learn_how_remote_control_works_lutema_helicopters


Click on the photo or this link to watch a video on how to use the remote control


Tagged with: , , , , , ,

Our step-by-step guide will help you change the Vivitek PJVIH1082 projector lamp in in four easy steps.

PJVIH1082_projector_5811116206_projector_lampStep 1: Know when the replace the Vivitek PJVIH1082 projector lamp

Your Vivitek PJVIH1082 projector uses the Vivitek 5811116206-SU projector lamp. When the Vivitek PJVIH1082 projector lamp is approaching end of life, you may notice the quality of the picture becoming poor or the colours looking faded or distorted.

You can expect 2000 hours of Vivitek 5811116206-SU lamp. 3000 hours if Eco Mode has been turned on.

To check the projector lamp hours:

PJVIH1082_projector_5811116206_lamp_status

  • Press the Menu button to open the OSD menu.
  • Press left/right arrow keys move to the STATUS Menu.
  • The LAMP HOUR field displays the number of hours the lamp has been in use

Step 2: Go with authentic projector lamps

Be sure the purchase an authentic Vivitek 5811116206-SU projector lamp for your Vivitek PJVIH1082 projector and keep it working at its best. Although generic lamps seem like a bargain, they are created using toxic and carcinogenic substitutes that results in a shorter lamp life and the inability to be properly calibrated to work with the sophisticated electronics in your Vivitek PJVIH1082 projector. Installing these generic lamps also makes your warranty void. Buy  an authentic Vivitek 5811116206-SU projector lamp to keep your projector working at its best.

Step 3: Replace the 5811116206-S projector lamp

Before changing the lamp:

  • Reduce the risk of electrical shock by disconnecting the power cord on the Vivitek PJVIH1082 projector.
  • Reduce the risk of severe burns by allowing the projector to cool for at least 45 minutes.


PJVIH1082_projector_remove_lamp_cover_5811116206_projector_lamp

  • Place something soft on the table to prevent your Vivitek PJVIH1082 from getting scratched. The lamp cover is located at the bottom of the projector.
  • Remove the captive screw holding the lamp cover place.
  • Remove the lamp cover and place it to one side.


PJVIH1082_projector_remove_old_5811116206_lamp

PJVIH1082_projector_install_new_5811116206

  • Take the new Vivitek 5811116206-SU projector lamp out of its packaging. Lift up the wire handle and gently guide it into the PJVIH1082 projector.
  • Take care not to touch the actual bulb as the oil from your fingers can leave a smudge that will burn into a black spot when the projector heats up.
  • Tighten the lamp screw.
  • Re-install the H1080FD lamp cover and tighten the screw.
  • Reset the total lamp hour timer.

Step 4: Resetting the Vivitek PJVIH1082 Lamp Hour Timer

It’s important to only reset the lamp timer when the Vivitek 5811116206-S projector lamp has been replaced so the projector can track the lamp hours.

PJVIH1082_projector_reset_5811116206_projector_lamp_counter

  • Press the Menu button to open the OSD menu.
  • Press left/right arrow keys to move to the Setup menu.
  • Press up/down arrows to move to the Advanced menu
  • Press Enter.
  • Press the cursor up/down arrows button to Lamp Hour Reset.
  • Press Enter.
  • A message will appear saying the Lamp Hour has been reset to zero.
  • Press the Menu button to return to the main Setup menu.

Extending the life of the Vivitek 5811116206-S projector lamp:

  • Keep your air filters clean to avoid overheating the projector.
  • Use the Lamp Power option on the Vivitek PJVIH1082 projector and set to Eco Mode to reduce the amount of power used but extend lamp life.
  • Learn more with Top tips for extending DLP projector lamp life.
Tagged with: , ,

Lutema-Mid-Sized-3.5CH-Remote-Control-Helicopter-MIT35CMHO

Here are some basic tips to help you get started with you Lutema RC helicopter!

Your remote control 3-channel Lutema helicopter is fun to fly but if you’re a beginner you’ll need to give yourself some time to master the remote control and certain maneuvers. With a bit of practice you’ll be flying your Lutema RC helicopter like a pro in no time at all.

These instructions are compatible with Lutema RC helicopter models: MIT35CMHB, MIT35CMHY, MIT35CMHR, MIT35CMHO

Tip 1: Stay safe

Be sure to monitor your Lutema RC helicopter when the battery is recharging. Lithium batteries can heat up quickly. While the Lutema RC helicopter is charging, get your space ready. Close windows and doors, move any objects out of the way and make sure you have enough space between the remote control helicopter blades and people around you.

Before you start flying your Lutema RC helicopter, make sure the it’s turned off and the throttle on the remote control is all the way down. You don’t want the helicopter spinning off before you’re ready to take control. And you don’t want any of the R/C helicopter blades to hit anyone.

Tip 2: Learn the Lutema RC helicopter basics

Your Lutema RC  helicopter remote has three main controls: the throttle, the direction and the trim.

  • The throttle is the left hand control stick. It controls the horizontal movements. Pushing it all the way up will make the R/C helicopter gain height. Push it all the way down and the remote control helicopter will slowly descend.
  • The direction is the right hand control stick, also called the steering lever. Push it to the right and the helicopter moves in a clockwise direction. Push it to the left and the RC helicopter will spin in an anti-clockwise direction.
  • Use the trim button to stop uncontrolled movements. If the remote control helicopter starts spinning off into an clockwise spin, press the right trim button to correct it. If it starts spinning in a counter-clockwise direction, press the left trim button.

Step 3: Lutema RC helicopter altitude control and stabilization

Your first practice will be to learn how to keep the Lutema RC helicopter at a constant and stable altitude.

  • Switch the RC helicopter to ON. You should see some flashing lights.
  • Place the R/C helicopter on a flat surface with nothing it its way.
  • Take a few steps back before turning on the remote control.
  • Slowly push the throttle up until the helicopter lifts off.
  • Use the right trim button to stop uncontrolled clockwise spinning. Use the left button to stop uncontrolled counter-clockwise spinning.
  • Land the remote control helicopter by slowing releasing the throttle stick. The RC helicopter will slowly descend.

Step 4: Steering the Lutema RC  helicopter

Once you’re comfortable with getting the Lutema RC helicopter off the ground, try doing some maneuvers.

  • Push the throttle stick up and stabilize the remote control helicopter.
  • To make the RC helicopter move forward, press the direction gently to the right. Not too far to the right because the helicopter will just spin rather than moving forward
  • Push the direction stick to the left and the R/C helicopter will move to counter clockwise
  • Push the direction stick to the right and get the remote control helicopter to start flying in a clockwise circle.

Step 5: Practice makes perfect

Once you get the handle on how the remote works and the various directions the RC helicopter can fly, experiment with the controls. You’ll find your natural flying style and start doing more complicated maneuvers in no time.

Learn_how_remote_control_works_lutema_rc_helicopters


Click on the photo to watch a video on how to use the remote control


Tagged with: , , , , ,

Lutema_Avatar_4C_rc_helicopterThese tips can help you get the most out of your new Lutema Avatar Hovercraft.

Your 4-channel Avatar Hovercraft is fun to fly but if you’re a beginner you’ll need to give yourself some time to master the remote control and certain maneuvers. With a bit of practice you’ll be flying your RC helicopter like a pro in no time at all.

Your 4-channel Avatar Hovercraft is easy to fly. If you’re new to the world of Lutema RC Helicopters and if this is your first machine, take some time to get used to the remote control. You’ll want to master certain basic maneuvers.

These instructions are compatible with models MIT4CAVHB and MIT4CAVHR.

Safe practices with your Lutema Avatar Hovercraft

Since lithium batteries can heat up quickly, be sure to monitor your helicopter when the battery is recharging. When you’re waiting for the battery to be recharged, get your space ready. Move any objects out of the way and may sure you have enough clear space to fly the helicopter without running into anyone or any objects.

Before starting to fly, get your remote helicopter is set up properly. Make sure the Lutema RC helicopter is turned off and the remote control throttle is all the way down. This is ensure the helicopter doesn’t fly off randomly before you’ve taken control.

Learn the Lutema Avatar Hovercraft basics

Your Lutema Avatar Hovercraft remote has three main controls.

  1. Throttle (horizontal lever): The left hand control stick is the throttle that controls the height of the R/C helicopter. To make the remote helicopter gain height, push the throttle all the way up. To make the RC helicopter descend, push the throttle all the way down.
  2. Direction (steering lever): The right hand control stick controls direction of the RC helicopter. Move the stick to the right and the R/C helicopter moves in a clockwise direction. Push it to the left and the remote helicopter will spin in an anti-clockwise direction.
  3. Trim: The trim button stops any uncontrolled movements. Moving the trim button to the right stops the remote helicopter from spinning off in a clockwise direction. Moving trim button to the left corrects the R/C helicopter from spinning counter-clockwise.

Practicing Lutema Avatar Hovercraft  altitude control and stabilization

Practice keeping the Lutema Avatar Hovercraft at a constant and stable altitude.

  • Switch the helicopter to ON. The lights will start flashing.
  • Place the helicopter on a flat surface with nothing in its way.
  • Take a few steps back before turning on the remote control.
  • Slowly push the throttle up until the helicopter lifts off.
  • Use the right trim button to stop uncontrolled clockwise spinning. Use the left trim button to stop uncontrolled counter-clockwise spinning.
  • Land the helicopter by slowing releasing the throttle stick. The helicopter will slowly descend.
  • Repeat the procedure until you can get the remote Lutema R/C helicopter to fly smoothly.

Steering the Lutema Avatar Hovercraft

Once you’re comfortable with getting the Lutema Avatar Hovercraft off the ground, try doing some maneuvers:

  • Push the throttle stick up and stabilize the remote helicopter.
  • Press the direction stick to the right to move the R/C helicopter forward. Not too far to the right because the remote helicopter will just spin rather than moving forward.
  • Move the direction stick to the left and practice moving the remote helicopter counter clockwise.
  • Move the direction stick to the right s0 the remote helicopter starts flying in clockwise circles.

Keep practicing these moves until they come automatically to you. You’ll soon be flying the Lutema Avatar Hovercraft like a pro in no time at all. Click on the photo or link below for a video on more flying tips.

Avatar_remote_control_instructions


Click on the photo for an instructional video on how to use the Avatar remote control


Tagged with: , ,

Optoma_EP7199_projectorDon’t panic when it comes time to replace the Optoma EP7199 projector lamp. Just follow our guide.

Step 1: Know when to replace the projector lamp

You’ll start to see the following warning signs when the Optoma BL-FU180A projector lamp is approaching end of life:

  • A screen that is gradually dimming or deteriorating.
  • Colour in the image appears dark or off colour.
  • Lamp light flashing a steady orange.
  • The following warning sign will appear on screen:

Optoma_EP716_BL-FU180A_projector _lamp_warning

Step 2: OEM all the way!

Look for the seal of approval to be sure you’re getting an authentic OEM Optoma BL-FU180A projector  lamp. If the price seems too good to be true then chances are it’s a generic lamp made by a non-OEM manufacturer.

Why avoid generic lamps?

Generic lamps have six main problems:

Buy this lamp on Amazon sold by these authorized dealers:

Step Three: Replace the Optoma BL-FU180A projector lamp

Follow these important safety steps before installing a new Optoma BL-FU180A projector  lamp:

  • The used Optoma BL-FU180A projector  lamp contains mercury and should be properly recycled. Don’t throw it into regular garbage.
  • Switch off the power to the Optoma EP7199 projector by pressing the Power/Standby button.
  • Disconnect the power cord.
  • Allow the projector to cool down for at least 30 minutes. If should be cool to the touch. These projectors run using high temperatures and you can burn yourself badly if you don’t allow the projector to cool down.

Optoma_EP7199_BL-FU180A_remove_projector _lamp_cover

Place something soft underneath the Optoma EP7199 before turning the projector onto it’s back. Remove the two screws holding the projector  lamp cover in place.

Optoma_EP719_BL-FU180A_remove_projector_lamp_coverPush the cover up to remove it.


Optoma_EP7199_BL-FU180A_remove_projector_lamp_screws

Use a screwdriver to remove the two screws holding the Optoma BL-FU180A (SP.82G01.001) projector lamp module in place.

Lift up the wire handle and slowly put out the old lamp. Be careful not to bang the lamp against the projector as this may case the bulb to break. Learn what to do if the lamp has exploded inside the projector.

NOTE: This projector lamp must be properly recycled; it contains mercury so can’t be placed into regular garbage.

Optoma_EP7199_BL-FU180A_new_projector_lampPlace the new Optoma BL-FU180A (SP.82G01.001) projector lamp into the Optoma EP7199 projector. Tighten the two screws on the projector lamp. Replace the lamp cover and tighten its two screws.

Optoma_EP7199_BL-FU180A_projector_lamp
You must now reset the Lamp Replacement Timer.

Step 4: Reset the projector lamp timing

The Optoma EP7199 projector has an automatic projector lamp reset timer that tracks the life of the lamp and triggers the lamp replacement warning. You need to reset the projector lamp timer each time the lamp is replaced.Optoma_EP7199_BL-FU180A_projector_lamp_reset


  • Press the Menu option on either the remote or on the projector.
  • Scroll over the Lamp Setting. Press enter.
  • Select Reset Lamp Hours. Press Enter
  • The Execute/Cancel command line will appear.
  • Scroll over to choose Execute. Press Enter. The lamp hours is reset to zero.

Tips for a longer projector lamp life:

Get the Optoma BL-FU180A (SP.82G01.001) projector lamp to last longer following these tips:

  • Turning on the Eco Mode to lower power consumption and extend the lamp life by 130%.
  • Keep your air filters clean to avoid overheating the projector.
  • Turn off the Optoma EP7199 projector and let it stand for at least one hour ever 24 hours.
  • Make sure there is enough airflow around the projector particularly if it’s been permanently mounted.
  • Top tips for extending DLP projector lamp life
Tagged with: , ,

boxlight-xd10m_projector_replacement_projector_lampFollow this guide for help in replacing your Boxlight XD-10m projector lamp.

No warning messages

This projector doesn’t have any warning messages or indicator lights to let you know when the Boxlight XD-10m projector lamp is reaching end of life. Watch for faded images on screen or the a dimmed lighting coming from the projector.

Be sure to check the projector lamp life using the STATUS menu found on the MAIN MENU. You can expect up to 2000 hours of use before having to replace the projector lamp if you do regular maintenance on your Boxlight XD-10m projector. NOTE: Don’t use the lamp in the projector past it’s due date or it may overheat, stop working or explode causing the projector to shut down.

Buy authentic replacement lamps

Your Boxlight XD-10m projector uses the Boxlight XD10M-930 Projector Lamp and it’s crucial to buy authentic lamps rather than the cheaper knock off lamps being sold on popular e-commerce sites.

Although generic lamps seem like a bargain, these knock off lamps actually end up costing you money.  You get what you pay for and in the case of generic lamps it’s some serious problems:

Save yourself unnecessary headaches and buy an authentic Boxlight XD10M-930 from a recognized dealer. You’ll be getting a far superior product with a replacement guarantee and tech support.

Find this lamp sold on Amazon by these authorized dealers:

Replacing the Boxlight XD10M-930 projector lamp

Before replacing the lamp follow these safety tips:

  • Reduce the risk of electrical shock by disconnecting the power cord on the Boxlight XD-10m projector.
  • Reduce the risk of severe burns by allowing the Boxlight XD-10m projector to cool for at least 45 minutes.

Follow these steps to replace the projector lamp:

boxlight-xd10m_projector_remove_-cover_XD10m_projector_lamp


Step 1: Place a small flat screwdriver into the slot in the lamp access grill at the front of the projector. Slide the screwdriver towards the back to disengage the grill and then slide it away from the lens and off the projector.

boxlight-xd10m_projector_remove_-yellow_tab_XD10m_projector_lamp

Step 2: Pull the yellow tab on the projector lamp module.


boxlight-xd10m_projector_loosen_screw_XD10m_projector__lamp


Step 3: Loosen the captive screw on the projector lamp module.


boxlight-xd10m_projector_remove_-tab_XD10m_projector_lamp

Step 4: Grasp the pull tab to pull the projector lamp module out. Be sure to recycle this lamp properly. The Boxlight XD10M-930 projector lamp contains mercury and should not be thrown into regular garbage. Recycle it!


Step 5: Get the new projector lamp ready. Gently place it into the projector. Avoid touching the actual bulb as oil from your fingers will remain on the bulb and start to burn when the lamp heats up leaving black holes on the lamp. Pushing too hard can cause the Boxlight XD10M-930 projector lamp to shatter. Learn what to do should the bulb shatter.

Step 6: Tighten the screw on the outside of the projector lamp module.

Step 7: Press the yellow tab to reconnect the projector lamp module.

Step 8: Line up the ribs on the lamp grill with the marks on the bottom case. Slide the lamp grill cover in the directions on the bottom case.

Step 9:  Reset the lamp hour counter. (See below)

Resetting the Boxlight XD-10m projector lamp counter

  • Plug in the power cord and press the Power switch to turn the projector back on. boxlight-xd10m_projector_reset_lamp_hours_XD10m_projector_lamp
  • Go to MAIN MENU.
  • Scroll down to STATUS menu.
  • Press MENU/SELECT and RESET together for 10 seconds.
  • This will reset the projector lamp hours to zero.
  • Verify that the counter was reset by pressing MENU/SELECT and viewing the counter in the STATUS menu.

 Interested in a green alternative?

This projector has the option boxlight-xd10m_projector_Replace-bulb_XD10m_projector_lamp
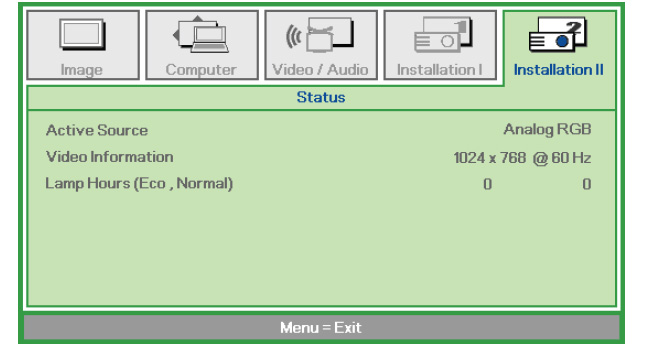
of only replacing the actual bulb and re-using the plastic cage. This reduces waste and is great way to green your projector. This Boxlight Lamp Replacement Guide video shows how simple the switch can be.

Learn how to extend the life of the Boxlight XD10M-930 projector lamp

Check out Top tips for extending DLP projector lamp life.


Tagged with: , ,
Join the discussion on Facebook! All your questions, answered! The Screen & Projector Group