We're now Screen and Projector! For updated content, visit ScreenAndProjector.com and follow @screenandproj on social media!

Sanyo PLC-EF31NL, Sanyo POA-LMP39  service part no 610 292 4848When it’s time to change your lamp on your Sanyo PLC-EF31/PLC-EF32 projector, you’ll notice the yellow light blinking on the lamp indicator.

Be sure to use the same type of Sanyo projector lamp bought from a verified source that has been manufactured to meet the specifications. Use model POA-LLB02 / POA-LMP39 (service part no 610 292 4848)  as your Sanyo projector lamp replacement.

Resist the temptation to buy a cheaper POA-LLBO2 or POA-LMP39 counterfeit model as this can damage the sensitive mechanisms in your Sanyo PLC-EF31/PLC-EF32 projector.

STEP-BY-STEP INSTRUCTIONS FOR SANYO PLCEF31/PLCEF32

Before installation

1. Check the number of POA-LLB02 / POA-LMP39 (service part no 610 292 4848)  lamps to be replaced on the Lamp Status Display.
2. Turn off the projector and unplug the AC cord.
3. Allow the Sanyo PLCEF31/PLCEF32 projector to cool for one hour – it should be cool to the touch. Inside of the projector can be very hot since these machines operator under high temperatures.

Replacing the POA-LLB02 / POA-LMP39 (610 292 4848)  Lamp Assembly

Caution: Don’t touch the screen or the actual bulb with your finger since the oil from your skin can cause a black spot on the bulb.

Sanyo PLC-EF31NL lamp cover, Sanyo POA-LMP39  service part no 610 292 48481. At the back of the Sanyo PLC-EF31/PLC-EF32 projectors you’ll find the Lamp Hazard cover. Using a Philips screwdriver loosen the three screws that hold the cover in place. Put the cover to one side.

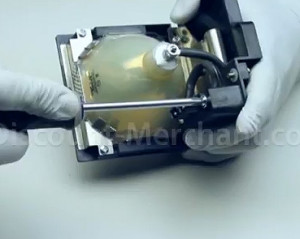
2. Remove the two screws on either side of the POA-LLB02 / POA-LMP39 (service part no 610-292 -4848)  lamp. Grab the handle on the lamp cage and gently pull out each lamp. Place those lamps to one side.

3. Take the newPOA-LLB02 / POA-LMP39 (service part no 610 292 4848)  lamp cage by the handle and gently maneuver it into place.
Sanyo PLC-EF31NL lamp assembly, Sanyo POA-LMP39 service part no 610 292 4848

4. Avoid touching the glass or the bulb. It should slide it easily – don’t force the lamp.
5. Tighten the screws on the Lamp Assembly.
6. Replace and tighten the three screws on either side of Lamp Hazard Cover.
7. Re-connect the power cord and turn on the Sanyo PLC-EF31/PLC-EF32 projector.


Reset the Sanyo PLC-EF31/PLC-EF32 Lamp Replacement Counter

Reset the Lamp Replacement Counter only when the POA-LLB02 / POA-LMP39 (service part no 610 292 4848)  has been replaced.

Do not operate the projectors while any of the lamps are removed as this may result in malfunctions, fire hazard and other accidents. Sanyo PLC-EF31NL lamp replacement option, Sanyo POA-LMP39 service part no 610 292 4848

  • Turn the Sanyo PLCEF31/PLCEF32 projector on.
  • Press the Menu option so the On-Screen Menu will appear.
  • Press Point left/right button(s) to move a red frame poster to Setting Menu icon.
  • Press Point Down button to move the red frame pointer to Lamp counter reset.
  • Press the Select button.
  • Move arrow to replace lamp number (Lamp 1 or Lamp 2) and then press Select button. The message “Lamp replace counter Reset?” will be displayed.
  • Move the pointer to YES and then press Select button.
  • Be sure to reset the correct lamp number otherwise Lamp Replace indicator continues lighting.Sanyo PLC-EF31 lamp replacement option, Sanyo POA-LMP39  service part no 610 292 4848
  • The Lamp box will disappear and the Lamp Replace Dialog box appears.
  • Select YES to reset Lamp Replace Counter.
  • Do not reset Lamp Replace Counter except after the Projection Lamp has been replaced.
  • NOTE: When you reset the Lamp Replace Counter the Lamp Replace indicator stops blinking.

Clean your filter regularly on the Sanyo PLC-EF31/PLC-EF32 projector and you’ll prolong the life of the newly installed POA-LLB02 / POA-LMP39 (service part no 610 292 4848).

You can also prolong the life of the lamp by turning off the Sanyo PLC-EF31/PLC-EF32 projector for one hour for at least 24 hours and waiting at least five minutes before turning the projector off.
Replace_Bulb_Keep_CageSave money, save resources

If you are looking an option that is more eco-friendly and can save you some money, consider replacing only the lamp and re-using the original lamp cage. Watch our step-by-step tutorial to learn more.

Tagged with: , , , , , , , , , ,

WSanyo PLC-EF30 projector, Sanyo POA-LMP39 service part no 610 292 4848hen it’s time to change your lamp on your Sanyo PLC-EF30 projector, you’ll notice the yellow light blinking on the lamp indicator.

Be sure to use the same type of Sanyo projector lamp bought from a verified source that has been manufactured to meet the specifications. Use model POA-LLB02 / POA-LMP39 (service part no 610 292 4848)  as your Sanyo projector lamp replacement. Resist the temptation to buy a cheaper POA-LLBO2 or POA-LMP38 counterfeit model as this can damage the sensitive mechanisms in your Sanyo PLCEF30 projector.

STEP-BY-STEP INSTRUCTIONS FOR SANYO PLC-EF30 Lamp Replacement

Before installation

1. Check the number of Sanyo POA-LLB02 / POA-LMP39 (service part no 610 292 4848) lamps needing to replaced on the Lamp Status Display. You may need to replace both lamps.
2. Turn off the projector and unplug the AC cord.
3. Allow the Sanyo PLC-EF30 projector to cool for one hour – it should be cool to the touch. Inside of the projector can be very hot since these machines operator under high temperatures.

Replacing the POA-LMP39 (610-292-4848) Lamp Assembly

Caution: Don’t touch the screen or the actual bulb with your finger since the oil from your skin can cause a black spot on the bulb.

Sanyo PLC-EF30 lamp cover, Sanyo POA-LMP39 service part no 610 292 4848
1. At the back of the Sanyo PLC-EF30 projector you’ll find the Lamp Hazard cover. Using a Philips screwdriver loosen the three screws that hold the cover in place. Put the cover to one side.
2. Remove the two screws on either side of each the Sanyo POA-LLB02 / POA-LMP39 (service part no 610 292 4848) lamp. Grab the handle on the lamp cage and gently pull out each lamp. Place those lamps to one side.
3. Take the new Sanyo POALLB02 / POA-LMP30 (6102924848) lamp cage by the handle and gently maneuver it into place. Sanyo PLC-EF30 lamp assembly, Sanyo POA-LMP39 service part no 610 292 4848
4. Avoid touching the glass or the bulb. It should slide it easily – don’t force the lamp.
5. Tighten the screws on the Sanyo POA-LLB02 / POA-LMP39 (service part no 610 292 4848) Lamp Assembly
6. Replace and tighten the three screws on either side of Lamp Hazard Cover.
7. Re-connect the power cord and turn on the Sanyo PLC-EF30 projector.

Reset the Sanyo PLC-EF30 Lamp Replacement Counter

Reset the Lamp Replacement Counter only when the Sanyo POA-LLB02 / POA-LMP39 (service part no 610 292 4848) lamp has been replaced.

Do not operate the projectors while any of the lamps are removed as this may result in malfunctions, fire hazard and other accidents.Sanyo PLC-EF30 lamp counter reset, Sanyo POA-LMP39 service part no 610 292 4848

  • Turn the Sanyo PLC-EF30 projector on.
  • Press the Menu option so the On-Screen Menu will appear.
  • Press Point left/right button(s) to move a red frame poster to Setting Menu icon.
  • Press Point Down button to move the red frame pointer to Lamp counter reset and then press the Select button.
  • Move arrow to replace lamp number (Lamp 1 or Lamp 2) and then press Select button. The message “Lamp replace counter Reset?” will be displayed.
  • Move the pointer to YES and then press Select button. Be sure to reset the correct lamp number otherwise Lamp Replace indicator continues lighting.Sanyo PLC-EF30 lamp counter reset, Sanyo POA-LMP39 service part no 610 292 4848
  • The Lamp box will disappear and the Lamp Replace Dialog box appears.
  • Select YES to reset Lamp Replace Counter.
  • Do not reset Lamp Replace Counter except after the Projection Lamp has been replaced. NOTE: When  the Lamp Replace Counter is reset, the Lamp Replace indicator stops lighting.

Prolong the life of your newly installed Sanyo POA-LLB02 / POA-LMP39 (service part no 610 292 4848) by waiting at least five minutes before turning the Sanyo PLC-SU32 projector off and turning the projector off for at least one hour turned off every 24 hours. Cleaning the air filter regularly will also prolong the life of the Sanyo POA-LLB02 / POA-LMP39 (service part no 610 292 4848).

Replace_Bulb_Keep_CageSave money, save resources

If you are looking an option that is more eco-friendly and can save you some money, consider replacing only the lamp and re-using the original lamp cage. Watch our step-by-step tutorial to learn more.


Tagged with: , , , , ,

counterfeit_projector_lamps_how_to_avoidSpot the seven signs of counterfeit projector lamps

With the popularity of the DLP Projectors and Rear Projector TVs, there’s been an explosion of websites counterfeit projector lamps.

“We have seen a dramatic rise with counterfeit lamps. Unfortunately they are extremely hard to spot,” said Dave Bethell of Genuine Lamps.com

How do you protect yourself from being sold a black market product that may harm your projector? Here are seven telltale signs for spotting counterfeits.

1. Price

The cheapest price for a genuine lamp is at 20% off the manufacturer’s price. This is an industry standard agreed upon by companies creating genuine lamps hybrids and the OEM (Original Equipment Manufacturer). If you come across a projector lamp or RPTV that seems like an incredible bargain—run because it’s a forgery and will cause problems later on.

2. Dodgy Part numbers

It’s easy for the counterfeit companies to simply use the part number as the manufacturer, many don’t bother to even make sure they have the correct number. Look at the manufacturer’s website for the part number and compare it against the one being used by the company offering the incredible bargain. If the two don’t match, don’t buy.

3.  Double speak

Statements such as “100% Brand New OEM Equivalent” and “OEM Compatible Lamps” and “guaranteed to be 100% compatible with the factory original” should make you suspicious. These statements are euphemisms for counterfeit lamps created by the bootleg companies in order to trick you into buying and prevent them from being sued. The company is not pretending to be selling anything but fakes they’ve just worded it differently.

4. Difficult to contact

If you’re buying from a place with no direct customer service line, no direct email and no salesperson to contact, then that may also be a sign that the company is selling counterfeit. You should be able to easily contact the company and there should be a clearly outlined return policy.

5. Mislabeling

Black market products often have labeling that looks unprofessional or there is clearly a knockoff label. If you the manufacturers label looks suspicious, check underneath for an original label. Often companies will put a knock-off label over top of their own.

6. No original codes

Check for the original code. Original lamps are stamped with a code identifying each company. See the chart below for more information. If the lamp is missing this code then it’s not adhering to the ANSI standards for bulbs and should be avoided.  Codes such a PL or GL are codes used by copy-lamp manufacturers.

Lamp NameCode
PhillipsUHP
OsramP-VIP
PhoenixSHP
UshioUMPRD
MitsubishiVLT
Hewlett PackardL1
IBM31
EPSONELP


7. Naked bulbs, no cage

Counterfeit lamps are often sold with no cage just the light bulb. Phillips has authorized MI Technologies to sell their replacement bulbs since this company also manufactures its own cages.  It’s this is a rare exception to the rule, however. Most companies selling only light bulbs are selling counterfeits. There are others selling OEM lamps.

Wondering why you should avoid cheap blackmarket counterfeits? Read more:

.

Save

Save

Save

Tagged with: , , ,

Sanyo POA LMP 111

Educate yourself against counterfeits

How do you spot the counterfeits from the genuine products? It’s time to change your projector or rear projector TV lamp. You decide to buy online and your stress level skyrockets when you see the number of suppliers online. Learning about lamp modules is your first step towards protecting yourself against getting ripped off.

Know your parts

Your projector/RPTV lamp has two parts: the bulb and the cage (or housing). It’s important to have both elements be genuine. Projector bulbs are high-performance and were developed to work closely with your projector. The cage contains the sensitive electrical elements but also keeps your lamp stable and makes it line up properly inside your projector.

Each manufacturer has its own cage design, which is why it’s crucial to have the correct model. Counterfeit lamps have not been manufactured with these specifics in mind and can damage your projector or RPTV.

Tried and true

OEM (Original Equipment Manufacturer) are lamp modules created directly by the manufacturer for their specific projector. While they are the most expensive they are also the safest bet since they come fully guaranteed with genuine parts and have been inspected for quality. Sometimes it’s worth the price for less hassle.

Genuine lamps are hybrids lamps manufactured by companies holding the technology patent from the original company. These manufacturers are endorsed by the OEMs and sell genuine lamp companies built with cages from a different source. These alternate cages still meet the specifications set by the original manufacturer and are created in a quality-controlled environment using ISO9001 standards. Genuine lamps are typically 20% lower in price compared to the OEM lamps.

3M-78-6969-8919-9 Module

Beware the naked bulb

While some manufacturers do sell the bulb only without the cage, it’s not a recommended purchase for the average layperson. It can be a complicated process that should be done by a skilled repair person or at least by someone with a technical background. If you do try and change your light bulb, use rubber gloves. You don’t want any oil from your skin on the bulb. These bulbs burn at such a high temperature that the area with the oil will be hotter than other surface parts and may prematurely burn out. The most important reason to avoid this kind of replacement is that many counterfeit lamps are sold as bulb only.

Phillips has authorized MI Technologies to sell their replacement bulbs since this company also manufactures its own cages.  It’s this is a rare exception to the rule, however.

A fake is a fake is a fake

Compatible or copy lamps are both euphemisms for counterfeit lamps.  These “non-genuine” lamps don’t use OEM bulbs or cages and manufacture their product with less durable components. This can create havoc in your projector by damaging the sensitive operating components, causing an electrical short circuit, overheating the projector and sometimes exploding inside. You may also find your warranty has become void after installing these third-party parts. If the price of your replacement lamp is less than 20% of the original manufacturer’s price – walk away.

Be careful with recycling

Re-Lamped or refurbished lamps re-use the old cage and simply put in a new bulb. While its gaining in popularity as an enviromentaly-friendly solution, you should proceed with caution. Many  lamp modules have been designed not to be taken apart and refurbished so you should check with your manufacturer. When replacing the lamp be sure not to bend or twist the cage or it may not fit back into the projector properly.

You’ll need very specific conditions to recycle your cage. Your existing cage needs to be fairly pristine so if its warped or cracked replace it.  If there is a lot of dust, replace it. (Dust particles can heat up and clog the cooling process making the projector overheat.) A broken lamp also means you should buy a new cage. The bulbs do leave behind small traces of mercury and should be cleaned properly. Be sure to check inside connectors and if any are twisted, old and worn, they too will have to be changed. If your warranty is still valid, it may be smarter to buy new. It you’re not mechanically inclined, buy new as well.


Save

Save

Tagged with: , , , , , , , , ,

lamps_insideOriginal replacement projector lamps are the way to go.

Counterfeit DLP Lamps will cost more in the long run. Original replacement projector lamps will protect your investment. Buy from a certified manufacturer or reseller. It may be tempting to buy a counterfeit replacement off the Internet but they may end up costing you more in the long run.

Most of these non-OEM  brands are priced lower because they’ve been manufactured with inferior or even counterfeit parts. The initial savings upfront may not be worth it if your projector ends up being damaged.

The subtle technology of DLP lamps

On the surface counterfeit brands may appear to be the same but their technology is actually quite different from the OEM lamps manufactured by Philips Lighting. DLP Projectors use high pressure to generate light and this pressure needs to be controlled inside the lamp.  Authentic projector lamps have been calibrated to the exact wattage in order to control the pressure. Too high a pressure may result in the lamp exploding and damaging the inside of your projector. A countefeit lamp will also give off too little pressure resulting in a low light output and a poor picture quality.

Projector lamps also need a high voltage in order to work and so been have designed to meet each projectors specific requirements and dimensions. They are able to hold up to the demands needed to operate within the DLP environment. Non-original lamps have not been designed to handle the subtleties in wattage and pressure. When you purchase the right projector lamp, you are guaranteed it’s going to work and not damage your projector.

Not all brands are alike

As the Original Equipment Manufacturer (OEM), Philips handles 60% of the market for overhead projectors. Their high-quality bulbs have an average life span of close to 2,000 hours and have been manufactured to be compatible with other components of your projector including the ballast and power supply. Once installed, Philips lamps are going to get your projector working at optimum levels.

The unknown can be costly

Counterfeit brands sold through the Internet can’t offer this kind of guarantee, particularly those manufactured from the overseas Asian market  where the standards are lower and regulations not as strict. Installing a cheaper brand may actually damage other sensitive components connected to your projectors operating system. You may also find your warranty has become void after installing these third-party parts.

For peace of mind

When you purchase from an authorized Reseller and Dealer, you know you’re receiving a Philips bulb that is reliable, durable and safe. Why sacrifice peace of mind or run the risk of having your projector break down before a major presentation for the sake of a cheaper counterfeit brand? Simplify your life and buy OEM or genuine DLP projector lamps.

Tagged with: , , ,

If you haven’t heard, Toshiba is being forced to give out refunds through a class-action settlement that claims Toshiba knowingly misrepresented the life of their proprietary, direct current, DLP lamps, which we all know to be extremely short compared with their Philips Lighting counterparts, whom use alternating current in their UHP brand lamps.

Wired staff writer Jose Fermoso writes:

“The class-action lawsuit, Ersler v. Toshiba of America Inc., had a claim that Toshiba ‘knowingly misrepresented the life span of the bulbs in the lamps contained in the lamp assembly component of its 2004 and 2005 DLP television models.’ If true, this would mean the sale of the TVs had brought about a ‘breach of express and implied warranties,’ and a violation of the State’s consumer Fraud Act.”

If you own one of the TVs and know have the right to the claim, you can go to the site created for the settlement at www.dlplampsettlement.com, or you can call the toll-free 1-800-894-1766.

Customers with DLP televisions using generic lamps have all complained that the cost of lamps has been high and the life of the bulbs is all too short. Buying the right brand DLP TV or other rear projection television lamp will be the most cost efficient, which is why we’ve always recommended Philips brand lamps – the inventor of UHP lighting technology.

Via Wired Magazine

Tagged with: , , , , ,

Please read carefully!

FixYourDLP.com has identified a potential hazard that may severely damage your Samsung TV with lamp code BP96-01653A!

Samsung DLP lamp units, model BP96-01653A may fail due to improper insertion. We discovered this while doing some tests on these enclosures. If you don’t install the BP96-01653A firmly into the TV, the housing connector may cause damage to both the ballast and the lamp—or even worse a fire.

You’ll know immediately if there’s something wrong because as soon as you turn your television on, and there’s white smoke emanating from the back of your television.

You should shut your television off immediately and open your lamp door and pull out that lamp. Inspect it and hopefully, you’ve just burned the connectors to the ballast, and not the ballast itself. Our testing has only caused the connectors to burn or melt, but don’t take any chances—we’ve never seen a fire, but we also don’t rule out the possibility of fires either.

Here is a correct installation method and the reasons why a bad installation will cause the connectors to burn:

IMPORTANT SAFETY WARNING

Regarding the installation of a BP96-01653A lamp  unit into a Samsung DLP Television.

Installation

Step 1

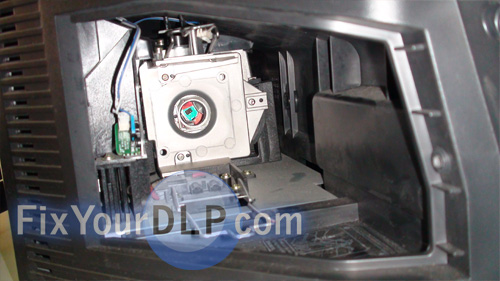
Figure A – Open panel, lamp unit removed

You must install the lamp unit to fit snug with the ballast connector.

To do this, align the lamp unit with the female ballast connector facing down, on the bottom side of the enclosure, then slide the lamp unit until it snaps into place. Check to make sure the unit is firmly inside the television.

Step 2

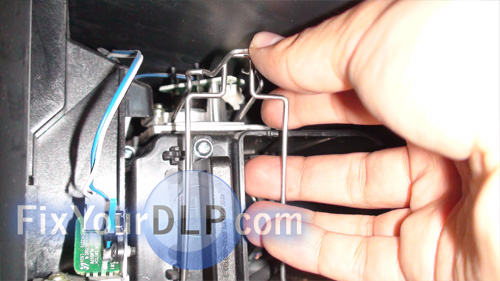
Figure B – Snapping the lamp into place

Snap the wire brackets in tightly by lifting the bottom set up to meet with the top bracket. The wire bracket keeps the lamp and lamp enclosure seated properly to reduce the risk of fire.

when installed properly, the unit should sit secure and slightly elevated from the floor of the compartment.

Step 3

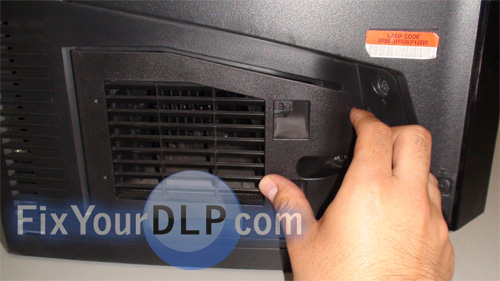
Figure C – Close back panel securely

Once the lamp is firmly secure, close the back panel to engage the blue lamp door sensor switch. Leaving the door open will prevent the television from starting up.


Important Damage or Fire Warning

Because of the nature of the ballast or lamp driver, there is a risk of damage or fire to your television set.

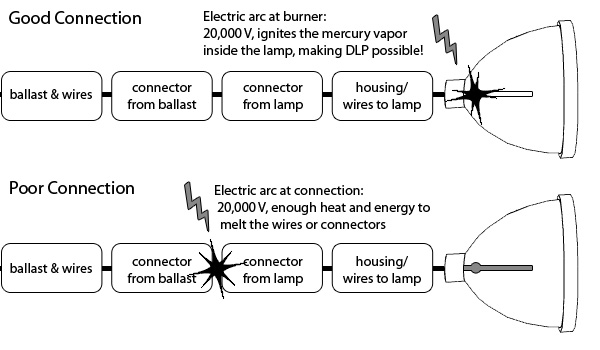
The ballast ignites the lamp with up to 20kV of electricity to arc the gas tube inside. If the ballast does not have a firm connection with the lamp unit, the arc will occur between the ballast connectors (from the ballast to the lamp), which may cause a fire, or melt your plastic connectors. Indications of this are a rapid clicking sound, a burning smell, and/or a non-functioning lamp. If you improperly install the lamp into your television causing a ballast or lamp failure, this may void your warranty for the television or the lamp product.

Tagged with: , , , , , ,

Sony replacement lamp for your Grand WEGA and XBR TVs –
Part Number: XL-2100, otherwise known as the Sony A-1606-034-B.

For the absolute best prices, click to buy this original lamp module complete or as a bare lamp

The Sony XL-2100U lamp is known as a few different part numbers:
XL2100U, XL-2100, XL2100
XL-2100E, XL2100E
XL-2100J, XL2100J
XL-2100C, XL2100C
XL2100U
A1606034B, A-1606-034B, A-1606-034-B, A1606-034B

Yeah, there are all the same part! This was Sony’s way of distinguishing which markets their products where released. For example, the “U” represents United States, while “E” stands for europe, “J” signifies Japan, and “C” is for China

The Sony A-1606-034B is the technical part number. Sony refers to most of its TV parts and accessories with the “A-” designation.

This lamp fits in various Grand WEGA and Bravia Projection LCD (or LCOS) rear projection tvs (RPTVs) from 42″ all the way to 70″ TV sets. Models in particular compatible with this lamp are:

KDF42WE655 (5.8MB PDF manual: check page 16-22 for the lamp replacement instructions)
KF42WE610 (7.7MB PDF manual: check page 11-16 for the lamp replacement instructions)
KF-42WE620 (11.4MB PDF manual: check page 15-19 for the lamp replacement instructions)

KDF50WE655 (5.8MB PDF manual: check page 16-22 for the lamp replacement instructions)
KF50WE610 (7.7MB PDF manual: check page 11-16 for the lamp replacement instructions)
KF-50WE620 (11.4MB PDF manual: check page 15-19 for the lamp replacement instructions)

KDF-60XBR95 (5.4MB PDF manual: check page 13-16 for the lamp replacement instructions)
KDF60XBR950 (5.4MB PDF manual: check page 13-16 for the lamp replacement instructions)
KF60WE610 (7.7MB PDF manual: check page 11-16 for the lamp replacement instructions)

KDF70XBR950 (5.4MB PDF manual: check page 13-16 for the lamp replacement instructions)
KDF-70XBR95 (5.4MB PDF manual: check page 13-16 for the lamp replacement instructions)
XBR950 (5.4MB PDF manual: check page 13-16 for the lamp replacement instructions)

There’s just so much misinformation out there about these TVs. Some TV models have dashes in them, some don’t…to be quite honest, I’m not sure if they should or shouldn’t have dashes. Please chime in with your TV model number as it is exactly written!

BTW, here is a youtube video we made of the disassembly and reassembly of the lamp module:

A step-by-step guide on this can also be found HERE

Remember if you’re not comfortable with the installation, we do recommend saving yourself the headache for disassembly and go with the complete module kit.

Note finding a trustworthy supplier of original lamps is crucial to protecting your Sony set from damage caused by after-market and sub par products. Your Sony lamp module was engineered exclusively with the help of Philips Lighting, the innovator of UHP Technology. Do not substitute any other brand in place of the original. We suggest reading the following articles:

Cloned Philips lamps article

How to extend the life of your lamp

Beware of Third-Party & Generic DLP TV Lamps, Counterfeit, Copy Lamps

Related Content:
Does your Sony TV have a weird color problem? A lot of REDS, or GREENs, or BLUEs? You are not alone!
Need to troubleshoot your TV? Try the FixYourDLP.com Troubleshooter Wizard

Tagged with: , , ,

The Livingstation Projection Display Systems came in two flavors. The 57″ LS57P1 & LS57P2 and the 47″ LS47P1 & LS47P2. Technically speaking, these were identical sets with the exception of the screen size and weight. Epson, one of the pioneers in projection technology entered the consumer projection TV market with these two TV sets. Although they did not catch on with the masses as anticipated, the picture quality is among the best 720P TVs and projectors on the market, even today, three years after the product launch.

Some key features:

  • 100W / 120W 1.0 Philips UHP Lamp (Part Number: V13H010R02 or ELSLP1)
  • 720P, native 19:9 aspect ratio
  • Proven Epson 3LCD Digital Technology w/ DNX w/ upconversion
  • Photo on Demand (View, print, and store digital images)
  • ATSC Tuner

Epson LS57P1-2_LS47P1-2-Brochure
Epson LS57P1-2_LS47P1-2-Quick-Setup-Guide
Epson LS57P1-2_LS47P1-2-User-Manual 136 pages

The Epson Livingstation idea was ahead of it’s time. Epson was thinking of the TV as the center of a home’s media center with memory card readers, a great GUI for viewing images, and even a builtin high resolution photo color printer! Today, in 2010, we see TVs coming on the marketplace with built-in wifi, hard drives, web browsers and applications such as Youtube, Twitter, Facebook, Myspace, NY Times, etc.

One of the great things about 3LCD Technology is it’s virtually zero maintenance requirements. You get a commercial caliber product that only needs it’s lamp replaced every 4,000 to 6,000 hours. If you’ve paid close attention to the technical details on this product, you might ask yourself why Epson claims 10,000+ hours. In hindsight, that number has been revised 🙂

Tagged with: , ,

This article is sponsored by Discount-Merchant.com, the leader in LCOS replacement lamps for your Sony TV. Buy your replacement lamps at rock bottom prices knowing you’re getting genuine parts!

Complete Module
Bare Lamp

Sony has created a bit of confusion with their LCOS TVs and the replacement aftermarket lamps. Not only is there confusion about the actual TV model numbers, but there is a lot of confusion about the lamp part numbers.

To illustrate this point, we will use the replacement lamp part number F-9308-750-0. Wait a minute, Sony also refers to this part as the: Sony XL-2400 lamp. But they went one step further to confuse people with a third part number, the Sony A-1129-776-A. If anyone knows why they’ve done this, please share with us!

So they’ve got three different part numbers:
F-9308-750-0
A-1129-776-A
XL-2400

what TVs are they compatible with?

This is a problem too as some venders show the TV models with dash (“-“) separators and others don’t.

With dashes
KDF-42E2000, KDF-46E2000, KDF-50E2000, KDF-50E2010, KDF-50EA11, KDF-55E2000, KDF-E42A10, KDF-E42A11, KDF-E50A10, KDF-E50A10PRMO, KDF-E50A11, KDF-E50A12U, KF-42E200, KF-50E200, KF-55E200, KFE-42A10, and KFE-50A10

without dashes:
KDF42E2000, KDF46E2000, KDF50E2000, KDF50E2010, KDF50EA11, KDF55E2000, KDFE42A10, KDFE42A11, KDFE50A10, KDFE50A10PRMO, KDFE50A11, KDFE50A12U, KF42E200, KF50E200, KF55E200, KFE42A10, and KFE50A10

I’m sure there are other models numbers, but that’s beside the point.

Apart from the three distinct part numbers, there are variations within them depending on sales region.

I.E.,
XL2400, XL-2400U, XL-2400E, XL-2400J, XL-2400C, XL2400U, XL2400E, XL2400J, XL2400C, A1129776A, A-1129-776A, A-1129-776-A, A1129-776A

XL-2400U, with the U standing for United States

XL-2400E, as in the European markets

This is another strange point. With the Internet being what it is today, you would think a clear answer would have materialized by now…but no….

Reply to this with your feedback with your TV model number and your TV Lamp part number please! We will keep a organized list above to get everyone on the same page!

Tagged with: , , , , ,
Join the discussion on Facebook! All your questions, answered! The Screen & Projector Group